Update-Module VMware.PowerCLI – Unable to find repository


On one of my development machines (old school Windows 2012 R2 with PowerShell 5.1) I tried to upgrade the VMware.PowerCLI module to the latest version. But this time it was not just type the “update-module VMware.PowerCLI” command and you’re ready. Instead I received the following error:

Unable to find repository ‘https://www.powershellgallery.com/api/v2′. Use Get-PSRepository to see all available repositories.

image

I remembered this post from Przemyslaw Klys describing the same issue. Recently PowerShellGallery disabled support for TLS 1.0 and is now requiring TLS 1.2 So you have to enable TLS 1.2 support on your “old” servers.

The quick fix, if you want to enable TLS 1.2 for the current PowerShell session is to run the following command:

[Net.ServicePointManager]::SecurityProtocol = [Net.ServicePointManager]::SecurityProtocol -bor [Net.SecurityProtocolType]::Tls12

After enabling TLS 1.2 it’s time to upgrade to the latest version of the VMware.PowerCLI module.

Or you can just enable TLS 1.2 on your system by checking this guide from Microsoft.

– Happy scripting –

Powershell: Veeam B&R – Get total days before the license expires


So it’s time for a new post with some “traditional” Powershell so no snappins from VMware or Veeam. But first some background info. I am working for a Veeam ProPartner  with a Service Provider partner program. in this program Veeam only supplies “temporary licenses” so you have to deal with an expiration date of the license. This also applies to the Veeam NFR licenses for vExperts, VCP, MVP, etc. But how do you get notified when the license is about to expire? Well I don’t know if there is an option for that, maybe in the Enterprise Portal but as far as I know will it only display an error when the license key is expired.

I decided to dive under the hood and tried to find the places where Veeam B&R holds the license information. I couldn’t find the license info with the Veeam Powershell Toolkit. So the next step was to find the info inside the Veeam Backup Database but I couldn’t find it either inside the database. The last step was the right one. The license information is kept inside the Windows registry in the following key:

HKLM\SOFTWARE\VeeaM\Veeam Backup and Replication\license

But the info is saved in a REG_BINARY so it’s harder to extract. But lucky me Tim Dunn wrote a simple one-liner to extract this data. So I added this to my script:

$regBinary = (Get-Item 'HKLM:\SOFTWARE\VeeaM\Veeam Backup and Replication\license').GetValue('Lic1')
$veeamLicInfo = [string]::Join($null, ($regBinary | % { [char][int]$_; }))

The $regBinary variable gets the data from the registry key. The $veeamLicInfo variable converts the $regBinary into human readable lines of text. So now we extracted the license info, we only need write a RegEx to extract the info we need to create a notification e-mail. So take a look at the $pattern variable which will search for:
“EXPIRATION DATE=MM/DD/YYYY”

The $expirationDate variable will execute the RegEx and it saves the first match via [0]. After that the match will be splitted and the the value after the “=” character will be used as the expiration date.

So now we have the expiration date but how do we calculate the remaining days. Well that’s exactly what the code, that fills the $totalDaysLeft variable does.

So here you will find the complete script:

Warning: this script is only tested on Veeam Backup & Replication version 5. So I don’t know if the script will work on version 6 too.

Update: If you want to use the following script with Veeam Backup & Replication v6. You only have to change the $pattern variable to: $pattern = expiration date\=\d{1,2}\/\d{1,2}\/\d{1,4}

Update 2: It’s possible to read the version from the executable. So I created an updated version of the script that works with Veeam v5 and Veeam v6.x.

#http://blogs.msdn.com/b/timid/archive/2011/06/17/stupid-tricks-with-reg-binary-registry-data.aspx <- $regBinary trick
#http://stackoverflow.com/questions/622902/powershell-tips-tricks-for-developers <- regex

$returnStateOK = 0
$returnStateWarning = 1
$returnStateCritical = 2
$returnStateUnknown = 3

$veeamExe = Get-Item 'C:\Program Files\Veeam\Backup and Replication\Veeam.Backup.Manager.exe'
$regBinary = (Get-Item 'HKLM:\SOFTWARE\VeeaM\Veeam Backup and Replication\license').GetValue('Lic1')
$veeamLicInfo = [string]::Join($null, ($regBinary | % { [char][int]$_; }))

if($veeamExe.VersionInfo.ProductVersion -match "6"){
    $pattern = "Expiration date\=\d{1,2}\/\d{1,2}\/\d{1,4}"
}
else{
    $pattern = "EXPIRATION DATE\=\d{1,2}\/\d{1,2}\/\d{1,4}"
}

$expirationDate = [regex]::matches($VeeamLicInfo, $pattern)[0].Value.Split("=")[1]
$totalDaysLeft = ((Get-Date $expirationDate) - (get-date)).Totaldays.toString().split(",")[0]
$totalDaysLeft = [int]$totalDaysLeft

if($totalDaysLeft -gt "14"){
    Write-Host "The Veeam License will expire in $($totalDaysLeft) days"
    exit $returnStateOK 
}
elseif($totalDaysLeft -ge "7"){
    Write-Host "The Veeam License will expire in $($totalDaysLeft) days"
    exit $returnStateWarning 
}
elseif($totalDaysLeft -lt "7"){
    Write-Host "The Veeam License will expire in $($totalDaysLeft) days" 
    exit $returnStateCritical 
}
else{
    Write-Host "Something went wrong...."
    exit $returnStateUnknown 
}

You can change the parameters of the Send-MailMessage and schedule a task op your Veeam server to report the total times left before the license will expire.

How to return HP Serial Number via iLO and Powershell


Robert van den Nieuwendijk created the basis of this script and shared it on the VMware Communities. The problem I had with the original script was the default SSL certificate which HP uses on the iLO adapters. This resulted in an error and the script failed to return the XML file. So I started a search query on Google and found a post by Paul Brice who had the same problem while getting information via XML on an Iron Port setup. I tried his code to open the iLO XML information and it worked like a charm.

So I updated the script from Robert and added the information from Paul to it. The last thing I changed was the $url and added a RegEx to return the digits from the ESX hostname. For example esx72, the RegEx will return the 72.

Get-VMHost | Where-Object {$_.Manufacturer -eq "HP"} | `
Sort-Object -Property Name | ForEach-Object {
    $VMHost = $_
    $netAssembly = [Reflection.Assembly]::GetAssembly([System.Net.Configuration.SettingsSection])
    IF($netAssembly) {
        $bindingFlags = [Reflection.BindingFlags] "Static,GetProperty,NonPublic"
        $settingsType = $netAssembly.GetType("System.Net.Configuration.SettingsSectionInternal")
        $instance = $settingsType.InvokeMember("Section", $bindingFlags, $null, $null, @())
        
        if($instance) {
            $bindingFlags = "NonPublic","Instance"
            $useUnsafeHeaderParsingField = $settingsType.GetField("useUnsafeHeaderParsing", $bindingFlags)

            if($useUnsafeHeaderParsingField) {
                $useUnsafeHeaderParsingField.SetValue($instance, $true)
            }
        }
    }

    [int]$ip = (([regex]'\d+').matches($vmhost.Name) | select Value).Value

    [System.Net.ServicePointManager]::ServerCertificateValidationCallback = {$true}
    $url = "https://192.168.1.$ip/xmldata?item=All"
    $xml = New-Object System.Xml.XmlDocument
    $xml.Load("$url")
        New-Object PSObject -Property  @{
            "Name" = $VMHost.Name
            "Serial Number" = $xml.RIMP.HSI.SBSN
            "ILO Serial Number" = $xml.RIMP.MP.SN
            "ILO Type" = $xml.RIMP.MP.PN
            "ILO Firmware" = $xml.RIMP.MP.FWRI    
          }
} | Export-Csv -NoTypeInformation -UseCulture -Path C:\EsxSerialNumbers.csv 

The output of the script will be exported to a CSV file.

PowerCLI: Check Partition Alignment (Windows VMs Only)


image

Some time ago I  already created a script to report the disk alignment status of your Windows VM’s. I updated the script so you are able to export it to a CSV or XML file.

$myCol = @()
$vms = get-vm | where {$_.PowerState -eq "PoweredOn" -and `
$_.Guest.OSFullName -match "Microsoft Windows*" } | Sort Name 

foreach($vm in $vms){
$wmi = get-wmiobject -class "Win32_DiskPartition" `
-namespace "root\CIMV2" -ComputerName $vm            

    foreach ($objItem in $wmi){
        $Details = "" | Select-Object VMName, Partition, Status        
            if ($objItem.StartingOffset -eq "65536"){
                $Details.VMName = $objItem.SystemName
                   $Details.Partition = $objItem.Name
                $Details.Status = "Partition aligned"
            }
            else{
                $Details.VMName = $objItem.SystemName
                   $Details.Partition = $objItem.Name
                $Details.Status = "Partition NOT aligned"                    
            }
    $myCol += $Details
    }
}
$myCol | Export-Csv -NoTypeInformation "C:\Temp\PartitionAlignment.csv"
#$myCol | Export-Clixml "C:\Temp\PartitionAlignment.xml"


The script uses WMI to gather the information about the partition of the Windows VM. So if you’re using a Firewall, be sure to open the right ports. More info about WMI and Firewalls, can be found over here: http://msdn.microsoft.com/en-us/library/aa822854%28VS.85%29.aspx

The output will look like this:

image

Powershell: Script to Query the Veeam Backup database


image

Earlier this year I wrote a post about how to query the Veeam Backup SQL database to get the total job running time. I wanted to see if I was able to run this Query via Powershell. So I started to search on Google and I found a great series of articles on http://www.databasejournal.com about how to use Powershell to access Microsoft SQL databases. After reading part two, I was able to create a script to run my Query.

The only thing you have to change are the next three variables:

$dbServer = "servername\instance" 
$db = "VeeamBackup"
$veeamJob = "VeeamJobName"


Run the next script to query the Veeam Backup database and return the total job time.

$dbServer = "servername\instance"
$db = "VeeamBackup"
$veeamJob = "VeeamJobName"
$Query = "SELECT [job_name],CONVERT(char(10),[creation_time], 101) AS start_date `
,CONVERT(varchar, [creation_time], 108) AS job_start,CONVERT(char(10), [end_time], 101) AS end_date `
,CONVERT(varchar, [end_time], 108) AS job_end, `
LEFT(CONVERT(VARCHAR,CAST([end_time] AS DATETIME)-CAST([creation_time] AS DATETIME), 108),5) AS total_time `
FROM [VeeamBackup].[dbo].[BSessions] WHERE [job_name] = '$veeamJob' ORDER BY start_date"

$SqlConnection = New-Object System.Data.SqlClient.SqlConnection
$SqlConnection.ConnectionString = "Server=$dbServer;Database=$db;Integrated Security=True"
$SqlCmd = New-Object System.Data.SqlClient.SqlCommand
$SqlCmd.CommandText = $Query
$SqlCmd.Connection = $SqlConnection
$SqlAdapter = New-Object System.Data.SqlClient.SqlDataAdapter
$SqlAdapter.SelectCommand = $SqlCmd
$DataSet = New-Object System.Data.DataSet
$SqlAdapter.Fill($DataSet)
$SqlConnection.Close()
$DataSet.Tables[0] | Format-Table -AutoSize 

You can also find the script on poshcode.org: http://poshcode.org/1316


The script generate the following output:

image

Powershell: Export Installed Software to Excel


image

I created the next script to inventory the installed software on my servers. The only thing you need to create is a text file with all your servers in it and save it to Servers.txt.

#Create a new Excel object using COM
$Excel = New-Object -ComObject Excel.Application
$Excel.visible = $True
$Excel.SheetsInNewWorkbook = @(get-content "C:\Scripts\PS\Servers.txt").count

#Counter variable for rows
$i = 1

#Read thru the contents of the Servers.txt file
foreach ($server in get-content "C:\Scripts\PS\Servers.txt")
{
    $Excel = $Excel.Workbooks.Add()
    $Sheet = $Excel.Worksheets.Item($i++)
    $Sheet.Name = $server

    $intRow = 1

    # Send a ping to verify if the Server is online or not.
    $ping = Get-WmiObject `
    -query "SELECT * FROM Win32_PingStatus WHERE Address = '$server'"
       if ($Ping.StatusCode -eq 0) {

         #Create column headers
         $Sheet.Cells.Item($intRow,1) = "NAME:"
         $Sheet.Cells.Item($intRow,2) = $server.ToUpper()
         $Sheet.Cells.Item($intRow,1).Font.Bold = $True
         $Sheet.Cells.Item($intRow,2).Font.Bold = $True

         $intRow++

         $Sheet.Cells.Item($intRow,1) = "APPLICATION"
         $Sheet.Cells.Item($intRow,2) = "VERSION"

             #Format the column headers
             for ($col = 1; $col –le 2; $col++)
             {
                  $Sheet.Cells.Item($intRow,$col).Font.Bold = $True
                  $Sheet.Cells.Item($intRow,$col).Interior.ColorIndex = 48
                  $Sheet.Cells.Item($intRow,$col).Font.ColorIndex = 34
             }

             $intRow++

             $software = Get-WmiObject `
             -ComputerName $server -Class Win32_Product | Sort-Object Name 

             #Formatting using Excel

             foreach ($objItem in $software){
                $Sheet.Cells.Item($intRow, 1) = $objItem.Name
                $Sheet.Cells.Item($intRow, 2) = $objItem.Version

                   $intRow ++
             }

        $Sheet.UsedRange.EntireColumn.AutoFit()
    }
}

Clear

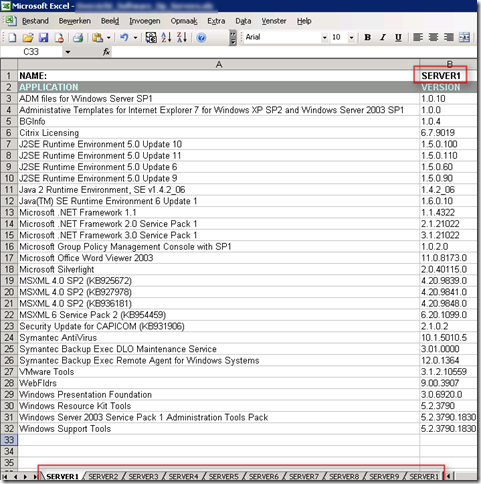
The following Excel file will be created. For each server in Servers.txt, there will be added a worksheet with the name of the server.

image

Powershell: Remove a Folder from every Home Directory


image

I had to remove a folder from every home directory. So I thought this is a nice thing to do with Powershell.

So I created the Remove-Folder function to do this for me :-).

The function will go through the following steps:

The begin part will browse to all the folders within the E:\users and export the full path to a CSV file. The path will look like this: E:\users\username\test\foldername.

In the process part it will remove all the folders which are saved in the CSV file.

Warning: The folders will be removed without a warning. So be sure you want to do this!!

function Remove-Folder{
    param($path,$folder)

    Begin{
        Get-Childitem $path -Recurse `
        | Where-Object { $_.Name -eq $folder } `
        | Select FullName `
        | Export-Csv -NoTypeInformation "$env:temp\remove.csv"
    }
    
    Process{
        $import = Import-Csv "$env:temp\remove.csv"
        foreach($folder in $import){
            Remove-Item $folder.FullName -Recurse -Force
        }
    Remove-Item "$env:temp\remove.csv"
    }
}

You can use the function with the following command:

Remove-Folder E:\users foldername

Via the following one-liner, you can validate the removal job:

Get-Childitem E:\users -Recurse `
| Where-Object { $_.Name -eq "foldername" } `
| Select FullName `
| Export-Csv -NoTypeInformation "$env:temp\remove.csv" 

Open the remove.csv file to verify the changes.

Powershell: Using SCHTASKS in Powershell


image

In this post you will see how powerful powershell is in combination with external applications like SCHTASKS.exe.

First you have to create a CSV file like this:

Name
Server1.domain.local
Server2.domain.local

The following one-liner imports the CSV file and creates a task on every server which is saved in the CSV file:

# Create a scheduled task on all the servers in *.csv
import-csv ".\*.csv" | % { schtasks /create 
/S $_.Name /SC DAILY /TN "Task_Name" 
/TR "program_or_script" /ST time /RU account}

The next one-liner imports the CSV file and will modify a scheduled task on every server which is saved in the CSV file:

# Change a scheduled task on all the servers in *.csv
import-csv ".\*.csv" | % { schtasks /change 
/TN "Task_Name" /S $_.Name 
/TR "program_or_script" /ST 23:05 /RU System }

The last one-liner imports the CSV file and will delete a scheduled task on every server which is saved in the CSV file:

# Delete a scheduled task on all the servers in *.csv
import-csv ".\*.csv" | % { schtasks /delete 
/tn "Task_Name" /f /s $_.Name }

More info about how to use SCHTASKS.exe can be found here: KB814596

Powershell: Delete a Folder of a Particular Age


image

I created this script to delete a folder which is older than two days. I needed this for a simple backup solution. I have a Powershell script that will backup a VM which runs in VMware Workstation. This script runs everyday and creates a folder with a date stamp. After a couple weeks there where a lot of copies of the particular VM and the free space of the backup hard disk became very low.

This script will remove all folders in the D:\vmbackup folder which are older then 2 days.

$Now = Get-Date
$Days = "2"
$TargetFolder = "D:\vmbackup"
$LastWrite = $Now.AddDays(-$Days)

$Folders = get-childitem -path $TargetFolder | 
Where {$_.psIsContainer -eq $true} | 
Where {$_.LastWriteTime -le "$LastWrite"} 

    foreach ($Folder in $Folders)
    {
    write-host "Deleting $Folder" -foregroundcolor "Red"
    Remove-Item $Folder -recurse -Confirm:$false
    }

Powershell: Set Logon Hours for all the users in an OU


image

With the script in this post you’re able to set logon hours to a bunch of users. All you have to do is to setup logon hours for a “template” user and define this “template” user into the $template variable.

image

The other step is to define the $ou variable with the path to the OU. In my case this was ict-freak/Gebruikers.

The script will now read the default logon hours and will apply them to the users in the OU.

$template = "" # This is a user with the default logon hours
$ou = "" # the full path to your ou "domainname/ouname1/ouname2"

# Get the logonhours from the template user
$template = Get-QADUser $template -IncludedProperties logonhours
[array]$logonHours = $template.DirectoryEntry.logonHours

# Get all users
$users = Get-QADUser -OrganizationalUnit $ou

# Loop through all the users
foreach($user in $users){
    Set-QADUser $user.Name -oa @{logonHours = $logonHours}
}


I found this trick here: http://www.powergui.org/thread.jspa?threadID=7860