Review: PHD Virtual Backup


Before I start with this post I first want to welcome a new sponsor: PHD Virtual.


In this post I will be doing a short review, sponsored by PHD, of the latest version of PHD backup. In this post I will show the following topics:

  1. install the PHD Virtual Backup Console and Plug-in
  2. Deploy OVF template of the PHD Virtual Backup Appliance
  3. Configure the PHD Virtual Backup Appliance
  4. Add VMs to a Backup job
  5. Restore a complete VM
  6. Restore individual Files
  7. Conclusion

So let’s start with the installation.

Continue reading “Review: PHD Virtual Backup”

Advertisement

Veeam Backup and Symantec Backup Exec side by side


imageimage

In this post I will show you how easy it is to run Backup Exec Job when Veeam Backup is ready with his job.

First you have to configure your backup job. The only thing different to the “normal” configuration is the Schedule tab. Set the job to Run now. Submit the job and cancel the job.

image

You will see the job under the Job Setup.

image

Now we’re going to test the job. Open a command prompt and run the following command:

“C:\Program Files\Symantec\Backup Exec\bemcmd.exe” -o01 -jJobName_Backup

image

If everything went ok, the Backup job should be running now.

More information about bemcmd.exe can be found here: http://seer.entsupport.symantec.com and in one of my earlier posts: backup-exec-start-a-backup-job-from-the-commandline

Now there is only one thing we need to configure in Veeam Backup. Open the Veeam Backup Job. Go to the Backup Destination window and click on Advanced.

image

Enable the Run the following command check box and enter the bemcmd.exe commando which we used earlier in the command prompt. After that, enable the Run every 1 backup cycle checkbox too.

image

Now you’re ready to go! When the Veeam Backup job is ready, it will start the Backup job of Symante Backup Exec and writes the Veeam Backup file to the tape drive.

Backup Exec: Start a Backup Job from the Commandline


Today I found some information about the tool called bemcmd.exe. With this little tool you can run and create backup jobs in Symantec Backup Exec.

If you run bemcmd.exe /? >c:\bemcmd.txt a help file will be created. You can also download the file here: bemcmd.pdf

You can run a created job with the following command:

C:\Program Files\Symantec\Backup Exec\bemcmd.exe -o01 –j<backupjob>

image

As you can see, the backup job is started in Backup Exec.

image

BackupExec: Disable Corrupt Data Encounterd error.


Het kan zijn dat je Backup via Symantec Backup Exec in een error eindigt met de volgende foutmelding:

image

Deze melding kun je negeren. Hoe dit in zijn werk gaat lees je hier onder.

Voor Backup Exec 11/12

Als je deze melding wilt uitzetten voer je de volgende key in.

Windows Registry Editor Version 5.00

[HKEY_LOCAL_MACHINE\SOFTWARE\Symantec\Backup Exec For Windows\Backup Exec\Engine\Backup]
"Fail Jobs On Corrupt Files"=dword:00000000

Als je deze melding wilt aanzetten voer je de volgende key in.

Windows Registry Editor Version 5.00

[HKEY_LOCAL_MACHINE\SOFTWARE\Symantec\Backup Exec For Windows\Backup Exec\Engine\Backup]
"Fail Jobs On Corrupt Files"=dword:00000001


Voor Backup Exec 9/10

Als je deze melding wilt uitzetten voer je de volgende key in.

Windows Registry Editor Version 5.00

[HKEY_LOCAL_MACHINE\SOFTWARE\VERITAS\Backup Exec\Engine\Backup]
"Fail Jobs On Corrupt Files"=dword:00000000

 
Als je deze melding wilt aanzetten voer je de volgende key in.

Windows Registry Editor Version 5.00

[HKEY_LOCAL_MACHINE\SOFTWARE\VERITAS\Backup Exec\Engine\Backup]
"Fail Jobs On Corrupt Files"=dword:00000001


Bron: http://thebackroomtech.com/2008/12/04/howto-stop-backup-exec-from-failing-entire-backup-jobs-when-corrupt-files-are-encountered/

Proven practices for integrating Backup Software with VCB


image

Chris Skinner een Senior Technical Instructor at VMware PSO-Education heeft een aantal papers geschreven over het integreren van backup software en VCB.

Op de viops site van VMware kun je de volgende papers vinden:


Bron: http://www.ntpro.nl/blog/archives/692-Integrating-Symantec-Backup-Exec-12.5-with-VCB-1.5.html

Whitepaper: VMware and VSS: Application Backup and Recovery


Veeam schrijft het volgende:

More and more organizations are choosing VMware Infrastructure to virtualize their mission‐critical applications (Active Directory, Exchange, SharePoint, SQL Server) to create a flexible, easily administered virtual infrastructure.
Virtual machines (VMs) and any applications they contain must be protected against failure. Typically, in the virtual world, this is done by performing an image‐level backup of the whole machine (for instance, using VMware Consolidated Backup). This method results in what is known as a crash‐consistent image. Restoring a crash‐consistent image is essentially equivalent to rebooting a server after a hard reset. For operating systems, this has not been an issue, since they can easily handle this type of activity. For database applications as well as for applications featuring replication, however, such a restore will often result in lost data, data corruption, or application failure.
To illustrate this concept, let’s review the consequences of using different VM disaster recovery methods for one of the most common mission‐critical applications: a Microsoft Active Directory domain controller (DC). Depending on the solution used, the following results will be achieved:

image

Download de PDF hier: VMwareandVSS-ApplicationBackupandRecovery.pdf

Backup Exec: Snapshot provider error (0x8007000E): Ran out of mem


Sinds ik SP2 op de SQL server had geïnstalleerd, kreeg ik de onderstaande foutmelding in mijn Backup Exec log file.

Click an error below to locate it in the job log


Backup- SQL1 
AOFO: Initialization failure on:
\\SQL\Shadow?Copy?Components.
Advanced Open File Option used: Microsoft Volume Shadow Copy Service (VSS).

Snapshot provider error (0x8007000E): Ran out of memoryCheck the Windows Event Viewer for details.

Dit probleem kun je oplossen door de hotfix te bestellen die vermeldt word in het volgende KB document: KB940239

Symantec: Backup Exec and an error with Shadow Copy Components


De onderstaande foutmelding kreeg ik toen ik een SQL server wilde toevoegen in mijn backup list van Symantec Backup Exec 10d.

SQLServer_Shadow_copies_error

Meer informatie over deze foutmelding vind je hier: http://seer.entsupport.symantec.com/docs/291014.htm


Deze foutmelding kun je oplossen door de volgende dll opnieuw te registreren ole32.dll

Dit doe je als volgt: Start – Run – regsrv32 ole32.dll {Enter}


De oplossing kwam uit een post van Zhu [MSFT] welke je hier kunt vinden: http://forums.techarena.in/showthread.php?t=498777

Unattended: BackupExec 10d Remote Agent


In de map C:\Program Files\VERITAS\Backup Exec\NT\Agents\RANT32 op de Backup Exec server staan de benodigde installatie bestanden. Deze kopieer je naar je installatie directory.

In de installatie directory vindt je de onderstaande cmd files.

  • setupaa.cmd de standaard Remote Agent
  • setupafo.cmd de Remote Agent met de Advanced Open File Option

In het setupaa.cmd bestand vindt je het volgende commando: @start /wait setup /RANT32: -s

In het setupafo.cmd bestand vindt je het volgende commando: @start /wait setup /AOFO: -s

Zie deze technote 258982 voor meer informatie.

UDA: How to Install VMBK.pl


prerequirements

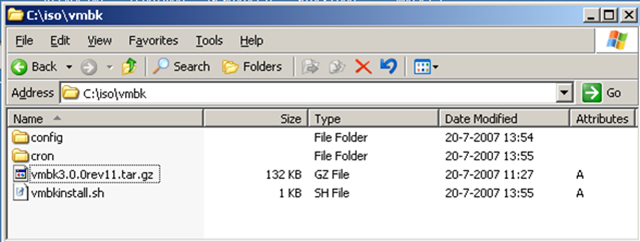
Op de NFS Share maak je de volgende twee mappen aan: config en cron. In de config map plaats je de custom config file welke je al gemaakt had voor het gebruik van VMBK. Dit geld ook voor de cron map.

Mocht je voor het eerst bezig zijn met VMBK dan raad ik je aan de volgende post te lezen: vmbk backup with different session names.

vmbkwithuda

Nadat je de mappen hebt aangemaakt voeg je de vmbk3.0.0rev11.tar.gz en het script vmbkinstall.sh toe.

Scripts

%post script

Voordat je het script kunt uitvoeren moet de NFS share iso eerst gemound worden. Dit gaat met het volgende commando:

esxcfg-nas -a iso -o vcserver.domain.nl -s iso

Vervolgens dien je op de firewall van ESX port 25 te openen.

esxcfg-firewall -o 25,tcp,out,SMTP

Daarna wordt het onderstaande script uitgevoerd.

## Install VMBK on ESX3.0.1.
# This little script installs VMBK3.0.0. rev 11 within the %post script from UDA
cp /vmfs/volumes/iso/vmbk/vmbkinstall.sh /tmp
cd /tmp/
chmod 755 vmbkinstall.sh
touch vmbkinstall.sh
./vmbkinstall.sh

Waarna als laatste de vmbkinstall.sh wordt aangeroepen. Dit script installeerd en configureerd VMBK.

vmbkinstall.sh

## Install VMBK on ESX3.0.1.
# This little script installs VMBK3.0.0. rev 11 within the %post script from UDA

## Copy the tar file from nfs:iso to /tmp
cp /vmfs/volumes/iso/vmbk/vmbk3.0.0rev11.tar.gz /tmp
cd /tmp/
tar zxf vmbk3.0.0rev11.tar.gz
cd vmbk/

## Install VMBK
./install.sh

## Copy Config file
cp /vmfs/volumes/iso/vmbk/config/vmbk-all.conf /usr/local/bin

Cronjob

Voeg de onderstaande code toe aan je %post script

touch /tmp/vmbkcron.txt
chmod 755 /tmp/vmbkcron.txt

cat <<EOF > /tmp/vmbkcron.txt
30 20 * * 1 /usr/local/bin/vmbk.pl -C /usr/local/bin/vmbk-all.conf > /dev/null 2>&1
30 20 * * 2 /usr/local/bin/vmbk.pl -C /usr/local/bin/vmbk-all.conf > /dev/null 2>&1
30 20 * * 3 /usr/local/bin/vmbk.pl -C /usr/local/bin/vmbk-all.conf > /dev/null 2>&1
30 20 * * 4 /usr/local/bin/vmbk.pl -C /usr/local/bin/vmbk-all.conf > /dev/null 2>&1
30 20 * * 5 /usr/local/bin/vmbk.pl -C /usr/local/bin/vmbk-all.conf > /dev/null 2>&1
30 20 * * 7 /usr/local/bin/vmbk.pl -C /usr/local/bin/vmbk-all.conf > /dev/null 2>&1
EOF

crontab /tmp/vmbkcron.txt