Tool: VI3 Snaphunter


De mannen van http://www.xtravirt.com/ hebben weer een leuke tool afgeleverd genaamd VI3 Snaphunter.

SnapHunter is an ESX3 Service Console utility which can report back on the Snaphot status of VM’s from multiple ESX Servers.  Its features include:

  • identify VM’s which contain snapshots
  • show size, date and name of snapshot
  • optionally commit snapshots
  • email reporting and scheduling

Installation instructions

  1. Upload snap_hunter.tar.gz to your ESX server using FastSCP/WinSCP or equivalent
  2. Extract snap_hunter.tar.gz by running the following command in the directory containing snap_hunter.tar.gz: tar zxvf snap_hunter.tar.gz.  This will create a directory called snap_hunter under the current directory.  Please read the README in this directory.
  3. cd snap_hunter
  4. Run the installation script with the following command ./install.pl

SnapHunter is now installed on your ESX host.


Je kunt het hier downloaden: http://www.xtravirt.com/

Book: VI3 Advanced Technical Design Guide


Een van de schrijvers (Ron Oglesby) heeft een aantal sample chapters vrijgegeven van het nieuwe boek.

quote van de website:

This is a 3 chapter preview of the VMware Infrastructure 3: Advanced Technical Design Guide. This was given away at VMworld 2007 to several hundred attendees. The cost of this book contains no royalties or profit. It is simply a preview that you pay to print.

De sample chapters kun je hier downloaden: http://www.lulu.com/content/1115401

How To: SSH Command from a Windows Box to a VMware ESX Server


In deze how to laat ik zien hoe je vanaf een Windows machine een commando kunt uitvoeren op het service console van VMware ESX. Dit werkt echter ook op de verschillende linux distributies.

Lees hier wat je allemaal met plink kunt doen.

Als eerste moet de putty installer gedownload en geïnstalleerd worden.

  • Download de putty installer vanaf hier: putty-0.60-installer.exe
  • Installeer deze in de standaard directory C:\Program Files\Putty
  • De Path variable aanvullen met het path naar de putty directory. Zie deze post voor meer info.

Vervolgens kun je via het onderstaande commando vdf -h weergeven in een cmd box.

plink.exe -l root -pw password esxserver vdf -h

-l staat voor user in dit geval root.

-pw staat voor password in dit geval password.

esxserver is de esxserver die benaderd word.

Dit is echter geen veilige oplossing voor het gebruik binnen scripts omdat de username en password kaal in het script staat.

Om dit alles te beveiligen gaan we gebruik maken van Private Key authentication. Klik hier voor meer informatie.

Om dit alles voor elkaar te krijgen moet je op de ESX Servers een public key genereren en de sshd_config aanpassen. Vervolgens dien je de key over te halen naar de Windows machine om deze vervolgens te converteren naar een ppk file die weer binnen putty of plink te gebruiken is.

Dit kun je als volgt voor elkaar krijgen.

De benodigde stappen voor op de VMware ESX Server.

  • Log in op het Service Console van de ESX Server.
  • Genereer een public key bestand met het volgende commando ssh-keygen -b 2048 -t rsa Let op! maak bij het genereren van de key gebruik van een passphrase om alles zo veilig mogelijk te houden.
  • Pas het /etc/ssh/sshd_config bestand als volgt aan nano /etc/ssh/sshd_config

RSAAuthentication yes
PubkeyAuthentication yes
AuthorizedKeysFile      .ssh/authorized_keys

  • Het id_rsa.pub bestand wat gegenereerd is in stap 2 kopieren naar het bestand authorized_keys.

cp id_rsa.pub /root/.ssh/authorized_keys

  • De sshd daemon opnieuw opstarten. Dit doe je met het commando /etc/init.d/sshd restart

De benodigde stappen voor op de Windows Server.

  • Kopier het id_rsa bestand naar een directory op de Windows Server. Dit kun je doen door middel van WinSCP of Veeam FastSCP te gebruiken.
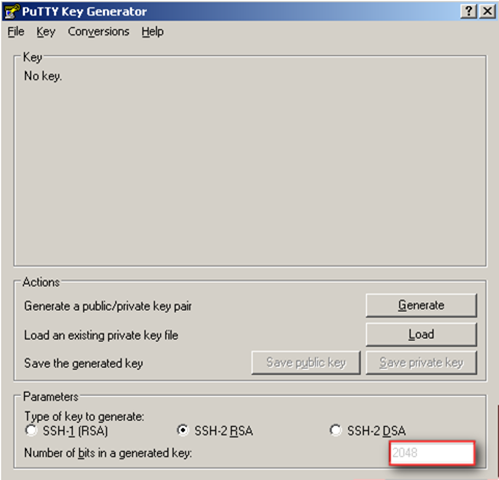
  • Vervolgens open je de puttygen.exe.

Stel eerst het aantal bits in op 2048

sshrsa

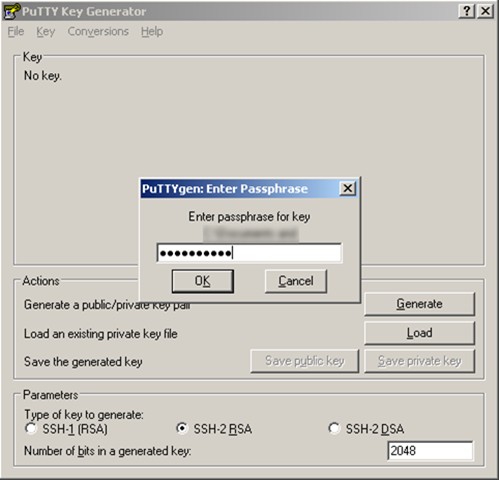
Klik op Conversions en open het id_rsa bestand.

sshrsa1

Er wordt gevraagd naar de passphrase die je ingevoerd hebt in stap 2 van de ESX Server. Nadat je op Ok hebt geklikt verschijnt het onderstaande scherm

sshrsa2

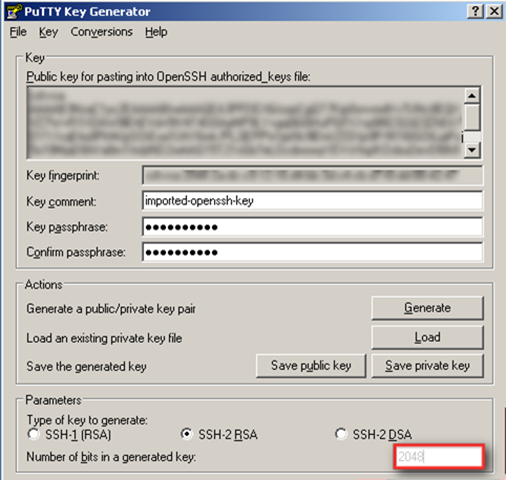
Nu kun je de private key opslaan als bijvoorbeeld C:\esx1.ppk. Dit bestand hebben we in de volgende stap nodig.

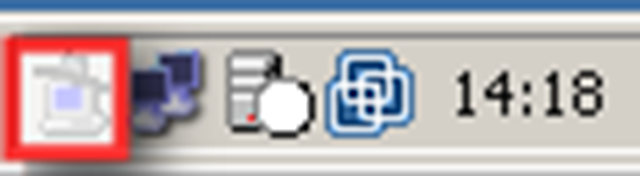
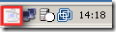
  • Start vervolgens de pageant.exe. Nadat deze is gestart verschijnt het volgende icoon in de taskbar

sshrsa3

  • Klik vervolgens met rechts op het nieuwe icoon gevolgd door add keys

sshrsa4

  • Blader nu naar de opgeslagen *.ppk file en vul de passphrase in.
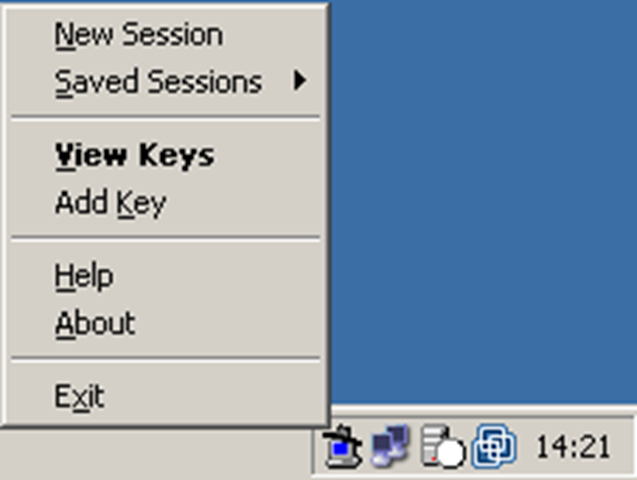
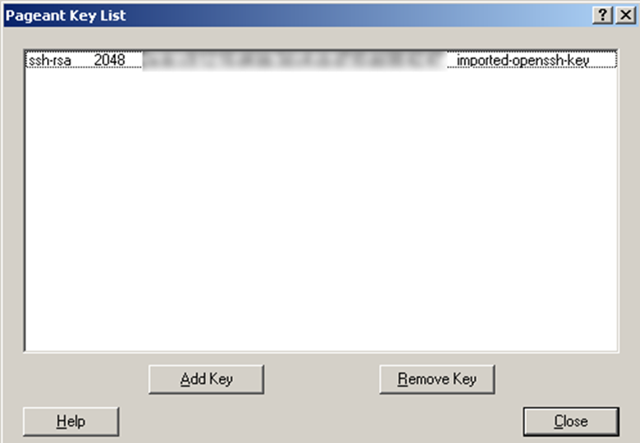
  • Klik vervolgens op met rechts op het pageant icoon in de taskbar gevolgd door View Keys

sshrsa5

Zoals je ziet is de key succesvol geïmporteerd. Doe dit ook voor al je andere ESX Servers.

  • Als laatste stap schrijf je het *.ppk bestand weg op een usb-stick of diskette en berg deze ergens goed op. Verwijder vervolgens het *.ppk bestand vanaf de C:\ schijf.

Een commando uitvoeren vanaf de Windows Server.

Nu kun je een een command prompt openen en met het volgende commando iets uitvoeren op de ESX Server

plink -agent root@esxserver commando

-agent kijkt in de pageant of er een public key geregistreerd staat. Is dit het geval dan kan er geautenticeerd worden.

-root@esxserver is de gebruiker root op de esxserver.

commando is het commando wat je wilt uitvoeren.

Als je nu vanuit de commandprompt het volgende commando uitvoert

plink -agent root@esxserver vdf -h

krijg je de onderstaande output

sshrsa6

How To: Install MGE Network Shutdown Module V3 within the Service Console of ESX 3.0.x


Deze post is ook als pdf geplaatst op www.vmug.nl

De software die je nodig hebt is de Network Shutdown Module Linux x86 Console.

Download de software hier: http://www.mgeups.com/.

Verder vindt je hier een Whitepaper: http://www.mgeups.com.

Zodra alle Software binnen is kunnen we beginnen.

Continue reading “How To: Install MGE Network Shutdown Module V3 within the Service Console of ESX 3.0.x”

VMware: Handy Service Console Commando’s for VI3


In deze post som ik een paar commando’s op die je kunt gebruiken in het Service Console van ESX 3.0.x.

HOSTD HOSTD is de vervanger van de vmware-serverd daemon.
Met het volgende commando herstart je de daemon service mgmt-vmware restart
VPXA VPXA is de vervanger van de vmware-ccagent daemon.
Met het volgende commando herstart je de daemon service vmware-vpxa restart
ESXCFG-NICS ESXCFG-NICS is de vervanger van de mii-tool, mui (esx 2.5.x) en de modules.cfg
Met het volgende commando kun je het e.e.a. configureren. esxcfg-nics <options> [nic]
-s|–speed <speed>
Set the speed of this NIC to one of 10/100/1000/10000. Requires a NIC parameter.
-d|–duplex <duplex> Set the duplex of this NIC to one of ‘full’ or ‘half’. Requires a NIC parameter.
-a|–auto Set speed and duplexity automatically. Requires a NIC parameter.
-l|–list Print the list of NICs and their settings.
-r|–restore Restore the nics configured speed/duplex settings (INTERNAL ONLY)
-h|–help Display this message.
ESXCFG-FIREWALL ESXCFG-FIREWALL is nieuw sinds ESX 3.0 en kun je gebruiken om de Firewall van ESX te configureren
Met het volgende commando kun je het e.e.a. configureren. esxcfg-firewall -l start (load) de firewall

esxcfg-firewall -u stopt (unload) de firewall

esxcfg-firewall -q kun je zien welke services ingeschakeld zijn.

esxcfg-firewall -s kun je de volgende services inschakellen.

nfsClient
ftpServer
ntpClient
dellom
nisClient
vncServer
tmpLicenseClient
swISCSIClient
CIMHttpsServer
sshClient
snmpd
tmpAAMClient
vpxHeartbeats
smbClient
hpim
tmpHostVmdbServer
tmpHostdSOAPServer
ftpClient
sshServer
ibmdirector
CIMHttpServer
telnetClient

Let op! deze service benamingen zijn cAsE sEnSiTiVe.

esxcfg-firewall -e kun je een specifieke service inschakellen.

esxcfg-firewall -d kun je een specifieke service uitschakellen.

ESXCFG-RESGRP ESXCFG-RESGRP is nieuw binnen VMware ESX 3.0.x. Hiermee kun je Resource groups beheren.
Met het volgende commando kun je het e.e.a. configureren. esxcfg-resgrp [options] [resgrp path]
-a, –add rgname
Add a new group under the path
-d, –delete Delete the resource group
-l, –list List all the resource groups
Or stats about a specific resource group
–restore Restore all resource groups from configuration
file (FOR INTERNAL USE ONLY).
-h, –help Show this message
ESXCFG-NAS ESXCFG-NAS is nieuw binnen VMware ESX 3.0.x. Hiermee kun je een NAS aankopellen en beheren.
Met het volgende commando kun je het e.e.a. configureren. esxcfg-nas <options> [<label>]
-a|–add
Add a new NAS filesystem to /vmfs volumes. Requires –host and –share options.
-o|–host <host> Set the host name or ip address for a NAS mount.
-s|–share <share> Set the name of the NAS share on the remote system.
-d|–delete Unmount and delete a filesystem.
-l|–list List the currently mounted NAS file systems.
-r|–restore Restore all NAS mounts from the configuration file. (FOR INTERNAL USE ONLY).
-h|–help Show this message.
ESXCFG-ROUTE ESXCFG-ROUTE is nieuw binnen VMware ESX 3.0.x. Hiermee kun je default route instellen voor de vmkernel.
Met het volgende commando kun je het e.e.a. configureren. esxcfg-route [ip-address] stelt de default gateway in voor de vmkernel.

esxcfg-route
VMkernel default gateway is 10.0.0.254

ESXCFG-VMKNIC ESXCFG-VMKNIC is nieuw binnen VMware ESX 3.0.x. Hiermee kun je het ip address instellen voor de vmkernel.
Met het volgende commando kun je het e.e.a. configureren. esxcfg-vmknic <options> [[<portgroup>]]
-a|–add
Add a VMkernel NIC to the system,
requires IP parameters and portgroup name.
-d|–del Delete VMkernel NIC on given portgroup.
-e|–enable Enable the given NIC if disabled.
-D|–disable Disable the given NIC if enabled.
-l|–list List VMkernel NICs.
-i|–ip <X.X.X.X> The IP address for this VMkernel NIC.
Setting an IP address requires that the
–netmask option be given in same command.

-n|–netmask <X.X.X.X> The IP netmask for this VMkernel NIC.
Setting the IP netmask requires that the –ip
option be given in the same command.
-r|–restore Restore VMkernel TCP/IP interfaces from
Configuration file (FOR INTERNAL USE ONLY).
-h|–help Show this message.

ESXCFG-SWISCSI ESXCFG-SWISCSI is nieuw binnen VMware ESX 3.0.x. Hiermee kun je de iSCSI Software Initiator configureren.
Met het volgende commando kun je het e.e.a. configureren. esxcfg-swiscsi options
-e, –enable
Enable sw iscsi
-d, –disable Disable sw iscsi
-q, –query Check if sw iscsi is on/off
-s, –scan Scan for disk available through sw iscsi interface
-k, –kill Try to forcibly remove iscsi sw stack
-r, –restore Restore sw iscsi configuration from file
(FOR INTERNAL USE ONLY)
-h, –help Show this message

Release: VMware ESX 3.0.2 and VCB 1.0.3


Ten days after release of its companion VirtualCenter 2.0.2, VMware finally releases ESX Server 3.0.2.

While this version should be aimed at bugfixes only, it brings in some extended support for:

  • New guest operating systems including:
    • Microsoft Windows Server 2003 SP2
    • Red Hat Enterprise Linux (RHEL) 5 (without paravirtualization)
    • Red Hat Enterprise Linux (RHEL) 4.5
    • Novell Netware 6.5 SP6
    • Sun Solaris 10 Update 3
  • Additional backup software from third-party vendors including:
    • CA BrightStor ArcServe 11.5 SP1
    • CommVault Galaxy version 6.1 SP4
    • IBM TSM Storage Agent version 5.3.3
    • Legato NetWorker 7.3.2 Jumbo Update 1
    • Symantec Backup Exec version 11d
    • Veritas NetBackup Exec version 6.0
  • New versions of management agents including:
    • Dell Open Manage 5.2
    • HP Insight Manager Agents 7.8
  • New hardware including:
    • Dell Poweredge 2970
    • HP P800 SA controller

VMware also updated its Consolidated Backup module (VCB) to version 1.0.3, introducing several major features like:

  • Support for iSCSI Storage
  • New Backup Software Support
    • Legato Networker version 7.3.2 Jumbo Update 1
    • Veritas NetBackup version 6.0
    • Symantec Backup Exec version 11d
    • Tivoli TSM Storage Agent version 5.3.3
  • New VCB Proxy Operating System Support
    • Windows 2003 SP2
    • Windows 2003 R2 SP2

Download both ESX Server 3.0.2 and VCB 1.0.3 here.

Bron: http://www.virtualization.info/2007/08/release-vmware-esx-server-302-vcb-103.html