An important vSphere 4 storage bug is solved in patch ESX400-200912401-BG


image

Chad Sakac over at http://virtualgeek.typepad.com already blogged about the APD bug in December last year. You can find his post here. 

Just a short quote from Chad his post about the symptoms of this APD bug:

Recently saw a little uptick (still a small number) in customers running into a specific issue – and I wanted to share the symptom and resolution.   Common behavior:

  1. They want to remove a LUN from a vSphere 4 cluster
  2. They move or Storage vMotion the VMs off the datastore who is being removed (otherwise, the VMs would hard crash if you just yank out the datastore)
  3. After removing the LUN, VMs on OTHER datastores would become unavailable (not crashing, but becoming periodically unavailable on the network)
  4. the ESX logs would show a series of errors starting with “NMP”

Examples of the error messages include:

    “NMP: nmp_DeviceAttemptFailover: Retry world failover device "naa._______________" – failed to issue command due to Not found (APD)”

    “NMP: nmp_DeviceUpdatePathStates: Activated path "NULL" for NMP device "naa.__________________".

What a weird one…   I also found that this was affecting multiple storage vendors (suggesting an ESX-side issue).  You can see the VMTN thread on this here.


We found out about this issue during a big storage project. We where creating a lot of new LUNs and where removing a lot of the old LUNs. If you remove a LUN on a way not mentioned in Chad his post:

This workaround falls under “operational excellence”.   The sequence of operations here is important – the issue only occurs if the LUN is removed while the datastore and disk device are expected by the ESX host.   The correct sequence for removing a LUN backing a datastore.

  1. In the vSphere client, vacate the VMs from the datastore being removed (migrate or Storage vMotion)
  2. In the vSphere client, remove the Datastore
  3. In the vSphere client, remove the storage device
  4. Only then, in your array management tool remove the LUN from the host.
  5. In the vSphere client, rescan the bus.

So when we used the workaround described above, everything went fine. But at my current employer, we use a large LeftHand iSCSI SAN.  One of the great things of Lefthand SAN is the ability to move LUNs between different clusters. With the APD bug, we couldn’t use this option anymore.

When we discovered this APD bug we contacted VMware Support. After a couple of weeks we received an e-mail with the following fix.

I can now confirm that the APD (All paths dead) issue has been resolved by a patch released as part of P03.

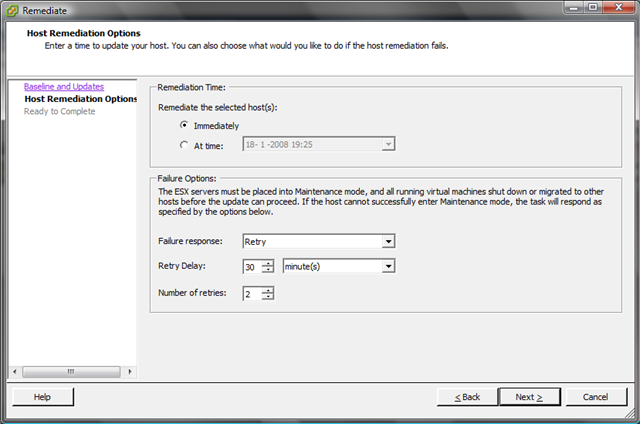
To install this patch, please upgrade your hosts to vSphere Update 1 and use Update Manager to install the latest patches.

Please ensure that ESX400-200912401-BG is installed as this resolves the APD problem

We upgraded one of our clusters to Update 1 and installed the latest patches including the ESX400-200912401-BG patch. After installing the patch, we did some tests and I can confirm that the APD bug is history!!

To reproduce this issue I created two iSCSI LUNs on the EMC VSA. Instead of removing the LUNs I disconnected the iSCSI network to simulate this. So before I disconnected the iSCSI network, all LUNs are working just fine:

image

After I disconnected the iSCSI network and waited a while, all the paths to the EMC LUNs are dead and they are colored red:

image

This is just normal behavior but before installing the ESX400-200912401-BG patch, the ESX host will stall for 30 till 60 seconds. This means that all the VMs running on a host of which a LUN was disconnected will stall, even though the VM is on a different datastore!! I am happy that VMware has solved this APD bug.


If you want to make sure if you already installed the APD patch, you can easily verify this with the vCenter Update Manager.

Go to the tab Update Manager and open the Admin View. Add a new baseline. Select the Host Patch option:

image

In the next screen select Fixed:

image 

Now we are going to create a filter. Enter the name of the patch:

image

Select the ESX400-200912401-BG patch:

image

When the new baseline is ready, return to the Compliance view and attach the new baseline:

image

The final step is to perform a scan on your Datacenter, Cluster or ESX Host. Now wait and see if the patch is already installed or not.


More info about the patch can be found here:

For the readers who cannot upgrade to vSphere Update 1 and the latest patches, you can find some workarounds here:

Advertisement

EDA 0.87 Patch 1 released


image

Brugh has released a patch for EDA 0.87.

This is how you apply the patch:

  • log in to the console
  • edit /var/www/eda/fs.php
  • change the ‘3000’ on line 32 to ‘1000000’
  • go to http://eda-ip-address/eda/fs.php
  • upload the file ‘eda-v0.87-1.tar.gz’
  • type ‘tar zxvf eda-v0.87-1.tar.gz -C /’ in the exec box (be exact with the slash but don’t type the quotes)


You can download the patch here: http://virtualappliances.eu/


Source: http://www.vmug.nl/modules.php?name=Forums&file=viewtopic&t=3937

VMware: Installing Updates with VUM


In deze post zie je hoe ik mijn ESX 3.5 test server update via de VMware Update Manager. Ik ga er vanuit dat je de VUM al hebt geïnstalleerd en dat je de updates al gedownload hebt. Zo niet dan lees je hier hoe je dat kunt doen.

Selecteer de host die je wilt gaan updaten. In dit voorbeeld gaat het om esx3srv1.ictfreak.local. Daarna klik je op Attach Baseline….

VUM_1

Nu selecteer je de baseline die je wilt gaan gebruiken of je maakt er zelf een aan via Create New Baseline…

VUM_2

Klik nu nogmaals op de host en op het tabblad Update Manager. Klik daarna op het Scan icoon (tweede vanaf rechts).

VUM_3

Klik Yes om de host te gaan scannen

VUM_5

Nu worden de firewall porten open gezet en de host word gescanned.

VUM_6

Nadat de scan klaar is krijg je het onderstaande scherm te zien.

VUM_7

Klik nu nogmaals op de host en dan op Remediate (eerste icoontje vanaf rechts).

VUM_3

Selecteer vervolgens de baselines.

VUM_8

Bij het tabblad Updates kun je zien welke updates er geïnstalleerd worden. Hier kun je eventueel ook Updates uitschakelen.

VUM_9

Opmerking: in eerste instantie kreeg ik hier een error en kon ik niet verdergaan. Na een herstart van de VirtualCenter service en de Update Manager service, kon ik wel gebruik maken van de Remediate optie.

Ik wil de updates gelijk installeren dus kies ik voor de optie Immediately. Het is ook mogelijk om er een job voor te schedulen. Verder kun je hier instellen wat er moet worden gedaan, mocht er een update mis gaan. Ik heb dit op Default laten staan.

VUM_10

Nog even een overzicht van wat er gepatched gaat worden.

VUM_11

De ESX Server word in Maintenance mode geplaatst

VUM_12

En de updates worden stuk voor stuk geïnstalleerd.

VUM_13

Nadat de updates klaar zijn, word de ESX Server opnieuw opgestart en hoeft deze alleen nog maar uit de maintenance mode gehaald te worden.

VUM_14

Zoals je ziet is het build nummer bijgewerkt naar 70356. De updates zijn geïnstalleerd. Nu kijken of al mijn VM’s nog willen starten 😉

VMware: VMotion Corruption after applying the new ESX 3.5 patches [Update]


De Lone Sysadmin heeft een update geplaatst op zijn weblog over dit hele verhaal: http://lonesysadmin.net/2008/01/18/update-manager-vmotion-and-me/


De Lone Sysadmin maakte er al melding van op zijn blog http://lonesysadmin.net/ maar er schijnt dus een groot probleem te zijn met de nieuwe patches van VMWare ESX 3.5.

Nadat je de patches hebt geïnstalleerd raakt je VMotion switch corrupt. Door de VMotion Switch te verwijderen en weer opnieuw aan te maken, wordt het probleem opgelost. Meer informatie vind je in document: SR#1101801771


Bron: http://lonesysadmin.net/2008/01/18/update-manager-loss-of-vmotion-capabilities/

VMware: Download Updates For VUM


Voordat je met de VUM aan de gang kunt gaan, moet je eerst de VUM Plugin installeren. Dit spreek denk ik wel voor zich.

Nadat je de Update Manager Plugin hebt geïnstalleerd, kun je via het menu Plugins – Update Manager – Schedule Update Download…. een job aanmaken voor het downloaden van de updates.

VUM_Download_Patches_1

In deze post downloaden we alleen de ESX Server Updates

VUM_Download_Patches_2

Ik wil dat de updates nu worden gedownload

VUM_Download_Patches_3

De updates worden gedownload.

VUM_Download_Patches_6

VMware: VMTS Patchmanager (build 2878)


De VMTS Patchmanager is een leuk, gratis en veelzijdig product.

Met de volgende pluspunten:

  • Centrale plaats voor het downloaden van de ESX Patches.
  • VirtualCenter support.
  • Een console voor het patch proces.

Er zijn helaas ook minpunten:

  • Geen support voor patch rollups (patch1).
  • Geen upgrade support (esx 3.0.1 naar esx 3.0.2). Patrick wees me er op dat deze optie er wel in zit.

Donwload de tool hier: http://www.vmts.net/VMTSPatchManager.htm

Hier vind je de quickstart: http://www.vmts.net/VMTSPatchManagerQuickStart.htm

En als laatste de manual: http://www.vmts.net/VPMSampleManual.asp

In de rest van de post zie je hoe eenvoudig het is om met deze tool een esx server te updaten.

Continue reading “VMware: VMTS Patchmanager (build 2878)”

How to: Install VMware ESX 3.0.2 update 1


In deze post lees je hoe je de nieuwe update voor ESX kunt installeren.

Vanaf het console via esxupdate:

  1. Upload het esx-upgrade-from-esx3-3.0.2-61618.tar.gz bestand via Win of FastSCP naar de /tmp folder op je ESX host.
  2. Kijk of de MD5SUM klopt. Dit doe je met het volgende commando: md5sum esx-upgrade-from-esx3-3.0.2-61618.tar.gz de volgende md5sum moet er uit komen: 43b3617c401e71622c72b10cfcdbc5fe esx-upgrade-from-esx3-3.0.2-61618.tar.gz.
  3. Zodra de md5sum overeenkomt kun je het bestand uitpakken. Dit doe je met het volgende commando: tar zxvf esx-upgrade-from-esx3-3.0.2-61618.tar.gz
  4. Open nu de nieuwe directory CD /61618
  5. Voer het volgende commando uit om de upgrade te starten: esxupdate -n update (blz: 164 vi3_installation_guide.pdf)
  6. Het upgrade process is gestart:
    [root@esx3srv1 61618]# esxupdate -n update
    INFO: No repository URL specified, going with file:/tmp/61618
    INFO: Configuring…
    INFO: Preparing to install VMware ESX Server 3.0.2-61618…

    Aan het einde zie je als het goed is de volgende melding verschijnen:

    INFO: — TOTALS: 9 packages installed, 0 pending or failed, 0 removed, 0 excluded —
    INFO: Install succeeded – please come again.

  7. Reboot de server via het commando: reboot -n

Meer informatie over het installeren / upgraden en patchen van VMware ESX vindt je in deze manual: http://www.vmware.com/pdf/vi3_installation_guide.pdf

Via de ISO (CD-Rom)

  1. Download het ISO bestand
  2. Bekijk of de md5sum overeen komt md5sum upgrade-esx-3.0.2-61618.iso
  3. Het volgende zou eruit moeten komen: b532310bfd1a785a4a7e9b4bb20b703f upgrade-esx-3.0.2-61618.iso
  4. Als de md5sum klopt, brand je de iso en start je de server op vanaf de iso.
  5. Meer informatie vind je op blz: 164 van vi3_installation_guide.pdf

Bron: http://www.vmware.com/support/vi3/doc/releasenotes_esx302_update1.html#whatsnew