Remove files older than x days with PoSH


image

One of the Symantec Live Update Servers started to complain about low disk space. So I started Treesize Pro to see what files or folders where eating my disk space.  After a couple of seconds Treesize Pro showed me that the liveupdate files, in the c:\LiveUpdate folder where the problem.

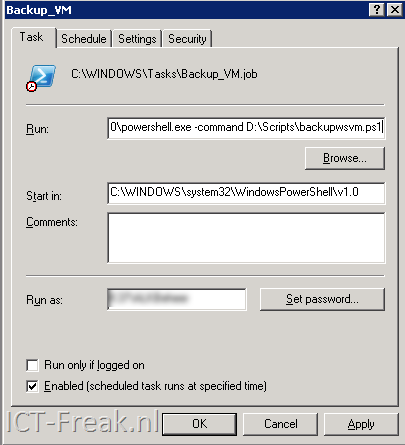
I created the following Powershell Script (after reading the source) and scheduled this script to run once a week.

Warning: This script will remove everything that matches the remove-item cmdlet!


$Now = Get-Date
$Days = "3"
$TargetFolder = "C:\LiveUpdate"
$LastWrite = $Now.AddDays(-$days)
$Files = get-childitem $TargetFolder -include *.zip, *.x86 -recurse `
    | Where {$_.LastWriteTime -le "$LastWrite"} 

foreach ($File in $Files)
{write-host "Deleting File $File" -foregroundcolor "Red"; `
    Remove-Item $File | out-null}

Just change the $Days, $TargetFolder variables and the file extensions (*.zip, *.x86) for you environment.
Source of this script: powershell-script-to-delete-files-older-than-certain-days.aspx

VMware: Start the VI Toolkit on Win 7


After installing Windows 7 build 7057 x64 the VI Toolkit starts with the following error /warning. If  you run the Set-ExecutionPolicy unrestricted  command as a normal user, the command will not run successfully.

image

The solution is simple: Open the VI Toolkit with the Run as administrator permissions option.

image

When the VI Toolkit window pop’s up. Run the Set-ExecutionPolicy unrestricted command, and the VI Toolkit starts without the error.

image

Powershell: Check if partition is aligned or not


This script has the following Requirements:

  • VI Toolkit
  • Powershell
  • WMI query
  • Windows VM’s

The following script get al lists of all Windows VM’s which are powered on. The next step is a WMI query which queries the Win32_DiskPartition class. The final step is a match with the $StartingOffset variable.

Add-PSSnapIn VMware.VimAutomation.Core

# Connect to vCenter
$VC = Connect-VIServer (Read-Host "Enter vCenter server")

$StartingOffset = "65536"

# Get all VM’s with powerstate = PoweredOn
$VMS = Get-VM | Where {$_.PowerState -eq "PoweredOn"} |Sort Name
ForEach ($VM in $VMS)
    {
  
# Process only Windows Server VM’s
   if ($VM.Guest.OSFullName -match "Microsoft Windows*")
        {  
      
# Do a WMI Query
       $results = get-wmiobject -class "Win32_DiskPartition" -namespace "root\CIMV2" -ComputerName $VM

           foreach ($objItem in $results)
                {
              
# Do the match
               if ($objItem.StartingOffset -match $StartingOffset){
                  
write-host $objItem.SystemName
                  
write-host $objItem.Name
                  
write-host "Partition aligned" -foregroundcolor green
                  
write-host}
              
else{
                  
write-host $objItem.SystemName
                  
write-host $objItem.Name
                  
write-host "Partition NOT aligned" -foregroundcolor red
                  
write-host                  
                    }
                }
        }
    }
# Disconnect from vCenter
Disconnect-VIServer -Confirm:$False

after running the script, the following output will be generated:

image

How To: Enable Remote WMI support in ISA 2004


 image

Ik wilde via een script WMI aanroepen op een van de ISA 2004 Servers maar dat werd uiteraard geblokkeerd. Na wat zoeken op Google, kwam ik de onderstaande oplossing tegen. Deze oplossing werkt perfect.

1.First you need to make explicict range form dcom high ports you can use via in the registry (see http://support.microsoft.com/?kbid=154596)
HKEY_LOCAL_MACHINE\Software\Microsoft\Rpc\Internet 
Edit the Ports multi-string to your liking. I use 5000-5100, this should be fine amount for a non application server.(see kb above)
Ports 5000-5100 (multi-string)

2. create two basic custom protocols for SMB and dcom,
cust_smb
445 tcp outbound
445 udp send
(no related application filters ticked!)

cust_dcom
135 tcp outbound
5000-5100 tcp outbound
(no related application filters ticked!)

3. create the rule, allow, source = trusted admin/monitor box(es), destination localhost, protocols: cust_smb, cust_dcom, all users

4. Edit the System policy
Untick the ‘enable’ for Microsoct Management Console, you don’t need it now because we have created a better rule for our trusted box(es) ( note having this ticked will create a hidden rule that can break wmi scripts and alike).
Untick the ‘force strict rpc compliance’ option for Active Dicrectory
Click ok, apply new configuration, restart the isa server

Je kunt ook de onderstaande reg file gebruiken i.p.v. stap 1 uit te voeren.

RPC_Ports.reg:

Windows Registry Editor Version 5.00

[HKEY_LOCAL_MACHINE\SOFTWARE\Microsoft\Rpc\Internet]
"Ports"=hex(7):35,00,30,00,30,00,30,00,2d,00,35,00,31,00,30,00,30,00,00,00,00,\
  00
"PortsInternetAvailable"="Y"
"UseInternetPorts"="Y"

Bron: http://forums.isaserver.org/m_410001100/mpage_1/key_/tm.htm#2002017878

Add Custom Fields to VI Client with Powershell (Samples)


Hugo Peeters heeft zijn Powershell scripts voor het vullen van Custom Fields in vCenter gepost:

Snapshot Count

I already showed you how to do this, but I have now added an IF-statement so that only changes are updated (equal values are not overwritten). And I have added Julian Wood’s correction. Add-VMSnapshotCount.ps1

Total Snapshot Size

The number of snapshots is quite inetresting, but even more interesting, is the total size of the delta files all snapshots are occupying. They might be eating up all your precious SAN space. Plus, reverting to or committing a large snapshot is tricky. Add-VMSnapshotSize.ps1

Host Hardware Model

Want to see what models of hardware you are using in your datacenter? You could look at the summary tab of each host. Or run this script to add the info to the every Hosts tab in the VI Client. Select your Datacenter, select the Hosts tab and enjoy! Add-VMHostModel.ps1

Host ESX Version

Did you update all your ESX Servers to the latest version? Check it quickly using this script. Add-VMHostVersion.ps1

Host LUN Count

Last but certainly not least: are you sure every datastore you are using is available to all your ESX Servers? It is visible at a glance when you add the LUN Count to your VI Client! Add-VMHostLUNCount.ps1


Check zijn site voor allerlei top Powershell scripts: http://www.peetersonline.nl/


Bron: http://www.peetersonline.nl/index.php/vmware/add-custom-fields-to-vi-client-with-powershell-samples/

Script: Defrag all Local VMDK’s.


powerShellIcon

De volgende function zoekt eerst alle *.VMX bestanden op en vervangt daarna de extentie *.VMX naar *.VMDK. Deze *.VMDK bestanden worden in de $List geplaatst. Daarna worden alle VMDK’s gedefragmenteerd via de vmware-vdiskmanager.exe.

function Defrag-allVMDKs{
param([string]$path)
$vdiskmanager = “C:\Program Files\VMware\VMware Workstation\vmware-vdiskmanager.exe”
$parameter = “-d”
$List = get-childitem $path -recurse | where {$_.extension -eq “.vmx”} |
foreach-object -process { $_.FullName } | ForEach-Object {$_ -replace “.vmx”, “.vmdk”}
ForEach($vmdk in $List)
{
echo $vmdk
& $vdiskmanager $parameter $vmdk
}
}

Via het volgende commando kun de bovenstaande function gebruiken.

Defrag-allVMDKs <drive>\<path>

Als je dit in de Shell uitvoerd ziet het er als volgt uit:

image

VMware: Snapshot Information in vCenter


 image

Hugo Peeters heeft een powershell script gemaakt welke het aantal snapshots laat zien in een custom field binnen vCenter.

Although I spend quite some time in the Powershell Command Line Interface, the main tool for managing the Virtual Infrastructure remains the VI Client. So wouldn’t it be great if we could somehow show the results of our Powershell VI Toolkit scripts inside the VI Client?
Well, we can! Let’s take a closer look at Custom Fields / Custom Attributes.
If you select either a VMHost (ESX Server) or a VM in the VI Client and open the Summary tab, you will see the Annotations section in the bottom left. When you click Edit, I’m sure you have used the Notes section to enter Descriptions. But have you ever used the Attributes section? Here you can manually add and remove custom attributes and their values. Go ahead and create one. Then select a cluster or datacenter and click the Hosts or Virtual Machines tab. You will notice you can display your custom attribute in this table view, just like all the other properties of your VMs / Hosts. Pretty sweet!
image

Voor meer info zie Hugo zijn post: http://www.peetersonline.nl/index.php/vmware/add-snapshot-information-to-the-vi-client-using-powershell/

Script: Backup VMware Workstation VM’s


Via het onderstaande script kun je redelijk eenvoudig een backup maken van je VMware Workstation VM’s. Mocht de VM nog actief zijn, dan wordt deze “netjes” afgesloten en vervolgens gekopieerd naar een directory op een netwerk share. Dit script heb ik geschreven voor een VM die bij ons in productie draait onder VMware Workstation (deze VM heeft een seriële modem aangekoppeld). Zo wordt er elke dag via een scheduled task een backup gemaakt.

De volgende parameters moet je meegeven aan de onderstaande function backup-wsvm:

  • $vmname – de naam van de VM.
  • $vmx – pad naar het vmx bestand.
  • $vmdir – de directory waarin de VM staat.
  • $vmbackup – de directory waar de VM naar toe gekopieerd moet worden.

function backup-wsvm{
  param([string]$vmname, [string]$vmx, [string]$vmdir, [string]$vmbackup)
 
  $driveltr = “v:”
  $share = \\server\share
  $date = get-date -uformat “%m-%d-%Y”
  $vmrun = “C:\Program Files\VMware\VMware Workstation\vmrun.exe”
  $stop = “stop”
  $start = “start”
  $soft = “soft”
  $Result = test-path -path “$vmbackup\$date\$vmname”

  if ($Result -eq $false)
  {
    net use $driveltr $share
    New-Item “$vmbackup\$date\$vmname” -type directory
        & $vmrun $stop $vmx $soft
            Copy-Item $vmdir $vmbackup\$date\ -recurse
                & $vmrun $start $vmx
                    net use $driveltr /Delete
   }
}

Daarna kun je via de volgende code een backup maken van je vm:

$vmname = “Powershell_Lab”
backup-wsvm “$vmname” “D:\vmware\$vmname\$vmname.vmx” “D:\vmware\$vmname” “V:\vmbackup”

How To: Schedule a Powershell script with Scheduled Task


In deze post lees je hoe je een Powershell script kunt schedulen via Windows Scheduled Tasks.

Start de Scheduled Task Wizard.

image

Klik op Browse… en voeg het onderstaande commando in:

%SystemRoot%\system32\WindowsPowerShell\v1.0\powershell.exe

image

Nadat de wizard klaar is, vink je Open advanced properties for this task when I click Finish aan. Daarna voeg je het volgende toe aan het Run veld: -command D:\Scripts\backupwsvm.ps1

image

Vervolgens druk je op OK om de task op te slaan.

Mocht je een Powershell script scheduled die gebruik maakt van de VI Toolkit. Dan moet je de onderstaande code toevoegen aan je script.

#ADD VMWARE PSSNAPIN
Add-PSSnapin -Name “VMware.VimAutomation.Core”

#FORCE TO LOAD VMWARE POWERSHELL PLUGIN
[Reflection.Assembly]::LoadWithPartialName(“vmware.vim”)

VMware: Set VMware TimeSync option with the VI Toolkit


Ik was vandaag even met Gabrie van Zanten (http://www.gabesvirtualworld.com/) aan het brainstormen over het aanpassen van de Time synchronization optie, binnen de VMware Tools via de VI Toolkit.

image

Dit is uiteindelijk gelukt (met een beetje hulp van Niket en LucD http://communities.vmware.com/message/1106816).

Je kunt het script op twee manieren gebruiken:

Het aan of uitzetten van deze optie op alle VM’s kan via het onderstaande script.

$vCenter = ”

Connect-VIServer $vCenter

[Reflection.Assembly]::LoadWithPartialName("vmware.vim")

$vmConfigSpec = New-Object VMware.Vim.VirtualMachineConfigSpec
$vmConfigSpec.Tools = New-Object VMware.Vim.ToolsConfigInfo
$vmConfigSpec.Tools.SyncTimeWithHost = $True (or $False if you want to disable it)

Get-VM | % { (Get-View $_.ID).ReconfigVM($vmConfigSpec)} # For al VMs

Disconnect-VIServer -Confirm:$False


Wil je dit op een specifieke VM uitvoeren dan gebruik je de volgende Get-VM regel:

Get-VM -Name $vmname | % { (Get-View $_.ID).ReconfigVM($vmConfigSpec)} # VM with name vmname.

Je moet alleen dan wel de variable $vmname aanmaken.

Via het volgende commando kun je de actie controleren.

Get-VM | Get-View | %{Write-Host $_.Name $_.Config.Tools.syncTimeWithHost}