PowerCLI: Check Partition Alignment (Windows VMs Only)


image

Some time ago I  already created a script to report the disk alignment status of your Windows VM’s. I updated the script so you are able to export it to a CSV or XML file.

$myCol = @()
$vms = get-vm | where {$_.PowerState -eq "PoweredOn" -and `
$_.Guest.OSFullName -match "Microsoft Windows*" } | Sort Name 

foreach($vm in $vms){
$wmi = get-wmiobject -class "Win32_DiskPartition" `
-namespace "root\CIMV2" -ComputerName $vm            

    foreach ($objItem in $wmi){
        $Details = "" | Select-Object VMName, Partition, Status        
            if ($objItem.StartingOffset -eq "65536"){
                $Details.VMName = $objItem.SystemName
                   $Details.Partition = $objItem.Name
                $Details.Status = "Partition aligned"
            }
            else{
                $Details.VMName = $objItem.SystemName
                   $Details.Partition = $objItem.Name
                $Details.Status = "Partition NOT aligned"                    
            }
    $myCol += $Details
    }
}
$myCol | Export-Csv -NoTypeInformation "C:\Temp\PartitionAlignment.csv"
#$myCol | Export-Clixml "C:\Temp\PartitionAlignment.xml"


The script uses WMI to gather the information about the partition of the Windows VM. So if you’re using a Firewall, be sure to open the right ports. More info about WMI and Firewalls, can be found over here: http://msdn.microsoft.com/en-us/library/aa822854%28VS.85%29.aspx

The output will look like this:

image

Powershell: Export Installed Software to Excel


image

I created the next script to inventory the installed software on my servers. The only thing you need to create is a text file with all your servers in it and save it to Servers.txt.

#Create a new Excel object using COM
$Excel = New-Object -ComObject Excel.Application
$Excel.visible = $True
$Excel.SheetsInNewWorkbook = @(get-content "C:\Scripts\PS\Servers.txt").count

#Counter variable for rows
$i = 1

#Read thru the contents of the Servers.txt file
foreach ($server in get-content "C:\Scripts\PS\Servers.txt")
{
    $Excel = $Excel.Workbooks.Add()
    $Sheet = $Excel.Worksheets.Item($i++)
    $Sheet.Name = $server

    $intRow = 1

    # Send a ping to verify if the Server is online or not.
    $ping = Get-WmiObject `
    -query "SELECT * FROM Win32_PingStatus WHERE Address = '$server'"
       if ($Ping.StatusCode -eq 0) {

         #Create column headers
         $Sheet.Cells.Item($intRow,1) = "NAME:"
         $Sheet.Cells.Item($intRow,2) = $server.ToUpper()
         $Sheet.Cells.Item($intRow,1).Font.Bold = $True
         $Sheet.Cells.Item($intRow,2).Font.Bold = $True

         $intRow++

         $Sheet.Cells.Item($intRow,1) = "APPLICATION"
         $Sheet.Cells.Item($intRow,2) = "VERSION"

             #Format the column headers
             for ($col = 1; $col –le 2; $col++)
             {
                  $Sheet.Cells.Item($intRow,$col).Font.Bold = $True
                  $Sheet.Cells.Item($intRow,$col).Interior.ColorIndex = 48
                  $Sheet.Cells.Item($intRow,$col).Font.ColorIndex = 34
             }

             $intRow++

             $software = Get-WmiObject `
             -ComputerName $server -Class Win32_Product | Sort-Object Name 

             #Formatting using Excel

             foreach ($objItem in $software){
                $Sheet.Cells.Item($intRow, 1) = $objItem.Name
                $Sheet.Cells.Item($intRow, 2) = $objItem.Version

                   $intRow ++
             }

        $Sheet.UsedRange.EntireColumn.AutoFit()
    }
}

Clear

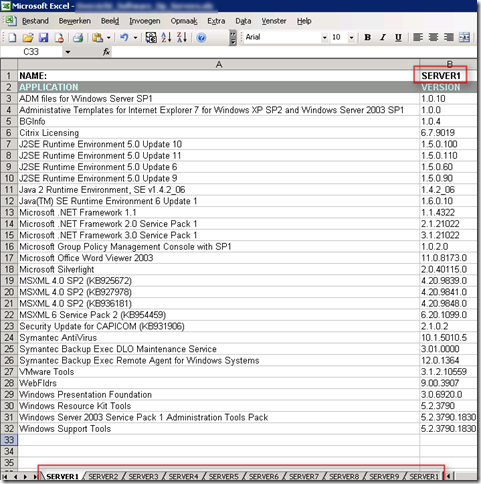
The following Excel file will be created. For each server in Servers.txt, there will be added a worksheet with the name of the server.

image

Powershell: Remove a Folder from every Home Directory


image

I had to remove a folder from every home directory. So I thought this is a nice thing to do with Powershell.

So I created the Remove-Folder function to do this for me :-).

The function will go through the following steps:

The begin part will browse to all the folders within the E:\users and export the full path to a CSV file. The path will look like this: E:\users\username\test\foldername.

In the process part it will remove all the folders which are saved in the CSV file.

Warning: The folders will be removed without a warning. So be sure you want to do this!!

function Remove-Folder{
    param($path,$folder)

    Begin{
        Get-Childitem $path -Recurse `
        | Where-Object { $_.Name -eq $folder } `
        | Select FullName `
        | Export-Csv -NoTypeInformation "$env:temp\remove.csv"
    }
    
    Process{
        $import = Import-Csv "$env:temp\remove.csv"
        foreach($folder in $import){
            Remove-Item $folder.FullName -Recurse -Force
        }
    Remove-Item "$env:temp\remove.csv"
    }
}

You can use the function with the following command:

Remove-Folder E:\users foldername

Via the following one-liner, you can validate the removal job:

Get-Childitem E:\users -Recurse `
| Where-Object { $_.Name -eq "foldername" } `
| Select FullName `
| Export-Csv -NoTypeInformation "$env:temp\remove.csv" 

Open the remove.csv file to verify the changes.

Powershell: Delete a Folder of a Particular Age


image

I created this script to delete a folder which is older than two days. I needed this for a simple backup solution. I have a Powershell script that will backup a VM which runs in VMware Workstation. This script runs everyday and creates a folder with a date stamp. After a couple weeks there where a lot of copies of the particular VM and the free space of the backup hard disk became very low.

This script will remove all folders in the D:\vmbackup folder which are older then 2 days.

$Now = Get-Date
$Days = "2"
$TargetFolder = "D:\vmbackup"
$LastWrite = $Now.AddDays(-$Days)

$Folders = get-childitem -path $TargetFolder | 
Where {$_.psIsContainer -eq $true} | 
Where {$_.LastWriteTime -le "$LastWrite"} 

    foreach ($Folder in $Folders)
    {
    write-host "Deleting $Folder" -foregroundcolor "Red"
    Remove-Item $Folder -recurse -Confirm:$false
    }

Found New Hardware Wizard Loop


image

After upgrading one of my VM’s to vSphere (Hardware / VMware Tools). I get the following wizard over and over again.

image

After a search on google I found out that there are two topics on the VMware communities:

I found the following “Solution”:

I have this problem too. If you check Device Manager, you’ll probably see what I see – 32 PCI-to-PCI bridges! Sadly, there’s apparently no way to prevent Windows from showing the New Hardware Wizard if the already-installed driver is unsigned (which the Fusion beta drivers are). So just go through it 32 times.

It’s true, after installing over and over again, the wizard stops popping up :-D. The weird thing is that this “bug” only appears on one of my VM’s. So I hope it will never popup again.

Powershell: Get-SubFolderSize


image 

On every home directory will be a  folder called Files. I was curious how big these folders are. So this is why I created the following Powershell script:

function Get-Foldersize{
  param([string]$StartFolder,
        [string]$SubFolder)
  
  $Dirs = Get-ChildItem -path $StartFolder\* -Recurse -Include $SubFolder 
    
  foreach($Dir in $Dirs){
  $objFSO = New-Object -com  Scripting.FileSystemObject
  "$Dir = " + "{0:N2}" -f (($objFSO.GetFolder("$Dir").Size) / 1MB) + " MB" 
  }
}

Get-FolderSize C:\Users Files


The output of the script will look like this:

image

Here are some pictures (as hard evidence 😉 ) of the folder properties:

image

Source: http://www.microsoft.com/technet/scriptcenter/

Windows: Terminal Server and connected Terminal Services clients pause when a Terminal Services client logs on or logs off


De laatste weken ben ik samen met Aleks Nikolić van Virtualistic.nl bezig met het troubleshooten van verschilende TS problemen. Tijdens de zoektocht naar mogelijke oplossingen kwamen uit op KB324446.

In KB324446 wordt het volgende geschreven:

When a Terminal Services client logs on or logs off (either in a session or on the console of the Terminal server), the Microsoft Windows Server 2003-based or the Microsoft Windows 2000-based Terminal server together with the connected Terminal Services client computers may stop responding or may pause for several seconds. Users may also experience one or more of the follow symptoms:

  • When a user types in a document, characters do not appear on the screen until this pause has ended.
  • Keyboard input and mouse input are queued, but they are not processed until this pause has ended.
  • Live performance monitoring (Perfmon) graphs have missing data points during this pause.
  • All running programs appear to stop responding, or “hang,” during this pause.
  • When Spooler is under a load from a large number of users, a high CPU usage is displayed for it.

Als je een Terminal server hebt met twee voedingen (wat wel gebruikelijk is volgens mij) dan moet je zeker de volgende change doorvoeren: Deze optie moet je alleen instellen als je raidcontroller een battery-backup cache module heeft (thanks Sven).

Zet het vinkje aan bij “Enable advanced performance”

image

Nadat de bovenstaande settings zijn doorgevoerd, moeten er ook nog een aantal registry keys aangepast worden. Namelijk de volgende:

Note This section applies to both Windows Server 2003 and to Windows 2000.

  • In the HKLM\SYSTEM\CurrentControlSet\Services\Lanmanserver\Parameters subkey,
  • configure the following entries:
    • Name: MaxWorkItems
      Data Type: REG_DWORD
      Value data: 8192 (decimal)
    • Name: MaxMpxCt
      Data Type: REG_DWORD
      Value data: 2048 (decimal)
    • Name: MaxRawWorkItems
      Data Type: REG_DWORD
      Value data: 512 (decimal)
    • Name: MaxFreeConnections
      Data Type: REG_DWORD
      Value data: 100 (decimal)
    • Name: MinFreeConnections
      Data Type: REG_DWORD
      Value data: 32 (decimal)
  • In the HKLM\SYSTEM\CurrentControlSet\Services\Lanmanworkstation\Parameters subkey, configure the following entry:
    • Name: MaxCmds
      Data Type: REG_DWORD
      Value data: 2048 (decimal)
  • By default, your registry does not have a Configuration Manager subkey. To create the key, locate and then right-click the following subkey:HKEY_LOCAL_MACHINE\System\CurrentControlSet\Control\Session ManagerPoint to New, and then click Key. Type Configuration Manager, and then press ENTER.
    In the new HKEY_LOCAL_MACHINE\System\CurrentControlSet\Control\Session Manager\Configuration Manager subkey, configure the following entry:
  • Name: RegistryLazyFlushInterval
    Data Type: REG_DWORD
    Value data: 60 (decimal)

Ik heb deze registry keys even uitgewerkt in de volgende twee files:

LanManServerTuning_KB32446.reg

Windows Registry Editor Version 5.00[HKEY_LOCAL_MACHINE\SYSTEM\CurrentControlSet\Services\lanmanserver\parameters]
“MaxWorkitems”=dword:00002000
“MaxMpxCt”=dword:00000800
“MaxRawWorkItems”=dword:00000200
“MaxFreeConnections”=dword:00000064
“MinFreeConnections”=dword:00000020

KB32446_Extra.reg

Windows Registry Editor Version 5.00[HKEY_LOCAL_MACHINE\SYSTEM\CurrentControlSet\Control\Session Manager\Configuration Manager]
“RegistryLazyFlushInterval “=dword:0000003c

Nadat je alle changes hebt doorgevoerd, moet je de server opnieuw op starten.

Event ID 1003: Error Code 00000019, parameter1 00000020


Vandaag klapte er een Citrix Terminal server uit ons farm met een BSOD als gevolg. Na een herstart van de server vond ik de onderstaande eventlog entry:

image

Nadat de server opnieuw was opgestart kwam er ook een melding, dat er een mini-dump was aangemaakt. Deze wilde ik gaan debuggen en kwam toen uit op de volgende site: http://www.microsoft.com/whdc/devtools/debugging/debugstart.mspx

Op de pagina staan ook de download links voor de debug tools. Je kunt ze ook hier vinden:

Nadat je de software hebt geïnstalleerd, open  een commandprompt en blader naar de onderstaande directory:

C:\Program Files\Debugging Tools for Windows (x86)>

Voer daarna het volgende commando uit:

windbg -y srv*c:\symbols*http://msdl.microsoft.com/download/symbols -i c:\windows\i386
-z C:\dump11112008_1150\Mini111108-01.dmp achter de –z optie zet je het pad naar je dmp file.

Het volgende scherm word gestart:

image

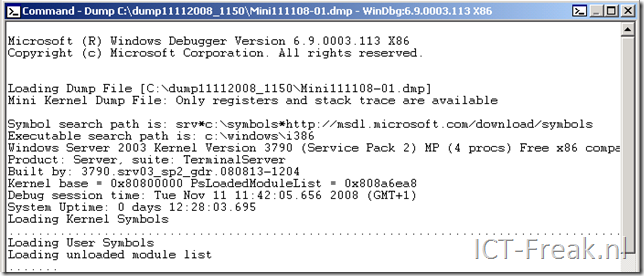
Even later zie je de Bugcheck Analysis:

image

Uit CTX115626 haal ik de volgende quote:

This hotfix rollup pack also contains all fixes included in Hotfix Rollup Pack 1, Hotfix Rollup Pack 2 , plus the following fixes that shipped since the release of Hotfix Rollup Pack 2:

  1. Servers might experience a fatal exception on vdtw30.dll.

    [From PSE450R02W2K3001][#170153]

Dat word dus Hotfix Rollup pack 3 installeren. Nu hopen dat dit zonder al te grote gevolgen blijft.

Script: Powershell script for changing the AD Home Dir and Drive


image 

Stel je bent midden in een migratie naar een andere fileserver of naar bijvoorbeeld een NetApp filer. Daarnaast wil je ook alle Home directory’s migreren. Dit houdt in dat je ook de Active Directory moet aanpassen.  Dit kun je op verschillende manieren doen. Ik heb gekozen om eens te kijken naar de Quest ActiveRoles addin voor Powershell en dat bleek behoorlijk krachtig te zij, zoals je kunt zien in het onderstaande scriptje:

image

Voordat je dit script kunt gebruiken heb je een PC nodig die lid is van het domain, PowerShell en de Quest AD cmd-lets geïnstalleerd heeft. Daarna kun je het script als volgt uitvoeren:

PS Scriptdir> .\Change_Home_Dir_drive.ps1

image

Daarna kun je in de Active Directory nakijken of het script succesvol heeft gelopen.

image

EventID: 213 LicenseService


Het kan zijn dat je de volgende error krijgt in de eventvwr.msc.

image

Na wat googlen kwam ik het volgende KB artikel tegen: KB296681 In dit artikel wordt stap voor stap uitgelegd hoe je dit kunt herstellen.

Stap 1: open Active Directory Sites and Services en selecteer vervolgens de site waar de server zich bevind. Klik daarna op Licensing Site Settings.

image

In dit geval was de Computer en het Domain invalid. Deze heb ik aangepast en na de eerst volgende replicatie mag de foutmelding niet meer voor mogen komen.

image