Veeam: Bitlooker & Powershell


In this post I will share some Powershell code to enable or disable the feature BitLooker for your Veeam jobs. Since Bitlooker is a “new” feature you have to enable it on your jobs that are created before you installed Veeam v9 or higher. I my case we are running Veeam Backup for quite some years now, so we had to enable this feature on hundreds of jobs. Once again Powershell to the rescue.

Bur first things first, what is Bitlooker?

With this option enabled, Veeam Backup & Replication performs the following operations during the job session:

  1. Veeam Backup & Replication accesses the MFT file on the VM guest OS to identify deleted file blocks, and zeros out these blocks.
  2. Veeam Backup & Replication processes and transports data blocks of the VM image in the following manner:
  • If a data block of the VM image contains only the deleted file blocks, Veeam Backup & Replication does not read this data block from the source datastore.
  • If a data block of the VM image contains zeroed out blocks and other data, Veeam Backup & Replication copies this block to the target. Due to data compression, data blocks that are marked as deleted are compressed, and the size of the resulting backup or replica file reduces.

source: https://helpcenter.veeam.com/docs/backup/vsphere/dirty_blocks.html?ver=95

You can find the Exclude delete file blocks option in the job configuration wizard under Storage – Advanced – Storage. This option is enabled by default if you configured the job after you installed Veeam v9 but is disabled on jobs created before the installation or upgrade to Veeam v9. See the screenshot below:

image

Well that’s great this new option but I need to configure this setting for hundreds or maybe even more jobs. Is this possible via Powershell? On the Veeam forum you can find a sample script written by v.Eremin. This script will enable this setting right away with no interaction to the user. I wanted to create a script so I was able to see which jobs needs to be configured. So I came up with the following script:

Add-PSSnapin VeeamPSSnapIn

Connect-VBRServer -Server VEEAM-SRV01.DOMAIN.LOCAL

$BitlookerInfo = @()
$AllVbrJobs = Get-VBRJob
$AllVbrJobsCount = ($AllVbrJobs | Measure).Count
$VeeamBackupServer = (Get-VBRLocalhost | Select -ExpandProperty Name).ToUpper()
Write-Output "Checking Veeam Server: $($VeeamBackupServer) ..."
Write-Output ''
$AllVbrJobsDirtyBlocksNullingDisabled = $AllVbrJobs | ?{$_.Options.ViSourceOptions.DirtyBlocksNullingEnabled -eq $False}
$AllVbrJobsDirtyBlocksNullingDisabled | %{
    $BitlookerInfo += New-Object PSCustomObject -Property @{
        BackupServer = $VeeamBackupServer
        Name = $_.Name
        ExcludeDeletedFileBlocks = $_.Options.ViSourceOptions.DirtyBlocksNullingEnabled
    }

    foreach($job in $BitlookerInfo){
        $vbrjob = Get-VBRJob -Name $job.Name
        Write-Output "Job: $($vbrjob.Name)"
        $options = $vbrjob.GetOptions()
        $options.ViSourceOptions.DirtyBlocksNullingEnabled = $true
        $vbrjob.SetOptions($options)
    }

}

$AllBitlookerDisabledJobsCount = ($BitlookerInfo | Measure).Count
Write-Output "Total Veeam jobs: $($AllVbrJobsCount)"
Write-Output "Total Veeam jobs where Bitlooker is enabled: $($AllBitlookerDisabledJobsCount)"
Write-Output ''
$BitlookerInfo | Sort Name | ft -AutoSize

Disconnect-VBRServer

This is the output of the script:

Checking Veeam Server: VEEAM-SRV01.DOMAIN.LOCAL …

Total Veeam jobs: 2
Total Veeam jobs where Bitlooker is enabled: 1

Name              BackupServer                              ExcludeDeletedFileBlocks
—-                   ————                                      ————————
Demo-Job-01 VEEAM-SRV01.DOMAIN.LOCAL    False

You can add a for each loop to loop through the Veeam Backup & Replication servers you configured. This will look like this:

Add-PSSnapin VeeamPSSnapIn $AllVeeamServers = @("VEEAM-SRV01.DOMAIN.LOCAL","VEEAM-SRV02.DOMAIN.LOCAL","VEEAM-SRV03.DOMAIN.LOCAL","VEEAM-SRV04.DOMAIN.LOCAL") foreach($VeeamServer in $AllVeeamServers){ Connect-VBRServer -Server $VeeamServer $BitlookerInfo = @() $AllVbrJobs = Get-VBRJob $AllVbrJobsCount = ($AllVbrJobs | Measure).Count $VeeamBackupServer = (Get-VBRLocalhost | Select -ExpandProperty Name).ToUpper() Write-Output "Checking Veeam Server: $($VeeamBackupServer) ..." Write-Output '' $AllVbrJobsDirtyBlocksNullingDisabled = $AllVbrJobs | ?{$_.Options.ViSourceOptions.DirtyBlocksNullingEnabled -eq $False} $AllVbrJobsDirtyBlocksNullingDisabled | %{ $BitlookerInfo += New-Object PSCustomObject -Property @{ BackupServer = $VeeamBackupServer Name = $_.Name ExcludeDeletedFileBlocks = $_.Options.ViSourceOptions.DirtyBlocksNullingEnabled } foreach($job in $BitlookerInfo){ $vbrjob = Get-VBRJob -Name $job.Name Write-Output "Job: $($vbrjob.Name)" $options = $vbrjob.GetOptions() $options.ViSourceOptions.DirtyBlocksNullingEnabled = $true $vbrjob.SetOptions($options) } } $AllBitlookerDisabledJobsCount = ($BitlookerInfo | Measure).Count Write-Output "Total Veeam jobs: $($AllVbrJobsCount)" Write-Output "Total Veeam jobs where Bitlooker is enabled: $($AllBitlookerDisabledJobsCount)" Write-Output '' $BitlookerInfo | Sort Name | ft -AutoSize Disconnect-VBRServer }

Powershell: Veeam Cloud Connect total virtual machines report


The PowerShell script below helps you to create a simple overview of your Veeam Cloud Connect environment. The environment where this script is developed in consist of two Veeam Cloud Connect Backup servers. The first server will be used for the Cloud Connect Backup solution and the second server will be used for the Cloud Connect Replica server. To connect to these servers we use the Connect-VBRServer cmdlet. I personally love this new cmdlet. It just works like the Connect-VIServer cmdlet. The script will get all the Cloud Tenants and gathers usage information, for Backup tenants only, and will return the total number of virtual machines. At the end of the script all the information will be bundled into a html report. This report will be send to the recipients defined in the $MailReportTo variable.

Add-PSSnapin VeeamPSSnapIn
$AllVccServers = @("vccr-bs01.lab.loc","vccb-bs01.lab.loc")

$MailReportTo = @("user1@domain.com","user2@doman.com")
$MailReportSubject = "Veeam Cloud Connect - Total virtual machines report"
$MailReportFrom = "$(hostname)@domain.com"
$MailReportSmtpServer = "smtp.domain.com"

$VeeamTenantInfo = @()
foreach($VccBackupServer in $AllVccBackupServers){
    Write-Output "Connecting to Veeam Cloud Connect Backup Server $($VccBackupServer)"
    Connect-VBRServer -Server $VccBackupServer

    foreach($VBRCloudTenant in (Get-VBRCloudTenant | Sort Name)){
        
        $RepositoryQuota = $([math]::Truncate($VBRCloudTenant.Resources.RepositoryQuota / 1024))
        $UsedSpace = $([math]::Truncate($VBRCloudTenant.Resources.UsedSpace / 1024))
        $UsedSpacePercentage = $VBRCloudTenant.Resources.UsedSpacePercentage
        $Repository = $VBRCloudTenant.Resources.Repository.name
        $Leaseperiod = $VBRCloudTenant.LeaseExpirationDate


        if($Repository -eq $null -and $VBRCloudTenant.ReplicaCount -ne 0){
            $UsedSpace = 0
            $Repository = 0
            $RepositoryQuota = 0
            $UsedSpacePercentage = 0
            $Repository = "n.a."
        }
        
        if($Leaseperiod -eq $null){
            $Leaseperiod = "n.a."
        }

        $VeeamTenantInfo += New-Object PSObject -Property ([ordered]@{
            User = $VBRCloudTenant.Name
            Enabled = $VBRCloudTenant.Enabled
            VMCount = $VBRCloudTenant.VMCount
            ReplicaCount = $VBRCloudTenant.ReplicaCount
            RepositoryQuota = $RepositoryQuota
            UsedSpace = $UsedSpace
            UsedSpacePercentage = $UsedSpacePercentage
            Repository = $Repository 
            LeaseExpirationEnabled = $VBRCloudTenant.LeaseExpirationEnabled
            LeaseExpirationDate = $Leaseperiod
        })
    }
    Disconnect-VBRserver
}

$html = "<html><body><h1>Veeam Cloud Connect</h1><table border=1 cellspacing=0 cellpadding=3>"
$html += "<html><body><h2>Cloud Connect Server: $((hostname).ToUpper())</h2><table border=1 cellspacing=0 cellpadding=3>"
$html += "<html><body><h3>Usage report generated on $(Get-Date -Format g)</h3><table border=1 cellspacing=0 cellpadding=3>"
$html += "<tr>"
$html += "<th>User</th>"
$html += "<th>Enabled</th>"
$html += "<th>VMCount</th>"
$html += "<th>ReplicaCount</th>"
$html += "<th>RepositoryQuota in GB</th>"
$html += "<th>UsedSpace in GB</th>"
$html += "<th>UsedSpacePercentage</th>"
$html += "<th>Repository</th>"
$html += "<th>LeaseExpirationEnabled</th>"
$html += "<th>LeaseExpirationDate</th>"
$html += "</tr>"
foreach($veeamTenant in $VeeamTenantInfo){
    $html += "<tr>"
    $html += "<td>$($veeamTenant.User)</td>"
    $html += "<td>$($veeamTenant.Enabled)</td>"
    $html += "<td>$($veeamTenant.VMCount)</td>"
    $html += "<td>$($veeamTenant.ReplicaCount)</td>"
    $html += "<td>$($veeamTenant.RepositoryQuota)</td>"
    $html += "<td>$($veeamTenant.UsedSpace)</td>"
    $html += "<td>$($veeamTenant.UsedSpacePercentage)</td>"
    $html += "<td>$($veeamTenant.Repository)</td>"
    $html += "<td>$($veeamTenant.LeaseExpirationEnabled)</td>"
    $html += "<td>$($veeamTenant.LeaseExpirationDate)</td>"
    $html += "</tr>"
}
$html += "<tr>"
$html += "<td colspan=2><b>Totaal</b></td>"
$html += "<td>$(($VeeamTenantInfo.VMCount | Measure -Sum).sum)</td>"
$html += "<td>$(($VeeamTenantInfo.ReplicaCount | Measure -Sum).sum)</td>"
$html += "<td>$(($VeeamTenantInfo.RepositoryQuota | Measure -Sum).sum)</td>"
$html += "<td>$(($VeeamTenantInfo.UsedSpace | Measure -Sum).sum)</td>"
$html += "<td></td>"
$html += "</tr>"
$html += "</table></body></html>"

$ScriptBaseName = ((gci ([string]$MyInvocation.InvocationName)).FullName) -replace "\.ps1$", ''
$html | Out-File "$($ScriptBaseName)_$(Get-date -Format yyyyMM).log.html"

try{
    if ($MailReportTo -eq $null){ throw [Exception]"No To address specified" }
    if ($MailReportSubject -eq $null) { throw [Exception]"No Subject specified" }
    if ($MailReportFrom -eq $null){ throw [Exception]"No From address specified" }
    if ($MailReportSmtpServer -eq $null) { throw [Exception]"No Smtp server specified" }
    Send-MailMessage -BodyAsHtml -Body $html -From $MailReportFrom -SmtpServer $MailReportSmtpServer -To $MailReportTo -Subject $MailReportSubject
    Write-Output "Mail message sent to $MailReportTo"
}
catch
{
    Write-Error "Error sending mail: $($_.Exception.Message)."
}

The report will look like this:

image

If you don’t want to use the html report. Use the code below to generate the report directly in the Powershell console.

Add-PSSnapin VeeamPSSnapIn
$AllVccServers = @("vccr-bs01.lab.loc","vccb-bs01.lab.loc")

$VeeamTenantInfo = @()
foreach($VccBackupServer in $AllVccBackupServers){
    Write-Output "Connecting to Veeam Cloud Connect Backup Server $($VccBackupServer)"
    Connect-VBRServer -Server $VccBackupServer

    foreach($VBRCloudTenant in (Get-VBRCloudTenant | Sort Name)){
        
        $RepositoryQuota = $([math]::Truncate($VBRCloudTenant.Resources.RepositoryQuota / 1024))
        $UsedSpace = $([math]::Truncate($VBRCloudTenant.Resources.UsedSpace / 1024))
        $UsedSpacePercentage = $VBRCloudTenant.Resources.UsedSpacePercentage
        $Repository = $VBRCloudTenant.Resources.Repository.name
        $Leaseperiod = $VBRCloudTenant.LeaseExpirationDate


        if($Repository -eq $null -and $VBRCloudTenant.ReplicaCount -ne 0){
            $UsedSpace = 0
            $Repository = 0
            $RepositoryQuota = 0
            $UsedSpacePercentage = 0
            $Repository = "n.a."
        }
        
        if($Leaseperiod -eq $null){
            $Leaseperiod = "n.a."
        }

        $VeeamTenantInfo += New-Object PSObject -Property ([ordered]@{
            User = $VBRCloudTenant.Name
            Enabled = $VBRCloudTenant.Enabled
            VMCount = $VBRCloudTenant.VMCount
            ReplicaCount = $VBRCloudTenant.ReplicaCount
            RepositoryQuota = $RepositoryQuota
            UsedSpace = $UsedSpace
            UsedSpacePercentage = $UsedSpacePercentage
            Repository = $Repository 
            LeaseExpirationEnabled = $VBRCloudTenant.LeaseExpirationEnabled
            LeaseExpirationDate = $Leaseperiod
        })
    }
    Disconnect-VBRserver
}
$VeeamTenantInfo

Powershell: Return Virtual Machines from PernixData FVP Blacklist


It’s a long time since my last blog post.  So it’s good to be back. In mean time we deployed PernixData FVP and it was fun to play with the Powershell module. 

You can import the PernixData FVP module installed on the PernixData FVP management server via:

Import-Module PrnxCli

This post is not about the Powershell module or how it works. You can check the following post by Byron Schaller.

In this post I want to share a Powershell script that can be used to report all the virtual machines currently added to the PernixData FVP blacklist.

The script below returns all the PernixData FVP clusters and for each cluster it will check the if there are virtual machines added to the Blacklist. If this is true, the script will return those virtual machines.

Import-Module PrnxCli Connect-PrnxServer <PRNXSERVER> $prnxVmBlacklistInfo = @() foreach ($fvpCluster in (Get-PrnxObject -Type FlashCluster | Sort-Object Name)) { Write-Host "Measuring Pernix FVP Cluster: $($fvpCluster.Name)" -ForegroundColor Yellow $BlacklistVMs = Get-PrnxObject -Cluster $fvpCluster.Name -Type "VM" | Where-Object {($_ | Get-PrnxAccelerationPolicy).CachePolicy -eq "Blacklisted"} foreach($vm in $BlacklistVMs){ $BlacklistInfo = New-Object PSObject -Property ([ordered]@{ FVPCluster = $fvpCluster.Name TotalFVPBlacklistVMs = $BlacklistVMs.Count VM = $vm.Name }) $prnxVmBlacklistInfo += $BlacklistInfo } }


$prnxVmBlacklistInfo

$timestamp = get-date -Format HH-mm-ss-dd-MM-yyyy $csv = $env:TEMP + $timestamp + "_PernixDataFVP_Blacklist.CSV" $prnxVmBlacklistInfo | Export-CSV -NoTypeInformation -UseCulture -Path $csv Disconnect-PrnxServer

The script exports the information gathered by the script to a CSV file inside the TEMP directory.

Veeam v7: How to change the Job notification settings with Powershell


In an earlier post you will find a Powershell script to change the VM Notes setting in Veeam Backup. This old script worked for previous version of Veeam Backup and Replication.

image_thumb[2]

In Veeam Backup v7 the Powershell code is a little bit changed so I had to rewrite the script.  The script below will enable the VM notes for a job, if the option is disabled.

if((Get-PSSnapin -Name VeeamPSSnapIn -ErrorAction SilentlyContinue) -eq $null){
    Add-PSSnapin "VeeamPSSnapIn"
}

foreach($vbrjob in (get-vbrjob | Sort Name)){
    $options = $vbrjob.GetOptions()
    if($options.ViSourceOptions.SetResultsToVmNotes -eq $false){
        $options.ViSourceOptions.SetResultsToVmNotes = $true
        Write-Host "Enable set results to VM notes for job $($vbrjob.Name)"    
    }
    $vbrjob.SetOptions($options)
}    

PowerCLI: Copy Datastore Items


In this short post I will show a PowerCLI script I wrote to copy ISO files from datastore y to datastore x. The datastores are in the same vCenter and virtual datacenter accessible but the vSphere hosts are located inside two different IP subnets and a firewall rule prevents to copy files between the two subnets. So I had to think about a work around. Well this one is easy. On the vCenter server I created a script to peform the following steps:

  1. Create two PSDrives for each Datastore
  2. Get al the ISO filenames
  3. Downlad the ISO to the c:\tmp directory from datastore y
  4. Upload the ISO from the C:\tmp directory to the datastore<X>\iso directory
  5. Remove the ISO from C:\tmp
  6. repeat the steps above until all the ISO files are copied to the new datastore.

The PowerCLI script to perform the described tasks:

New-PSDrive -location (get-datastore template-01) -name tpl01 -PSProvider VimDatastore -Root '\'
New-PSDrive -location (get-datastore template-02) -name tpl02 -PSProvider VimDatastore -Root '\'

$isos = ls tpl01:\iso\ | % {$_.Name}
foreach($iso in $isos){
    Write-Host "copy $($iso) to C:\tmp" -fore Yellow
    Copy-DatastoreItem -item tpl01:\iso\$iso -Destination C:\tmp
    
    Write-Host "copy $($iso) to template-02\iso" -fore Yellow
    Copy-DatastoreItem -item C:\tmp\$iso -Destination tpl02:\iso
    
    Write-Host "removing the tmp file $($iso) from C:\tmp" -fore Yellow
    Remove-Item C:\tmp\$iso -confirm:$false
    
    Write-Host "done" -fore Green
}

So once again PowerCLI to the rescue.

Powershell: Veeam B&R – Get total days before the license expires


So it’s time for a new post with some “traditional” Powershell so no snappins from VMware or Veeam. But first some background info. I am working for a Veeam ProPartner  with a Service Provider partner program. in this program Veeam only supplies “temporary licenses” so you have to deal with an expiration date of the license. This also applies to the Veeam NFR licenses for vExperts, VCP, MVP, etc. But how do you get notified when the license is about to expire? Well I don’t know if there is an option for that, maybe in the Enterprise Portal but as far as I know will it only display an error when the license key is expired.

I decided to dive under the hood and tried to find the places where Veeam B&R holds the license information. I couldn’t find the license info with the Veeam Powershell Toolkit. So the next step was to find the info inside the Veeam Backup Database but I couldn’t find it either inside the database. The last step was the right one. The license information is kept inside the Windows registry in the following key:

HKLM\SOFTWARE\VeeaM\Veeam Backup and Replication\license

But the info is saved in a REG_BINARY so it’s harder to extract. But lucky me Tim Dunn wrote a simple one-liner to extract this data. So I added this to my script:

$regBinary = (Get-Item 'HKLM:\SOFTWARE\VeeaM\Veeam Backup and Replication\license').GetValue('Lic1')
$veeamLicInfo = [string]::Join($null, ($regBinary | % { [char][int]$_; }))

The $regBinary variable gets the data from the registry key. The $veeamLicInfo variable converts the $regBinary into human readable lines of text. So now we extracted the license info, we only need write a RegEx to extract the info we need to create a notification e-mail. So take a look at the $pattern variable which will search for:
“EXPIRATION DATE=MM/DD/YYYY”

The $expirationDate variable will execute the RegEx and it saves the first match via [0]. After that the match will be splitted and the the value after the “=” character will be used as the expiration date.

So now we have the expiration date but how do we calculate the remaining days. Well that’s exactly what the code, that fills the $totalDaysLeft variable does.

So here you will find the complete script:

Warning: this script is only tested on Veeam Backup & Replication version 5. So I don’t know if the script will work on version 6 too.

Update: If you want to use the following script with Veeam Backup & Replication v6. You only have to change the $pattern variable to: $pattern = expiration date\=\d{1,2}\/\d{1,2}\/\d{1,4}

Update 2: It’s possible to read the version from the executable. So I created an updated version of the script that works with Veeam v5 and Veeam v6.x.

#http://blogs.msdn.com/b/timid/archive/2011/06/17/stupid-tricks-with-reg-binary-registry-data.aspx <- $regBinary trick
#http://stackoverflow.com/questions/622902/powershell-tips-tricks-for-developers <- regex

$returnStateOK = 0
$returnStateWarning = 1
$returnStateCritical = 2
$returnStateUnknown = 3

$veeamExe = Get-Item 'C:\Program Files\Veeam\Backup and Replication\Veeam.Backup.Manager.exe'
$regBinary = (Get-Item 'HKLM:\SOFTWARE\VeeaM\Veeam Backup and Replication\license').GetValue('Lic1')
$veeamLicInfo = [string]::Join($null, ($regBinary | % { [char][int]$_; }))

if($veeamExe.VersionInfo.ProductVersion -match "6"){
    $pattern = "Expiration date\=\d{1,2}\/\d{1,2}\/\d{1,4}"
}
else{
    $pattern = "EXPIRATION DATE\=\d{1,2}\/\d{1,2}\/\d{1,4}"
}

$expirationDate = [regex]::matches($VeeamLicInfo, $pattern)[0].Value.Split("=")[1]
$totalDaysLeft = ((Get-Date $expirationDate) - (get-date)).Totaldays.toString().split(",")[0]
$totalDaysLeft = [int]$totalDaysLeft

if($totalDaysLeft -gt "14"){
    Write-Host "The Veeam License will expire in $($totalDaysLeft) days"
    exit $returnStateOK 
}
elseif($totalDaysLeft -ge "7"){
    Write-Host "The Veeam License will expire in $($totalDaysLeft) days"
    exit $returnStateWarning 
}
elseif($totalDaysLeft -lt "7"){
    Write-Host "The Veeam License will expire in $($totalDaysLeft) days" 
    exit $returnStateCritical 
}
else{
    Write-Host "Something went wrong...."
    exit $returnStateUnknown 
}

You can change the parameters of the Send-MailMessage and schedule a task op your Veeam server to report the total times left before the license will expire.

Veeam: Module Snapshot poweron failed. Unable to retrieve the current working directory


After performing an Instant Recovery you might get the following error when the VM is trying to power on:

image

After a quick search on the Veeam Forums I found the following topic: http://www.veeam.com/forums/ about the same issue. In this topic I found the following solution to this issue:


Well, finally i get the issue fixed. I think it could be considered a bug. Let me explain.
If i set “F:\” as a vPower NFS destination, the error shows up. But if i set “F:\any_directory”, then all runs perfect!.
Well i write this here to help anybody with the same issue.

So vPowerNFS cannot be pointed directly to the drive letter of a partition. To change this setting you can use registry editor and your mouse, but you can also run the following Powershell script to change this setting:

$vPowerNFSDir = "D:\vPowerNFS\"

if((Test-Path $vPowerNFSDir) -eq $false){
    New-Item $vPowerNFSDir -type directory
}

If((Get-ItemProperty "HKLM:\Software\VeeaM\Veeam Backup and Replication" -name "NFSDefaultRootPath").NFSDefaultRootPath -ne $vPowerNFSDir){
    Set-ItemProperty "HKLM:\Software\VeeaM\Veeam Backup and Replication" -name "NFSDefaultRootPath" -value $vPowerNFSDir
}

if((Get-Service -DisplayName "Veeam Backup Service").Status -eq "Running"){
    Restart-Service -displayname "Veeam Backup Service"
}

if((Get-Service -DisplayName "Veeam vPower NFS Service").Status -eq "Running"){
    Restart-Service -displayname "Veeam vPower NFS Service"
}

The only thing you have to change in this script is the $vPowerNFSDir variable to the correct location of your Veeam Backup & Recovery Server. This script will check if the folder exists, If this is not the case it will create the folder. The next step is to check the Registry key for the correct location. If this is not the case the script will change the Registry for you. The last step is to restart the Veeam Backup Service and the Veeam vPower NFS Service.

Source: http://www.veeam.com/forums/

Veeam: Change Restore points and deleted VMs retention period


If you want to change the amount of restore points and the deleted VMs retention period, you can do this for your backup jobs by hand. But if you need to change a lot of Veeam Backup & Replication Jobs like I needed to do. You can find these settings in the Backup Job properties:

image

If you’re a reader of my blog, you know I like to automate this kind of jobs with Powershell. So I created a function to perform this change for me.

The function:

#requires -pssnapin VeeamPSSnapIn
Function Change-RestorePoints{
<#
.SYNOPSIS
    Change the Backup restore points and deleted VMs retention period
.DESCRIPTION

.NOTES
    Authors: Arne Fokkema
.PARAMETER JobName
    A Backup Job in Veeam Backup & Replication
.PARAMETER RetainDays
    The amount of restore points
.PARAMETER RetainCycles
    The amount of days for Deleted VMs retention period    
.EXAMPLE
    PS> Change-RestorePoints -JobName "Job-01" -RetainDays "21" -RetainCycles "21"
#>
    param(
        [parameter(valuefrompipeline = $true,
            position = 0,
            Mandatory = $true,
            HelpMessage = "Enter a Veeam B&R JobName")]
            $JobName,
        [parameter(valuefrompipeline = $true,
            position = 0,
            Mandatory = $true,
            HelpMessage = "Enter the amount of restore points to keep on disk")]
            $RetainDays,
        [parameter(valuefrompipeline = $true,
            position = 0,
            Mandatory = $true,
            HelpMessage = "Enter a deleted VMs retention period in days")]
            $RetainCycles
    )

    begin{
        $vbrjob = Get-VBRJob  | where {$_.Name -eq $JobName} 
    }
    
    process{
        $options = $vbrjob.GetOptions()
        $options.RetainDays = $RetainDays
        $options.RetainCycles = $RetainCycles
        Write-Host "Changing RetainDays: $($RetainDays) and RetainDays: $($RetainCycles) for job: $($vbrjob.Name)"
        $vbrjob.SetOptions($options)
    }
}

To change a particular job on a Veeam Backup & Replication server you can use the following one-liner:

Change-RestorePoints -JobName "Job-01" -RetainDays "30" -RetainCycles "30"

To change all the jobs on a particular Veeam Backup & Replication Server you can use the following foreach loop:

foreach($job in (Get-VBRJob | Sort Name)){
    Change-RestorePoints -JobName $job.Name -RetainDays "14" -RetainCycles "14"
}

The output will look like this:

image

Veeam: How to change the Job notification settings with Powershell


Today just a quick post about how Powershell can help you change the VM attribute option in Veeam Backup & Replication. Imaging that you have 20 backup jobs and you want or need to change the VM attribute settings. You can do this for every job with 10 mouse clicks or you can do it in five seconds by running the script from this post.

This is the setting I am talking about from the GUI:

image

When you change the “Notes” value to some custom field in you environment, the script will apply this setting for you.

if((Get-PSSnapin -Name VeeamPSSnapIn -ErrorAction SilentlyContinue) -eq $null){
    Add-PSSnapin "VeeamPSSnapIn"
}

$vbrserver = Get-VBRServer | Where {$_.Type -eq "VC"}
Foreach($vbrjob in (Get-VBRJob)){    
    $options = $vbrjob.GetOptions()
    $options.VmAttributeName = "Notes"
    $options.SetResultsToVmNotes = $true
    $vbrjob.SetOptions($options)
}

The first three lines of code checked if the VeeamPSSnapIn is loaded, if this is not the case it will be loaded via the Add-PSSnapin.

  • The backup options will be loaded via the .GetOptions() method.
  • VmAttibuteName is the value which you normally enter in the attribute field.
  • SetResultsToVmNotes is the checkbox to enable this setting.
  • via .SetOptions() method you can apply the new settings.

Veeam: Change the Veeam Storage Optimization with Powershell


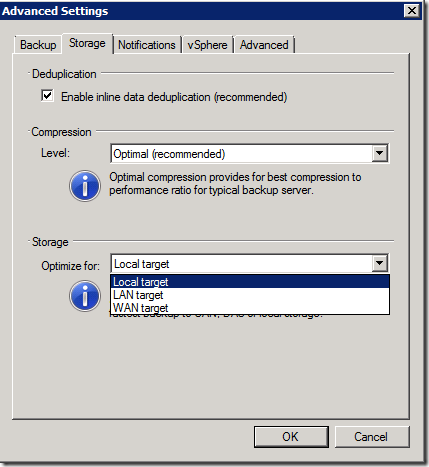
In Veeam Backup and Replication you can choose three different types of Storage optimization.

image

See the blog post on the Veeam website for more info: http://www.veeam.com/blog

From @gostev I received the following tip:

Note that storage optimization will not take effect until next full backup. Setting is used for newly created backup storage only.

There is no standard cmdlet to change this settings, so we have to find the property of the Storage optimization settings. With some trial and error I found the stgBlockSize property. This property can be found inside the vbrjob options.

You can view this properties via:

$vbrjob = Get-VBRJob | where {$_.Name -eq "<vbrjobname>"}
$options = $vbrjob.GetOptions()

and via the StgBlockSize property you are able to find the actual value of this setting.

$options.StgBlockSize

I have tried the three options from the screenshot and found the following three values:

    $localtarget = "KbBlockSize1024"
    $lantarget = "KbBlockSize512"
    $wantarget = "KbBlockSize256"

Now we have found the properties we need to change the settings via PowerShell. We can build some scripts.

If you want to change the Storage option to LAN target on all your backup jobs. You can run the following script on your Veeam Backup and Replication server. Don’t forget to change the StgBlockSize value with the variable you want to use.

if((Get-PSSnapin -Name VeeamPSSnapIn -ErrorAction SilentlyContinue) -eq $null){
    Add-PSSnapin "VeeamPSSnapIn"
}

$vbrjobs = Get-VBRJob 

foreach($vbrjob in $vbrjobs){

    #Storage optimization 
    $localtarget = "KbBlockSize1024"
    $lantarget = "KbBlockSize512"
    $wantarget = "KbBlockSize256"

    #Change Job Options
    $options = $vbrjob.GetOptions()
    $options.StgBlockSize = $lantarget

    $vbrjob.SetOptions($options)
}

Or if you want to change just a couple of your jobs, you can use the following script:

if((Get-PSSnapin -Name VeeamPSSnapIn -ErrorAction SilentlyContinue) -eq $null){
    Add-PSSnapin "VeeamPSSnapIn"
}

$vbrjobs = "<Job1>","<Job2>"

foreach($vbrjobname in $vbrjobs){

    #Storage optimization 
    $localtarget = "KbBlockSize1024"
    $lantarget = "KbBlockSize512"
    $wantarget = "KbBlockSize256"

    #Change Job Options
    $vbrjob = Get-VBRJob  | where {$_.Name -eq $vbrjobname} 
    $options = $vbrjob.GetOptions()
    $options.StgBlockSize = $lantarget

    $vbrjob.SetOptions($options)
}

So with the Powershell toolkit for Veeam you can perform every change you want and can do via the GUI. You can expect some more posts about automating Veeam Backup and Replication with Powershell.