How to copy ISO files between datastores via PowerCLI


We decided to replace our current central ISO datastore to a new one on different storage. You can use the CP commend on the Service Console, if you’re still running ESX classic. But I wanted to investigate if there was a way to do this with PowerCLI. Well there is cmdlet for that called Copy-DatastoreItem. In the PowerCLI help you will find something like this:

Copy-DatastoreItem

Synopsis Copies items between datastores and between a datastore and a local file system provider.

Syntax Copy-DatastoreItem [-Item] [[-Destination]] [-Force] [-PassThru] [-Recurse] [-WhatIf] [-Confirm]

But how do you find the datastore where you want to copy files from?  Well you need to keep in mind the following two objects. The Folder, if you created one (1) and the Datacenter where the Datastore belongs to (2):

image

Now that you know the path to the datastore containing the files you want to copy. You can start PowerCLI and connect to your vCenter server. Before you continue, you need to create a temp directory to temporarily save the ISO files in. In my case this is E:\iso. The one-liner will look like this:

Copy-DatastoreItem vmstore:\Alkmaar\DataCenter\template-01\iso\* E:\iso

And now we wait until the files are copied to the temp directory:

image

The next step is to copy the files from the temp directory to the new datastore.

Copy-DatastoreItem E:\iso\* vmstore:\DataCenter\template-01\iso\

And we wait again:

image

View Composer: Error during provisioning: Failed to authenticate to AD


Last weekend I was busy with a vCenter migration from vCenter 4.0 on a 32 bit Windows 2003 server to a vCenter 4.1 update 1 server on a Windows 2008 R2 64 bit VM. The database is already running on a separate database server.  The one thing special in this setup was VMware View Composer. So I started the migration and everything went well. vCenter was up and running and VMware View Composer service was started. So it was time to test the provisioning of new Desktops. I changed the pool to deploy 2 new desktops. The process ended with an error:image

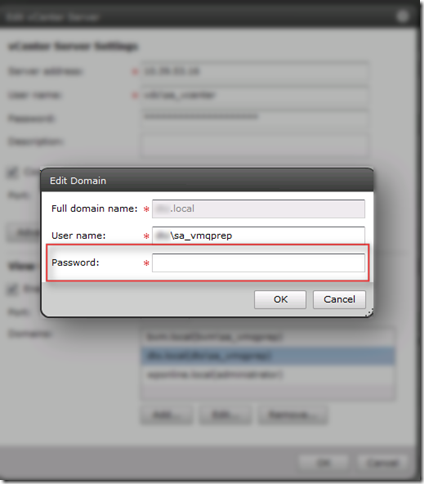
I was unable to fix this by myself so I contacted VMware Support and after a while we came up with the following solution: Login to the VMware View Administrator and browse to the vCenter Server page:View Configuration – Servers and select the vCenter server in the the vCenter Servers window and press edit. Now select the Quickprep user for the Desktop pool with the error and press edit:

image

And enter the password for the Quickprep user:

image

After re-entering the password for the Quickprep user, we where ready to test the Desktop pools again. We did a test with an existing Desktop pool and a new pool and both worked as expected. The Desktop pools are working again. I want to thank VMware support for the quick and accurate support.

PowerCLI: Easy iSCSI Send Target setup


In January this year I created a post about Easy NFS datastore setup with PowerCLI. In this post I showed how you can use a reference host to copy all the NFS share configurations to the new host. In this post I will show you how to do the exact same thing only for iSCSI Send targets. I finally find some time to write this post which I promised to write in part 2 of my PowerCLI and iSCSI series.

The following script will check the $REFHOST, in my case esx2.ict-freak.local for all the iSCSI Send targets configured on that host. After that the script will check if all the iSCSI Send targets exists on the $NEWHOST. If this is not the case the script will add the missing Send Targets.

$REFHOST = Get-VMHost "esx2.ict-freak.local"
$NEWHOST = Get-VMHost "esx1.ict-freak.local"

$REFHBA = Get-VMHostHba -VMHost $REFHOST -Type iScsi | Where {$_.Model -eq "iSCSI Software Adapter"}
foreach($target in (Get-IScsiHbaTarget -IScsiHba $REFHBA -Type Send)){
    $target = $target.Address
        $NEWHBA = Get-VMHostHba -VMHost $NEWHOST -Type iScsi | Where {$_.Model -eq "iSCSI Software Adapter"}
        If ((Get-IScsiHbaTarget -IScsiHba $NEWHBA -Type Send | Where {$_.Address -eq $target} -ErrorAction SilentlyContinue )-eq $null){
            Write-Host "Target $($target) doesn't exist on $($NEWHOST)" -fore Red
            New-IScsiHbaTarget -IScsiHba $NEWHBA -Address $target | Out-Null
        }        
}

But there is more..

Continue reading “PowerCLI: Easy iSCSI Send Target setup”

PowerCLI: Return the iSCSI Software Adapter


In my previous postsabout how to manage iSCSI targets with PowerCLI part 1 and part 2. I used the following line to return the iSCSI adapter:

$hba = $esx | Get-VMHostHba -Type iScsi

But when I used this line against a vSphere 4.1 update 1 host with Broadcom BCM5709 (Dell Poweredge R710). vSphere will use these adapters as Broadcom iSCSI Adapters. And when you run the $hba = $esx | Get-VMHostHba -Type iScsi one-liner, it will return all the vmhba adapters.

[vSphere PowerCLI] C:\> $esx | Get-VMHostHba -Type iScsi

Device     Type         Model                          Status

——     —-         —–                          ——

vmhba32    IScsi        Broadcom iSCSI Adapter         unbound

vmhba33    IScsi        Broadcom iSCSI Adapter         unbound

vmhba34    IScsi        Broadcom iSCSI Adapter         unbound

vmhba35    IScsi        Broadcom iSCSI Adapter         unbound

vmhba37    IScsi        iSCSI Software Adapter            online

This “problem” can easily be resolved with a Where statement. In the following Where statement you look for a Model that equals “iSCSI Software Adapter”. There is only one Software adapter in ESX(i) so it will return the right vmhba. The PowerCLI line will look like this:

$esx | Get-VMHostHba -Type iScsi | Where {$_.Model -eq "iSCSI Software Adapter"} 

[vSphere PowerCLI] C:\> $esx | Get-VMHostHba -Type iScsi | Where {$_.Model -eq "iSCSI Software Adapter"}

Device     Type         Model                          Status

——     —-         —–                          ——

vmhba37    IScsi        iSCSI Software Adapter         online

So the bottom line. Test your code on different setups and update it when necessary 😉

Veeam: Change Restore points and deleted VMs retention period


If you want to change the amount of restore points and the deleted VMs retention period, you can do this for your backup jobs by hand. But if you need to change a lot of Veeam Backup & Replication Jobs like I needed to do. You can find these settings in the Backup Job properties:

image

If you’re a reader of my blog, you know I like to automate this kind of jobs with Powershell. So I created a function to perform this change for me.

The function:

#requires -pssnapin VeeamPSSnapIn
Function Change-RestorePoints{
<#
.SYNOPSIS
    Change the Backup restore points and deleted VMs retention period
.DESCRIPTION

.NOTES
    Authors: Arne Fokkema
.PARAMETER JobName
    A Backup Job in Veeam Backup & Replication
.PARAMETER RetainDays
    The amount of restore points
.PARAMETER RetainCycles
    The amount of days for Deleted VMs retention period    
.EXAMPLE
    PS> Change-RestorePoints -JobName "Job-01" -RetainDays "21" -RetainCycles "21"
#>
    param(
        [parameter(valuefrompipeline = $true,
            position = 0,
            Mandatory = $true,
            HelpMessage = "Enter a Veeam B&R JobName")]
            $JobName,
        [parameter(valuefrompipeline = $true,
            position = 0,
            Mandatory = $true,
            HelpMessage = "Enter the amount of restore points to keep on disk")]
            $RetainDays,
        [parameter(valuefrompipeline = $true,
            position = 0,
            Mandatory = $true,
            HelpMessage = "Enter a deleted VMs retention period in days")]
            $RetainCycles
    )

    begin{
        $vbrjob = Get-VBRJob  | where {$_.Name -eq $JobName} 
    }
    
    process{
        $options = $vbrjob.GetOptions()
        $options.RetainDays = $RetainDays
        $options.RetainCycles = $RetainCycles
        Write-Host "Changing RetainDays: $($RetainDays) and RetainDays: $($RetainCycles) for job: $($vbrjob.Name)"
        $vbrjob.SetOptions($options)
    }
}

To change a particular job on a Veeam Backup & Replication server you can use the following one-liner:

Change-RestorePoints -JobName "Job-01" -RetainDays "30" -RetainCycles "30"

To change all the jobs on a particular Veeam Backup & Replication Server you can use the following foreach loop:

foreach($job in (Get-VBRJob | Sort Name)){
    Change-RestorePoints -JobName $job.Name -RetainDays "14" -RetainCycles "14"
}

The output will look like this:

image

Veeam: How to change the Job notification settings with Powershell


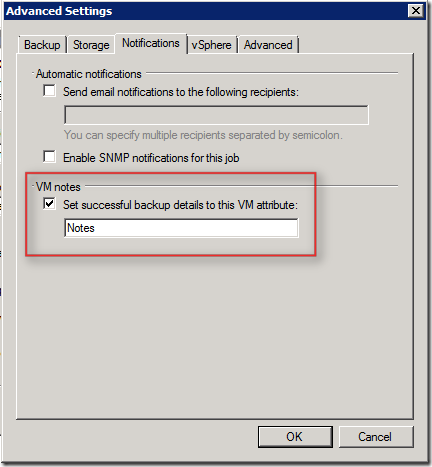
Today just a quick post about how Powershell can help you change the VM attribute option in Veeam Backup & Replication. Imaging that you have 20 backup jobs and you want or need to change the VM attribute settings. You can do this for every job with 10 mouse clicks or you can do it in five seconds by running the script from this post.

This is the setting I am talking about from the GUI:

image

When you change the “Notes” value to some custom field in you environment, the script will apply this setting for you.

if((Get-PSSnapin -Name VeeamPSSnapIn -ErrorAction SilentlyContinue) -eq $null){
    Add-PSSnapin "VeeamPSSnapIn"
}

$vbrserver = Get-VBRServer | Where {$_.Type -eq "VC"}
Foreach($vbrjob in (Get-VBRJob)){    
    $options = $vbrjob.GetOptions()
    $options.VmAttributeName = "Notes"
    $options.SetResultsToVmNotes = $true
    $vbrjob.SetOptions($options)
}

The first three lines of code checked if the VeeamPSSnapIn is loaded, if this is not the case it will be loaded via the Add-PSSnapin.

  • The backup options will be loaded via the .GetOptions() method.
  • VmAttibuteName is the value which you normally enter in the attribute field.
  • SetResultsToVmNotes is the checkbox to enable this setting.
  • via .SetOptions() method you can apply the new settings.

Veeam: Change the Veeam Storage Optimization with Powershell


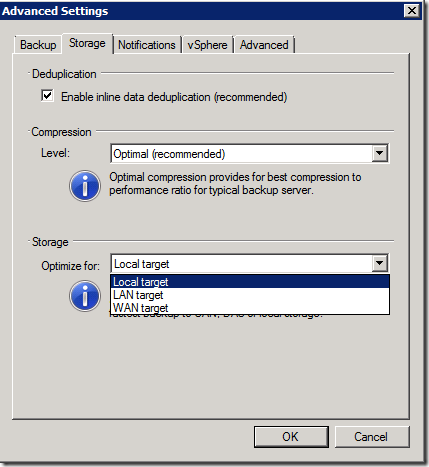
In Veeam Backup and Replication you can choose three different types of Storage optimization.

image

See the blog post on the Veeam website for more info: http://www.veeam.com/blog

From @gostev I received the following tip:

Note that storage optimization will not take effect until next full backup. Setting is used for newly created backup storage only.

There is no standard cmdlet to change this settings, so we have to find the property of the Storage optimization settings. With some trial and error I found the stgBlockSize property. This property can be found inside the vbrjob options.

You can view this properties via:

$vbrjob = Get-VBRJob | where {$_.Name -eq "<vbrjobname>"}
$options = $vbrjob.GetOptions()

and via the StgBlockSize property you are able to find the actual value of this setting.

$options.StgBlockSize

I have tried the three options from the screenshot and found the following three values:

    $localtarget = "KbBlockSize1024"
    $lantarget = "KbBlockSize512"
    $wantarget = "KbBlockSize256"

Now we have found the properties we need to change the settings via PowerShell. We can build some scripts.

If you want to change the Storage option to LAN target on all your backup jobs. You can run the following script on your Veeam Backup and Replication server. Don’t forget to change the StgBlockSize value with the variable you want to use.

if((Get-PSSnapin -Name VeeamPSSnapIn -ErrorAction SilentlyContinue) -eq $null){
    Add-PSSnapin "VeeamPSSnapIn"
}

$vbrjobs = Get-VBRJob 

foreach($vbrjob in $vbrjobs){

    #Storage optimization 
    $localtarget = "KbBlockSize1024"
    $lantarget = "KbBlockSize512"
    $wantarget = "KbBlockSize256"

    #Change Job Options
    $options = $vbrjob.GetOptions()
    $options.StgBlockSize = $lantarget

    $vbrjob.SetOptions($options)
}

Or if you want to change just a couple of your jobs, you can use the following script:

if((Get-PSSnapin -Name VeeamPSSnapIn -ErrorAction SilentlyContinue) -eq $null){
    Add-PSSnapin "VeeamPSSnapIn"
}

$vbrjobs = "<Job1>","<Job2>"

foreach($vbrjobname in $vbrjobs){

    #Storage optimization 
    $localtarget = "KbBlockSize1024"
    $lantarget = "KbBlockSize512"
    $wantarget = "KbBlockSize256"

    #Change Job Options
    $vbrjob = Get-VBRJob  | where {$_.Name -eq $vbrjobname} 
    $options = $vbrjob.GetOptions()
    $options.StgBlockSize = $lantarget

    $vbrjob.SetOptions($options)
}

So with the Powershell toolkit for Veeam you can perform every change you want and can do via the GUI. You can expect some more posts about automating Veeam Backup and Replication with Powershell.

vSphere: VM “freezes” during the removal of a snapshot


If your VM is running on a NFS datastore and Changed Block Tracking (CBT) is enabled, you might experience the following symptoms:

When removing the snapshot of the virtual machine residing on the NFS storage in an ESX/ESXi 4.1 host, you may experience these symptoms:

  • The virtual machine appears to be in a hung state within the console view
  • The virtual machine stops responding to ping requests
  • The virtual machine is inaccessible via remote desktop

But why is this VM freezing? The explanation is the locking mechanism which NFS uses:

This issue may occur if you are using a backup application that utilizes Changed Block Tracking (CBT) and the ctkEnabled option for the virtual machine is set to true. The virtual machine becomes unresponsive for up to 30 seconds as NFS locks on the .ctk file are changed.

The workaround is to disable CBT:

  1. Wait for the virtual machine to become responsive and for the snapshot operation to complete.
  2. Schedule an outage window for the affected virtual machine.
  3. Shut down the virtual machine.
  4. In the Inventory pane, right-click the virtual machine and click Edit Settings.
  5. Click the Options tab and click General.
  6. Click Configuration Parameters.
  7. If the ctkEnabled  parameter is not listed, click Add Row, add ctkEnabled, and set it to false.
  8. Power on the virtual machine.

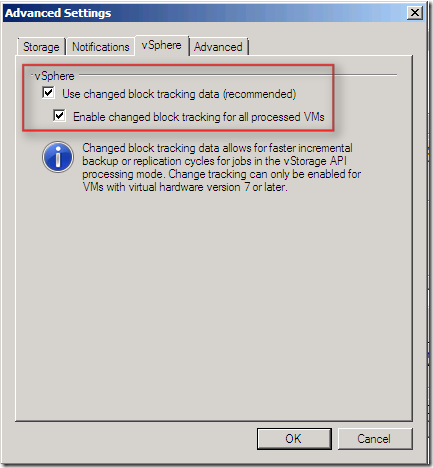
This workaround can impact the backup performance because you can’t use CBT. To Disable CBT in a Veeam job, you have to edit the job and disable CBT in the Advanced Settings under the vSphere tab:

image

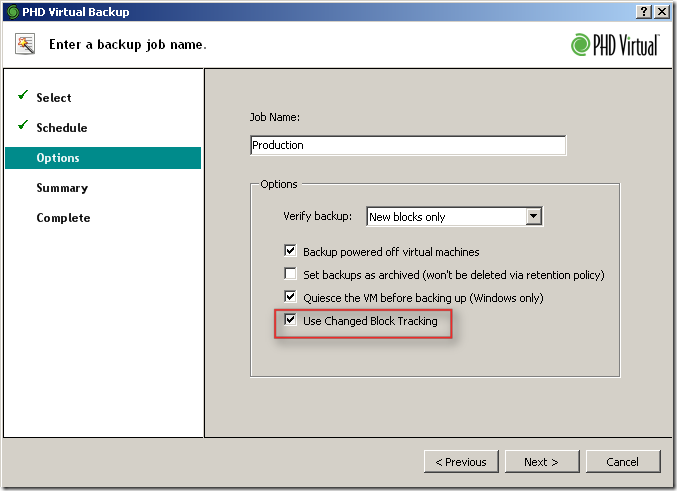
Or if you’re using PHD Virtual Backup you can change the CBT settings in the Options tab on the properties page of a Backup Job:

image


Source  
http://kb.vmware.com KB1031106

Storage vMotion only one hard disk to another datastore in vSphere


Sometimes it’s necessary to only migrate a single hard disk from a VM. This is the case when someone adds two 1 TB VMDK’s and fills them up completely. The maximum size of a VMFS datastore is 2TB minus 512 bytes. So in this case the datastore will be completely filled with no space left to keep the VM running. So if you want  to migrate just one hard disk to make sure the VMFS datastore will not fill up. You can use the vSphere client or PowerCLI to do perform this “advanced” Storage vMotion.

Note: if you want to reclaim your “wasted” storage back from your SAN, you have to recycle the whole datastore. So you have to migrate the other hard disks and configuration files as well.

vSphere Client

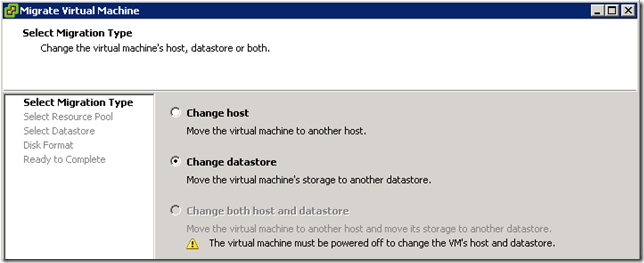
Start the Migrate Virtual Machine wizard and select datastore:

image

Continue reading “Storage vMotion only one hard disk to another datastore in vSphere”