Script: Install Printer Drivers On TS/Citrix Servers


Aleks van http://www.virtualistic.nl/ heeft een script geschreven voor het installeren van Printer drivers op een Terminal / Citrix server. Ik was de gelukkige betá tester (zonder problemen) en alles werkte out of the box.

Hieronder een quote van de website van Aleks:

Prerequisites:
– You have to be able to install printdrivers (duh!)
– You have to be able to connect to your printerserver (test this through typing \\yourprintserver you should see your shared printers)
What is inside the zip file?
– The script of course!
– Addprinters.txt this is the input file for the script. Place your printers in this .txt file (eg: \\yourprintserver\printer1)
The default location of the addprinters.txt is C:\ You can change this but make sure you edit the script to reflect the new location.

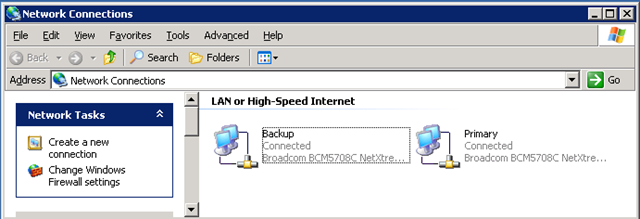
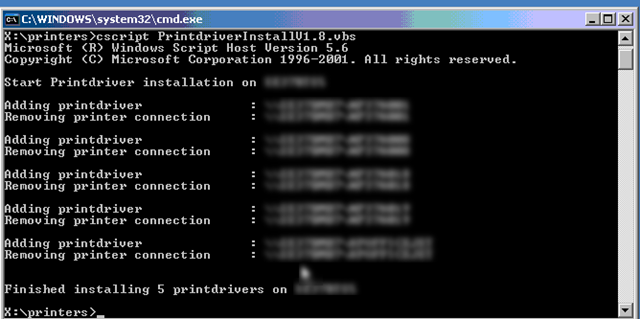
Zodra je het Addprinters.txt hebt gevuld, start je het script en dan verschijnt het onderstaande scherm.

PrinterDriver_Script

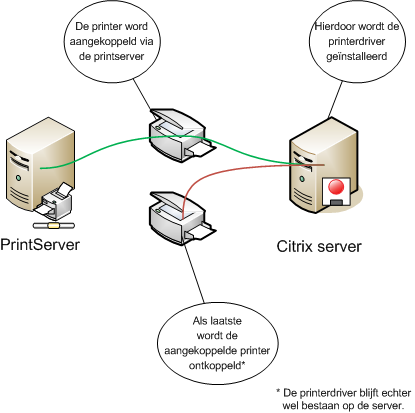
Nu ben je natuurlijk benieuwd wat het script gedaan heeft. Dat laat ik zien in de onderstaande tekening:

printerscript

Meer informatie en de download vindt je hier: http://www.virtualistic.nl/

Citrix: Symantec Tamper Protection Alert & CPU Utilization Management Executables


De volgende symptomen kunnen optreden:

Symptoms

One or more “SYMANTEC TAMPER PROTECTION ALERT” error events are written by Symantec Antivirus to the Application log. These messages are usually paired with a “CPU Utilization Management cannot manage process <PID>” warning event written by CTXCPUUtilMgmt to the Application log.

An example Symantec Antivirus event is as follows:

Log: Application
Type: Error
Source: Symantec Antivirus
Event: 45
Description: SYMANTEC TAMPER PROTECTION ALERT
Target: C:\Program Files\Common Files\Symantec Shared\ccEvtMgr.exe
Event Info: Open Process
Action Taken: Blocked
Actor Process: C:\Program Files\Citrix\Server Resource Management\CPU
Utilization Management\bin\ctxcpusched.exe

An example CTXCPUUtilMgmt event is as follows:

Log: Application
Type: Warning
Source: CTXCPUUtilMgmt
Event ID: 1542
Description: CPU Utilization Management cannot manage process <PID>.
Windows system message: 0x5.

The two events are associated by the PID in the CTXCPUUtilMgmt event and the PID of the Target in the Symantec Antivirus event.

Zie CTX113486 voor meef informatie

Microsoft: Windows Memory Diagnostic (WMD)


oca

Voor het testen van het geheugen van een PC heeft microsoft de volgende tool vrij gegeven: Microsoft Windows Memory Diagnostic. Deze tool is nu nog in Beta, en als je het mij vraagt een beetje aan de laate kant. Ik test al sinds jaar en dat met het tooltje memtest86.

Je kunt mtinst.exe hier: http://oca.microsoft.com/en/windiag.asp downloaden.

Nadat je de tool gedownload hebt, start je deze op.

WindowsMemoryDiagnostic

Je gaat akkoord met de Eula en het volgende scherm verschijnt. Ik heb gekozen voor optie 2 Save Cd Image to Disk… Dit omdat ik geen floppydrive meer heb.

WindowsMemoryDiagnostic_1

Brand nu de ISO en start daarna de pc op vanaf de CD-Rom. De memory diagnostic begint direct met testen.

WindowsMemoryDiagnostic_2

Zoals je kunt zien in het onderstaande (ook bovenstaande) stukje tekst, dien je de test zelf af te sluiten. Doe je dit niet dan blijft hij de tests herhalen.

WindowsMemoryDiagnostic_3

Microsoft: How to extend a volume with diskpart


In deze post zie je hoe je met Diskpart een volume kunt extenden.

Open een command prompt en voer de dikgedrukte commando’s uit.

C:\diskpart

Microsoft DiskPart version 5.2.3790.3959
Copyright (C) 1999-2001 Microsoft Corporation.
On computer: SERVER1

DISKPART> list volume

  Volume ###  Ltr  Label                Fs     Type            Size          Status     Info
  ———-  —  ———–  —–         ———-  ——-      ———     ——–
  Volume 0     R   W2K3STDSP2       CDFS  CD-ROM      1016 MB  Healthy
  Volume 1     C   OS                       NTFS   Partition     10 GB       Healthy    System
  Volume 2     D   DATA                    NTFS   Partition     10 GB       Healthy

DISKPART> Select volume 2

Volume 2 is the selected volume.

DISKPART> extend (diskpart gebruikt alle vrije schijfruimte)

DiskPart successfully extended the volume.

DISKPART> exit

Leaving DiskPart…


Zie KB325590 voor meer informatie

How to: Enable / Disable Network Interfaces through a script


Via de volgende stappen kun je de netwerkkaart in of uitschakelen.

Open de Network Connections en kijk naar de namen van de netwerkkaarten.

netsh_1

Voer nu een van de volgende commando’s uit:

Enable: netsh interface set interface “Local Area Connection ” ENABLE (waar “Local Area Connection” is de naam van de NIC binnen Windows).

Disable: netsh interface set interface “Local Area Connection ” DISABLE (waar “Local Area Connection” is de naam van de NIC binnen Windows).

De kaart word in of uitgeschakeld:

netsh_2

Voor meer informatie over netsh kun je het volgende commando uitvoeren binnen CMD: netsh /? of via de volgende websites:

How To: Extract a Winmail.dat file


Het kan voorkomen dat je een e-mail krijgt met daarbij een attachment genaamd: Winmail.dat.

Als je dit bestand dubbelklikt merk je dat Windows / Outlook of welk e-mail programma ook, hier niks mee kan.

Hoe kun je kijken wat er daadwerkelijk in het bestand zit. Dit kun je eenvoudig doen met de volgende tool: WMDecode. De tool kun je hier downloaden: http://www.biblet.com

Nadat je de tool hebt gedownload pak je deze uit naar een folder. Ik heb het programma uitgepakt naar D:\WMDecode.

Sleep vervolgens het Winmail.dat bestand op het bestand WMDecode.exe.

winmail_1

Daarna opent het volgende scherm:

winmail_2

Zoals je ziet, zijn er twee bestanden uitgepakt.

! Opmerking: Dit programma is tijd gelimiteerd. Dit betekent dat je het na een maand niet meer kan gebruiken. Voor een volledig werkende versie kun je het registreren voor $10 op www.reg.net/product.asp?ID=7394

Geek stuff: Wi-Fi Detector Shirt


In de automatiseringsgids van 12 oktober 2007 stond op pagina 3 het volgende t-shirt:

Het t-shirt begint te knipperen zodra er een IEE 802.11b of 802.11g-netwerk in de buurt is. Naarmate het signaal sterker word branden er meer lampjes.

Het t-shirt kost 30$ en is te bestellen op de volgende website: http://www.thinkgeek.com/tshirts/generic/991e/?cpg=cj

Quote van de website:

Product Features

  • Glowing animated shirt dynamically displays the current wi-fi signal strength.
  • Shows signal strength for 802.11b or 802.11g
  • Black 100% Cotton T-Shirt
  • Animated Decal is Removable (with hook and loop fasteners) for Easy Washing
  • Battery Pack is Concealed in a Small Pocket Sewn Inside the Shirt
  • Runs for hours off three AAA Batteries (not included)

Washing Instructions

  1. Carefully peel animated decal from front of T-Shirt
  2. Unplug ribbon connector behind decal and remove decal
  3. Unplug battery pack and remove it
  4. You can leave the ribbon cable inside the shirt
  5. Machine wash gentle cycle on cold
  6. Hang to dry
    Please Note: If you plug the connector into the battery pack backwards the shirt will not animate properly. It will not damage the shirt. Simply reverse the connector.

Bron: http://www.thinkgeek.com/tshirts/generic/991e/?cpg=cj en de Automatiseringsgids van 12 oktober 2007