WSUS: cannot download large Windows update files in Windows Server 2003


De volgende symptomen kunnen optreden:

SYMPTOMS

On a computer that is running Microsoft Windows Server 2003, when you try to use Windows Server Update Services to download Windows update files that are larger than 700 megabytes (MB), the download operation does not succeed.

CAUSE

This problem occurs because the WinVerifyTrust function in Windows Server 2003 cannot verify the certificate validity of the Windows update files.

In het document KB888303 vind je meer informatie.

Printing: Garbage


printer

Bij het printen vanuit een bepaalde applicatie, kwam het onderstaande uit de printer rollen. Ik zou het knap vinden als iemand dit kan ontcijferen, de gebruiker in kwestie kon dit niet.

printing_garbage_1

Ik ben dus opzoek gegaan naar een oplossing en dat is het volgende geworden.

Open de Printing Preferences van de printer. Klik daarna op het tabblad Geavanceerd.

printing_garbage_2

Vervolgens pas je de optie “Downloadoptie voor True Type-fonts” aan naar “Downloaden als bitmap”. Daarna moet de gebruiker de printer opnieuw toevoegen. Vervolgens zou het printen weer normaal moeten verlopen.

Exchange: Clean Install Exchange 2007 SP1 On Windows Server 2003 SP2


exchange2007

In deze post lees je hoe je een Default Exchange 2007 SP1 setup uitvoerd op een Windows 2003 SP2 server/domain.

requirements

  • Windows 2003 SP1 of hoger
  • Microsoft .Net 2.0 SP1
  • Windows Powershell 1.0
  • IIS 6.0 (Zonder de SMTP role)
  • Domain Functional Level op Windows 2000 Native of Windows Server 2003

Download Exchange 2007 SP1 (in deze download zit de RTM geslipstreamed) hier:

Continue reading “Exchange: Clean Install Exchange 2007 SP1 On Windows Server 2003 SP2”

Microsoft: Command-line reference


Het volgende staat er op de technet website van Microsoft:

Command-line reference A-Z

To find information about a command, on the A-Z menu, click the letter that the command starts with, and then click the command name.

In addition to the tools installed with the Windows Server 2003 family there are over 40 support tools that you can install directly from the product CD. You can use these tools to diagnose and resolve computer problems. For more information about these support tools and how to install them, see Install Windows Support Tools.

For more information about changes to the functionality of MS-DOS commands, new command-line tools, command shell functionality, configuring the command prompt, and automating command-line tasks, see Command-line reference.

You must run command-line tools at the prompt of the Cmd.exe command interpreter. To open Command Prompt, click Start, click Run, type cmd, and then click OK. To view help at the command line, at the command prompt, type:

CommandName /?

As a security best practice, consider using an account without administrative credentials to perform routine, nonadministrative tasks. To perform only specific tasks with an account with administrative credentials, you can use the Runas command.

Een overzicht van alle command-line opties binnen Windows Server 2003 vind je hier: http://technet2.microsoft.com/windowsserver/

Citrix: Discovery error "errors occurred when using <servername> in the discovery process"


Zoals altijd, een plaatje zegt meer dan duizend woorden:

In het artikel CTX112853 staat het antwoord vermeld. Deze foutmelding treed op wanneer network COM+ access niet is geïnstalleerd op de Citrix/Terminal Server. Dit is meestal het geval wanneer er geen IIS wordt geïnstalleerd op de Citrix/Terminal Server.

Dit kun je op drie manieren voor elkaar krijgen:

  1. Installeer network COM+ access  via Add/Remove Software – Windows Components – Application Server (vink deze niet aan maar highlight) Enable network COM+ access 
  2. Je kunt dit proces ook automatiseren. Zorg ervoor dat de I386 map van de Windows CD op een lokale drive staat bijvoorbeeld C:\I386. Vervolgens pas je de onderstaande tekst aan, sla je deze op als sourcepath.reg en importeer je deze

    Windows Registry Editor Version 5.00

  3. [HKEY_LOCAL_MACHINE\SOFTWARE\Microsoft\Windows\CurrentVersion\Setup]
    “SourcePath”=”C:\\”
    “ServicePackSourcePath”=”C:\\”
    Let op! zet in de Pathnaam geen i386 deze vind de setup vanzelf.

    Nadat je de bovenstaande actie hebt uitgevoerd maken het het bestand Complus.inf.

    in dit bestand komt de volgende inhoud te staan:
    [Components]
    complusnetwork = ON

    Complus.inf sla je op een schijf waar je makkelijk bij kunt.

    De laatste stap is het aanmaken van een batchfile genaamd Complus.cmd

    in dit bestand komt de volgende inhoud te staan:
    “%SystemRoot%\system32\sysocmgr.exe” /i:”%SystemRoot%\inf\sysoc.inf” /u:”driveletter:\Complus.inf”

    Sla het batchbestand op en voer deze uit. Het onderstaande scherm verschijnt heel kort en nadat deze is verdwenen is de network COM+ access geïnstalleerd.

    complus

  4. Als laatste kun je dit ook meenemen in je WINNT.SIF. Dit doe je als volgt:

    Zoek de [Components] op in je WINNT.SIF en voeg de volgende regel toe:
    complusnetwork = ON

    Nu word network COM+ access automatisch geïnstalleerd tijdens de Windows Setup.

Internet Explorer: Default Search Engine


In deze post vind je een aantal registry tweaks voor de Internet Explorer Search Engine.

ie7kbsearchprovider


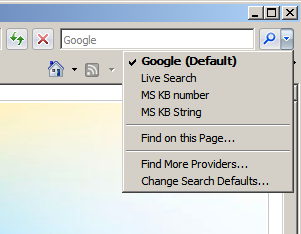
Google als default Search Engine

Kopieer de onderstaande tekst in notepad en sla deze op als ie7googlesearch.reg.

Windows Registry Editor Version 5.00

;Add Google as a Search Engine
[HKEY_CURRENT_USER\Software\Microsoft\Internet Explorer\SearchScopes\{A5816146-54D7-4DEF-B045-53B0E67878FD}]
“DisplayName”=”Google”

;Add Google as a Search Engine
[HKEY_CURRENT_USER\Software\Microsoft\Internet Explorer\SearchScopes\{A5816146-54D7-4DEF-B045-53B0E67878FD}]
“URL”=”
http://www.google.com/search?q={searchTerms}&rls=com.microsoft:{language}&ie={inputEncoding}&oe={outputEncoding}&startIndex={startIndex?}&startPage={startPage}”

;Add Google as a Search Engine
; Export your own Key here as it may be different
[HKEY_CURRENT_USER\Software\Microsoft\Windows\CurrentVersion\Internet Settings\Connections]
“SavedLegacySettings”=hex:3c,00,00,00,c1,00,00,00,01,00,00,00,00,00,00,00,00,00,00,00,00,00,00,00,04,00,00,00,00,00,
00,00,a0,7b,ae,ef,9e,48,c6,01,01,00,00,00,02,00,00,00,c0,a8,01,66,00,00,00,00,00,00,00,00,6f,00,6f,0
0,74,00,25,00,5c,00,54,00,45,00,4d,00,50,00,00,00,44,00,3b,00,2e,00,56,00,42,00,53,00,3b,00,2e,00,56
,00,42,00,45,00,3b,00,2e,00,4a,00,53,00,3b,00,2e,00,4a,00,53,00,45,00,3b,00,2e,00,57,00,53,00,46,00,
3b,00,2e,00,57,00,53,00,48,00,00,00,79,00,73,00,74,00,65,00,6d,00,33,00,32,00,5c,00,57,00,62,00,65,0
0,6d,00,00,00,00,00,00,00,00,00,00,00,00,00,00,00,

;Make Google DEfault Search Engine
[HKEY_CURRENT_USER\Software\Microsoft\Internet Explorer\SearchScopes]
“DefaultScope”=”{A5816146-54D7-4DEF-B045-53B0E67878FD}”

;Phishing Filter Automatic
[HKEY_CURRENT_USER\Software\Microsoft\Internet Explorer\PhishingFilter]
“Enabled”=dword:00000002

; Export your own Key here as it may be different
[HKEY_CURRENT_USER\Software\Microsoft\Windows\CurrentVersion\Internet Settings\Connections]
“SavedLegacySettings”=hex:3c,00,00,00,c4,00,00,00,01,00,00,00,00,00,00,00,00,00,00,00,00,00,00,00,04,00,00,00,00,00,
00,00,a0,7b,ae,ef,9e,48,c6,01,01,00,00,00,02,00,00,00,c0,a8,01,66,00,00,00,00,00,00,00,00,6f,00,6f,0
0,74,00,25,00,5c,00,54,00,45,00,4d,00,50,00,00,00,44,00,3b,00,2e,00,56,00,42,00,53,00,3b,00,2e,00,56
,00,42,00,45,00,3b,00,2e,00,4a,00,53,00,3b,00,2e,00,4a,00,53,00,45,00,3b,00,2e,00,57,00,53,00,46,00,
3b,00,2e,00,57,00,53,00,48,00,00,00,79,00,73,00,74,00,65,00,6d,00,33,00,32,00,5c,00,57,00,62,00,65,0
0,6d,00,00,00,00,00,00,00,00,00,00,00,00,00,00,00,

Importeer daarna de ie7googlesearch.reg en de default search is aangepast naar google.

Let op! dit is een current user setting. Dit dien je dus voor alle users via een script of iets dergelijks uit te voeren.

Search Engine voor het zoeken naar KB artikelen van MS

Kopieer de onderstaande tekst in notepad en sla deze op als ie7kbsearch.reg

Windows Registry Editor Version 5.00

; add search MS Knowledgebase by KB number (just type the number in the search box)
[HKEY_CURRENT_USER\Software\Microsoft\Internet Explorer\SearchScopes\MSKBnumber]
“DisplayName”=”MS KB number”
“URL”=”
http://support.microsoft.com/?kbid={SearchTerms}”

;add search MS knowledgebase by string (type the string in the search box)
[HKEY_CURRENT_USER\Software\Microsoft\Internet Explorer\SearchScopes\MSKBString]
“DisplayName”=”MS KB String”
“URL”=”http://support.microsoft.com/search/default.aspx?query={SearchTerms}”

Importeer daarna de  ie7kbsearch.reg en de KB search engine word aangemaakt.

Let op! dit is een current user setting. Dit dien je dus voor alle users via een script of iets dergelijks uit te voeren.

Windows: Offline Defragmentation of The Active Directory database


Ik was vandaag genoodzaakt om een offline defragmentatie uit te voeren op een domain controller. Dit heb ik gedaan door het volgen KB232122.

In deze post laat ik jullie via screenshots zien hoe dit in zijn werk gaat.

Let Op! Doe deze tutorial alleen als je door een KB van Microsoft word gevraagd om dit te doen.

Continue reading “Windows: Offline Defragmentation of The Active Directory database”

Error Joining Domain: The Endpoint format is invalid.


Ik had een VM binnen VMware Workstation opgebouwd. Deze heb ik daarna via de VMware Converter overgezet naar mijn ESX omgeving met het vinkje: Install VMware Tools.

Door deze optie treed er een fout op binnen de VMWare Tools waardoor ik de volgende foutmelding kreeg bij het Joinen van het domein.

joindomain error

De oplossing vond ik op de blog van david hochstaetter. Het is vrij simpel. De VMWare Tools deïnstalleren. De VM opnieuw opstarten. Toevoegen aan het domein. Vervolgens de VM weer opnieuw opstarten. En als laatste installeer je de VMware Tools weer.