VMware: Open Source VMware Tools


openVMwareTools

VMware heeft de source code van de VMware Tools vrijgegeven aan de open source community.

Hier een quote van de website:

With the Open Virtual Machine Tools project, we are hoping to solve this and other related problems. The tools are currently composed of kernel modules for Linux and user-space programs for all VMware supported Unix-like guest operating systems. They provide several useful functions like:

  • File transfer between a host and guest
  • Improved memory management and network performance under virtualization
  • General mechanisms and protocols for communication between host and guests and from guest to guest

Meer info vind je hier http://open-vm-tools.sourceforge.net/

bron: http://www.ntpro.nl/blog/

VMWare: New Patches


VMware ESX 3.0.2.

ESX-1001725

ESX-1001726

ESX-1001727

ESX-1001728

ESX-1001729

ESX-1001730

ESX-1001731

ESX-1001732

ESX-1001735

Hier vindt je een overzicht van alle patches voor ESX 3.0.2: vi3_patches_302


VMware ESX 3.0.1.

Hier vindt je een overzicht van alle patches voor ESX 3.0.1: vi3_patches_301.html


VMware ESX 3.0.0.

Hier vindt je een overzicht van de alle patches voor ESX 3.0.0: vi3_patches_300.html

VMware: USB-Harddisk within the Service Console


In deze post lees je hoe je een USB-Harddisk kun aansluiten en gebruiken binnen het VMware ESX Service Console. Binnen het Service Console kun je geen gebruik maken van NTFS partities. Gelukkig kwam ik deze oplossing tegen op de blog van Mike Laverick (http://www.rtfm-ed.co.uk/)

Firstly, NTFS drives don’t appear to be mountable at Service Console. Despite the fact that normally Redhat Linux has a R/O driver for NTFS no matter what I did I couldn’t get the Service Console to recognise the partition.

1. Delete any partitions from the removable drive using Disk Management in Windows
2. Right-click the disk and select “New Partition” and follow these steps, clicking “Next” to get move on at each stage.
3. Select Primary Partition
4. Enter the maximum size for the Partition Size
6. Choose assign a drive letter. In my case I used F:
7. Select “Do not Format this partition
8. There will be a dialog box, summarising all the previous stuff.
9. Click Finish

Rather using M$ format command or tools which limit the format to 32GB, I found a format tool on the internet that allow you to break through the 32GB barrier. It’s called fat32format.exe and it can be downloaded from here:

http://www.ridgecrop.demon.co.uk/index.htm?fat32format.htm

The syntax of the fat32format command is very simple – as its the same as the standard format command namely:

fat32format

Mounting the drive at the console is very easy. Login to the Service Console as root and make a mounting point with something like mkdir /mnt/usbdisk. Plug-in the drive and read the info on the screen to see the device name for the drive such as /dev/sdk. Then mount it to the usbdisk with mount /dev/sdk1 /usbdisk.

Thanks Mike for digging this out.

Bron: http://www.rtfm-ed.co.uk/

Tool: VI3 Snaphunter


De mannen van http://www.xtravirt.com/ hebben weer een leuke tool afgeleverd genaamd VI3 Snaphunter.

SnapHunter is an ESX3 Service Console utility which can report back on the Snaphot status of VM’s from multiple ESX Servers.  Its features include:

  • identify VM’s which contain snapshots
  • show size, date and name of snapshot
  • optionally commit snapshots
  • email reporting and scheduling

Installation instructions

  1. Upload snap_hunter.tar.gz to your ESX server using FastSCP/WinSCP or equivalent
  2. Extract snap_hunter.tar.gz by running the following command in the directory containing snap_hunter.tar.gz: tar zxvf snap_hunter.tar.gz.  This will create a directory called snap_hunter under the current directory.  Please read the README in this directory.
  3. cd snap_hunter
  4. Run the installation script with the following command ./install.pl

SnapHunter is now installed on your ESX host.


Je kunt het hier downloaden: http://www.xtravirt.com/

How To: XenEnterPrise 4 within a VM on Workstation 6


Nadat het gelukt was om VMware ESX 3.0.x te installeren in een VM op VMware Workstation 6 (zie deze post) kon Xen natuurlijk niet achter blijven.

Hierbij laat ik jullie in deze mini tutorial zien hoe dit in zijn werk gaat.

Voordat je kunt beginnen heb je de volgende dingen nodig:

  • XenServer-4.0.1-install-cd.iso
  • XenServer-4.0.1-linux-cd.iso
  • Een pc met een intel VT processor.
  • Veel geheugen, minimaal 2048MB waarvoor 1024MB nodig is voor de VM zelf. Dit heb je nodig want anders wil Xen niet starten.
  • VMware Workstation 6

Daarna maak je een VM aan met als uitgangspunt Other Linux 2.6.x kernel 64-bit.

Vervolgens dien je het VMX bestand aan te passen zoals het onderstaande:

config.version = “8”
virtualHW.version = “6”
scsi0.present = “TRUE”
memsize = “1024”
scsi0:0.present = “TRUE”
scsi0.virtualDev = “lsilogic”
scsi0:0.fileName = “XENENTERPRISE4.vmdk”
ide1:0.present = “TRUE”
ide1:0.fileName = “H:\XEN\XenServer-4.0.1-linux-cd.iso”
ide1:0.deviceType = “cdrom-image”
floppy0.autodetect = “TRUE”
ethernet0.present = “TRUE”
ethernet0.wakeOnPcktRcv = “FALSE”
ethernet0.virtualDev = “e1000”
ethernet0.addressType = “generated”
ethernet1.present = “TRUE”
ethernet1.wakeOnPcktRcv = “FALSE”
ethernet1.virtualDev = “e1000”
ethernet1.addressType = “generated”
ethernet2.present = “TRUE”
ethernet2.wakeOnPcktRcv = “FALSE”
ethernet2.virtualDev = “e1000”
ethernet2.addressType = “generated”
usb.present = “FALSE”
ehci.present = “TRUE”
sound.present = “TRUE”
sound.fileName = “-1”
sound.autodetect = “TRUE”
svga.autodetect = “TRUE”
pciBridge0.present = “TRUE”
mks.keyboardFilter = “allow”
displayName = “XENENTERPRISE4”
guestOS = “other26xlinux-64”
nvram = “Other Linux 2.4.x kernel.nvram”
deploymentPlatform = “windows”
virtualHW.productCompatibility = “hosted”
tools.upgrade.policy = “useGlobal”
### ICTFreak Addition to VMX File
## Enabling Intel VT
monitor_control.restrict_backdoor = TRUE
monitor_control.vt32 = TRUE
### End Addition

floppy0.present = “FALSE”

isolation.tools.hgfs.disable = “TRUE”

ethernet0.generatedAddress = “00:0c:29:5d:7e:9a”
ethernet1.generatedAddress = “00:0c:29:5d:7e:a4”
ethernet2.generatedAddress = “00:0c:29:5d:7e:ae”
uuid.location = “56 4d 76 d7 d7 f0 7f 12-df fa 58 dc 92 5d 7e 9a”
uuid.bios = “56 4d 76 d7 d7 f0 7f 12-df fa 58 dc 92 5d 7e 9a”
scsi0:0.redo = “”
pciBridge0.pciSlotNumber = “17”
scsi0.pciSlotNumber = “16”
ethernet0.pciSlotNumber = “32”
ethernet1.pciSlotNumber = “33”
ethernet2.pciSlotNumber = “34”
sound.pciSlotNumber = “35”
ehci.pciSlotNumber = “36”
ethernet0.generatedAddressOffset = “0”
ethernet1.generatedAddressOffset = “10”
ethernet2.generatedAddressOffset = “20”

tools.remindInstall = “TRUE”

Nadat je de vet gedrukte donkerblauwe toevoegingen hebt gedaan, kun je het vmx bestand opslaan.

Nu kun je de ISO mounten en XEN Enterprise 4 installeren.Nadat de setup klaar is zie je het onderstaande scherm

xeninws6

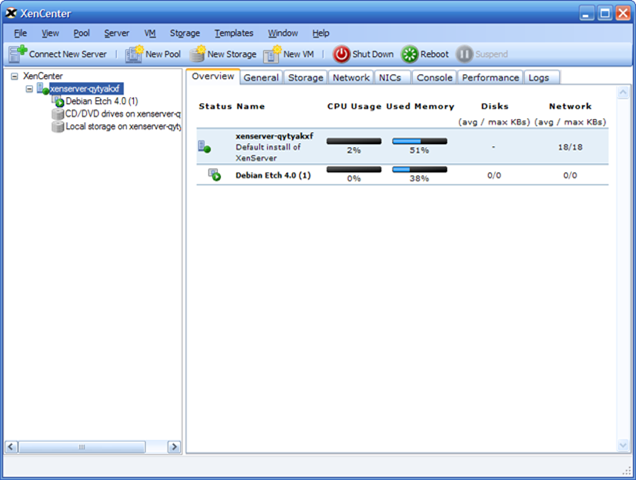
En daarnaast kun je op een Windows machine de XenCenter (VC van Xen) Software installeren. Dat ziet er zo uit

xencenter

Veel plezier met het testen van Xen binnen VMware Workstation 6.

Book: VI3 Advanced Technical Design Guide


Een van de schrijvers (Ron Oglesby) heeft een aantal sample chapters vrijgegeven van het nieuwe boek.

quote van de website:

This is a 3 chapter preview of the VMware Infrastructure 3: Advanced Technical Design Guide. This was given away at VMworld 2007 to several hundred attendees. The cost of this book contains no royalties or profit. It is simply a preview that you pay to print.

De sample chapters kun je hier downloaden: http://www.lulu.com/content/1115401