
Rob scmidt heeft zijn VMware VCP Study Questions vrij gegeven. Het zijn 310 vragen in het flashcard formaat.
Je kunt de vragen hier downloaden: http://www.petri.co.il
Rob scmidt heeft zijn VMware VCP Study Questions vrij gegeven. Het zijn 310 vragen in het flashcard formaat.
Je kunt de vragen hier downloaden: http://www.petri.co.il
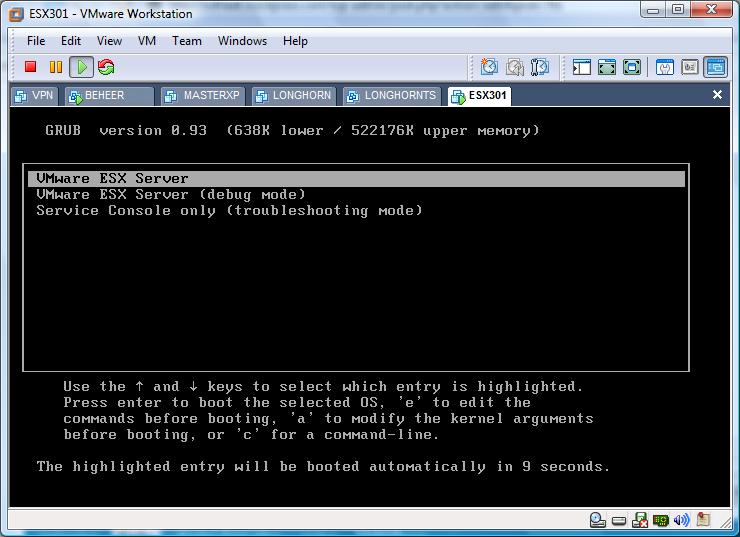
Tijdens het browsen op het vmtn forum kwam ik toevallig dit topic tegen: http://vmware.com/community/ waarin getest wordt met VMware Workstation 6 met een VM waar ESX 3.0.1 op wordt geïnstalleerd. Ik heb dit zelf even getest en het werkt! daar is echter ook alles mee gezegd want de performance is slecht maarja wat wil je het is toch leuk om te testen.
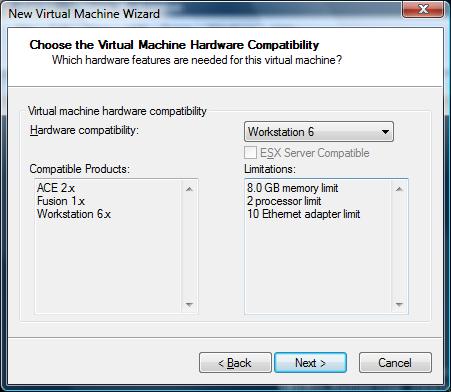
Start de new Virtual Machine Wizard en klik op Custom

Kies voor Workstation 6 VM.
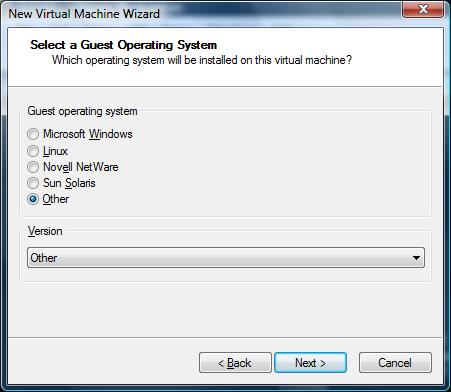
Kies Other als Guest Operation System
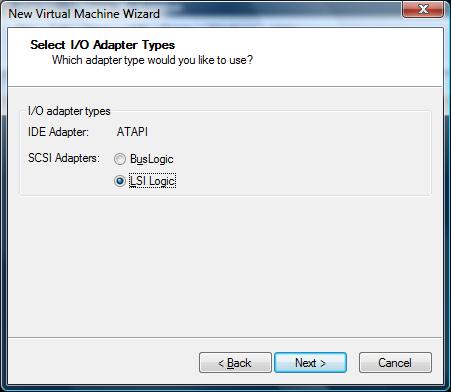
De SCSI Adapter wordt een LSI Logic.
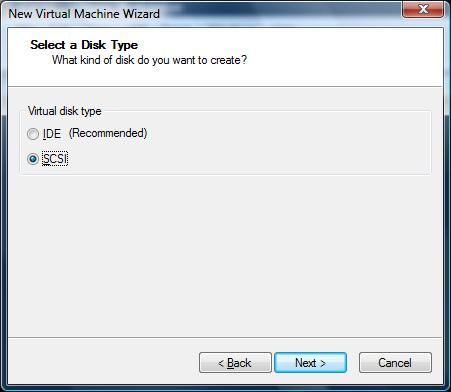
En dan een SCSI hardisk.
Nadat je VM klaar is sluit je VMware Workstation af. Open daarna het VMX bestand in je favoriete editor en voeg de volgende parameters toe:
ethernet0.virtualDev = “e1000”
monitor_control.restrict_backdoor = TRUE
monitor_control.vt32 = TRUE
De monitor_control.vt32 = TRUE werkt alleen als je Intel VT op je processor hebt.
Daarna kun je ESX 3.0.1. installeren.
Na de installatie wordt ESX 3.0.1 opgestart
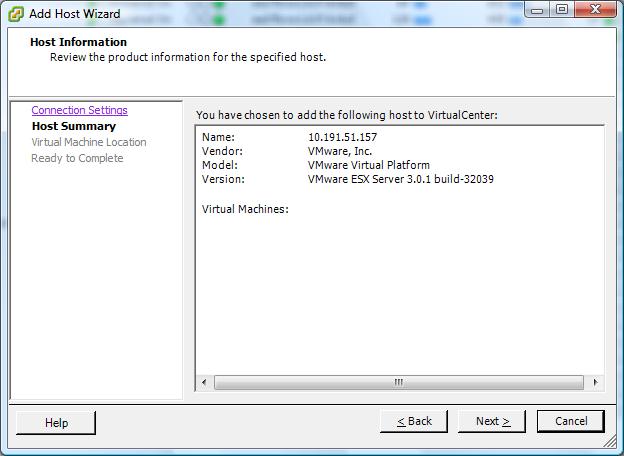
In de onderstaande printscreen zie je de Virtuele ESX server in VC2
Xtravirt.com heeft een soortgelijk document gemaakt. Deze kun je hier downloaden: xtravirt.com
De volgende melding kreeg ik zodra ik een VM wilde starten op mijn nieuwe Toshiba Tecra A7:
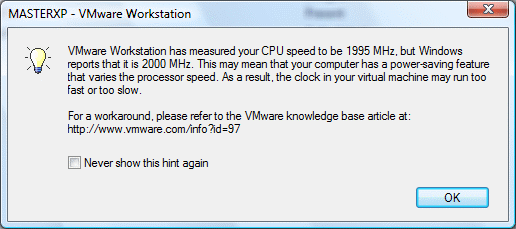
Deze melding kun je oplossen door de config.ini aan te passen of door deze aan te maken.
In Windows XP doe je dit in de volgende directory: C:\Documents and Settings\All Users\VMware\VMware Workstation <versienr>\
In Windows Vista doe je dit in de volgende directory: C:\Users\All Users\VMware\VMware Workstation <versienr>\
Het volgende moet er in de config.ini worden toegevoegd:
host.cpukHz = “2000000”
host.noTSC = “TRUE”
ptsc.noTSC = “TRUE”
Een quote uit het KB artikel over de host.cpukHz waarde:
The example presented here assumes that the host computer has a maximum speed of 1700MHz. The first line is the most important one. It should be your host computer’s maximum speed in KHzthat is, its speed in MHz times 1000, or its speed in GHz times 1000000.
Zie het volgende KB artikel voor meer informatie: KB1227
Na het testen van het VIPatch script (zie eerdere post) vondt ik het vervelend dat ik de patches nog met de hand moest uitpakken. Met behulp van 7z.exe (onderdeel van 7zip welke je hier kunt downloaden: http://www.7-zip.org) kun je dit process vereenvoudigen.
Het onderstaande scriptje roept de VIPatchdownloader-v100.vbs aan en download de bestanden naar de directory D:\Patches\Downloads\VIPatches. In deze directory heb ik 7z.exe geplaatst. Na het downloaden van de patches pakt het script deze uit naar de directory D:\Patches en verwijderd de tar en tgz bestanden.
@echo off
CLS
@Echo Download Patches
D:
cd Patches\VI3Patchdownloader
VIPatchDownloader-v100.vbs
@Echo Untar Patches
cd Patches\Downloads\VIPatches
7z.exe x *.tgz
7z.exe x *.tar -oD:\Patches\ -y
Del *.tar -y
Del *.tgz -y
@Echo Patch download and extraction completed
Daarna kun je het update script van Vincent Vlieghe (http://virtrix.blogspot.com/) gebruiken om de patches te installeren.

Eric Sloof is bezig met het schrijven van de tool vmCDmounted.
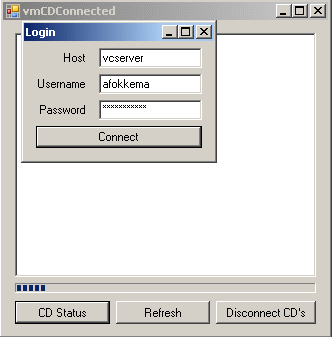
Dit tooltje bekijkt of er nog iso bestanden gekoppeld zijn aan een VM. Een andere feature waar Eric nog mee bezig is, is het disconnecten van de gekoppelde iso’s. Ben je nieuwschierig en wil je het tooltje ook testen dan kun je het hier downloaden: vmCDConnected.zip
Eric succes met sleutelen 😉
![]()
VMware heeft vandaag weer een aantal patches voor ESX 3.0.1 vrij gegeven.
ESX-4825991 Patch | 05/15/07 | Critical Patch
ESX-5095559 Patch | 05/15/07 | Security Patch
ESX-5140477 Patch | 05/15/07 | Security Patch
ESX-6657345 Patch | 05/15/07 | General Patch
ESX-6704314 Patch | 05/15/07 | Security Patch
ESX-7281356 Patch | 05/15/07 | General Patch
ESX-7302867 Patch | 05/15/07 | Critical Patch
ESX-7408807 Patch | 05/15/07 | General Patch
ESX-7557441 Patch | 05/15/07 | General Patch

Mocht je gebruik willen maken van extra parameters in een vmx bestand van een VM, dan ben je vast wel eens tegen het volgende aangelopen:
Je maakt een aanpassing aan het vmx bestand via je favoriete editor. Je slaat het bestand op. Je bekijkt of de wijzigingen goed zijn doorgevoerd via het cat commando. Alles lijkt goed te zijn gegaan todat je de VM selecteerd binnen VirtualCenter 2.0.x deze geeft gelijk een melding dat er iets is veranderd en wil antwoord op de vraag of het correct is. Dit kreeg ik bij een VM die als fileserver diende met als gevolg een kleine hik in het netwerk.
Dit alles kun je voorkomen door de regels in te voeren via VMware VirtualCenter Server. Het enige nadeel van deze manier van aanpassen is, dat de VM uit moet staan wil je een aanpassing door voeren aan het vmx bestand.
Stap 1: Sluit de VM af. Vraag de properties op van de VM en klik op de het tabblad Options.
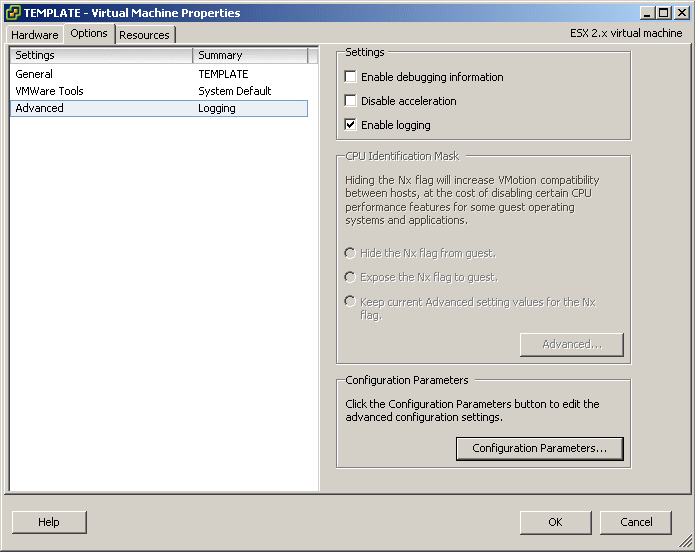
Stap 2: Klik op Add Row en voeg de aanpassing door. In mijn geval is het een parameter voor VMBK.
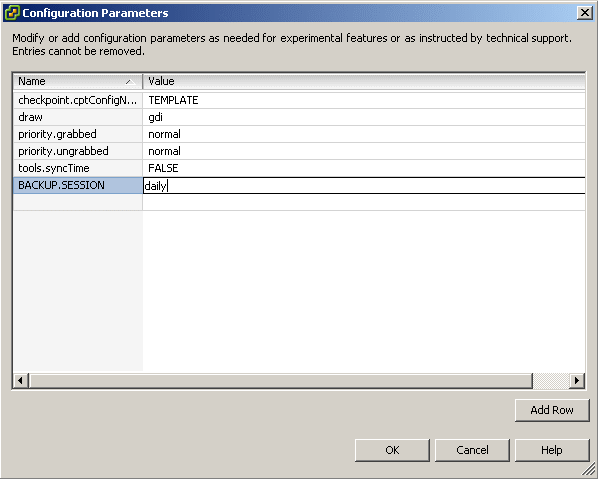
Resultaat: Zoals je ziet is het VMX bestand succesvol aangepast.

Introduction
————
Instead of downloading ESX 3 patches individually this application automatically batch downloads patches for you and can be used repeatedly to maintain your local patch repository.This utility is designed for Windows XP, Vista and Server 2003 but may work on other Windows Operating Systems.
No support is provided for the utility but we will endeavour to reply to email requests for assistance.
Instructions
————1. Unzip all the zip file contents in to a folder on your PC
2. Open an internet browser and navigate to http://www.vmware.com/download/vi/vi3_patches.html#c4310
3. Select the patches you want to download by selecting the text and copying it to your clipboard, eg: Ctrl + C. You can select all the patches if you want, or just some of them. You don’t need to be particular about the tidying up any uneeded text as the application filters the patch names to correctly identify them.
4. Once you have made you selection, paste the selection in to the textfile.txt file which is already included.
Note: the textfile provided is current to 12 April 2007 for all VMware ESX 3.0.1 patches and will work correctly as it is.
5. Save the file, and then double-click the VIPatchDownloader-v100.vbs file to start downloading your patches (ensure you have an internet connection before you start). You will be prompted where you wish to place the patches and the application will create a new folder called ‘VIPatches’. Make sure you have sufficient rights to create files in the destination location that you choose. A progress window will appear but it may take a few moments to initialise after you’ve selected the destination so please be patient. Patches are downloaded sequentially.
Note: closing the progress window part way through patch downloading will not stop the application. It will continue to complete the selected downloads unless you end the wscript.exe process through Windows Task Manager and close any open download screens.
6. Once the downloads are complete the progress window will advise and then close after 5 seconds.
HTTP Proxy
———-
To use wget through a proxy you must first create an environment variable. Type the following at the Windows command prompt:set http_proxy=http://proxy.example.com:8080
Replace proxy.example.com with your actual proxy server and replace 8080 with your actual proxy server port.
Download het script hier: http://www.xtravirt.com/
Hier zie je het script in actie:

In de volgende topic op vmug http://www.vmug.nl/ werd het commando VIMSH al even genoemd. Nu heeft Eric Sloof (http://www.ntpro.nl/blog/) een post gemaakt waarin hij verteld dat de website xtravirt.com een whitepaper heeft gepubliseerd over het commando VIMSH.
De whitepaper kun je hier downloaden: http://www.xtravirt.com
Veel lees en script plezier 😉
Bron: http://www.ntpro.nl/blog/archives/134-Guide-to-VMware-vimsh.html
Mike Laverick van RTFM-Education heeft een post gemaakt over de Ultimate Deployment Appliance (UDA) welke Carl Thijsen in elkaar gezet heeft.
Hier kun je de post lezen: http://www.rtfm-ed.co.uk/?page_id=366
Meer informatie over UDA vindt je hier: http://www.ultimatedeployment.org/uda/index.html
