Vmware: Show VMware Tools version with BGInfo


Ik denk dat de meeste van jullie de tool BGInfo wel kennen. Met deze tool kun je systeeminformatie tonen op de desktop. Ik wilde in onze VMware omgeving en ook in mijn Master VM’s het versie nummer tonen van VMware Tools. Dit kun je vrij eenvoudig doen in BGInfo.

Open BGInfo of je eigen *.bgi bestand. Klik daarna op ‘Custom..’ gevolgd door ‘New’. Geef nu een Identifier naam op. Daarna selecteer je ‘Version information for a file’. Als laatste browse je naar het bestand ‘VMwareService.exe’ en klik je op Ok..

Show_VMware_Tools_version_with_bginfo

Vanaf nu kun je VMware Tools version toevoegen aan je bgi bestand.

image

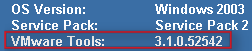
Nadat je het nieuwe *.bgi bestand hebt doorgevoerd, zie je vanaf dan het versie nummer van de VMware Tools. Je kunt het versie nummer controleren via het About scherm van de VMware Tools.

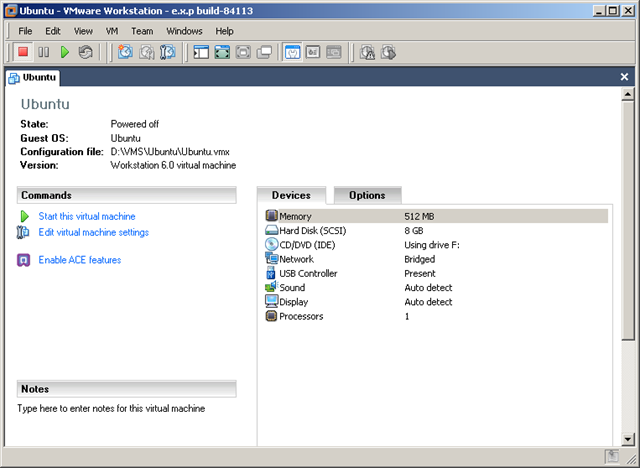
Hieronder zie je en printscreen van een VM in VMware Workstation.

image

In ESX 3.01 ziet het er zo uit:

image

Citrix: Username.Domain folders on the TSProfile Share


Het kan voorkomen dat je de onderstaande tsprofiles tegen komt op je TSProfile share. Meer informatie over hoe dit komt lees je in KB821929

UsernameDomain2

Ik vond een post van Robert Illing op het Citrix forum met de oplossing:

Apparently in SP1 they incorporated this hotfix – http://support.microsoft.com/?id=821929. If you look at the bottom if the hotfix it shows how windows looks at the terminal server roaming profiles.

We use \\server\username for our home drives and the \\server\username.domain caused us problems. The thing is windows will actually attempt \\server\username, but the user has to have full control on their profile. They also need to be the owner of the folder. If they are not the owner, windows will create a NEW profile for them using username.domain which created tons of profiles on our san.

There is a work around on the ownership problem. As we scripted our whole solution, and went about to go in and change ownership on thousands of profiles. If you create a GPO and go to Computer Configuration, Administrative Templates, System, User Profiles, then select “Do not check for user ownership of roaming profiles folder”. This will ignore the ownership of the profile.

So to clarify once you apply that GPO. You should be able to use \\server\username as long as the user has full control on their profile.

Op de policy met GPMC.msc en ga naar Computer Configuration – Administrative Templates – System –  User Profiles daarna enabale je de volgende optie Do not check for user ownership of roaming profiles folder

UsernameDomain

Citrix: Licensing error EventID 1028


Ik starte vandaag een oude VM op en wilde verbinding maken naar de Citrix omgeving. Dit lukte niet. Ik kreeg de onderstaande error.

License_Error

De volgende EventID werd in de eventlog weggeschreven op de terminal/citrix server.

eventid1028

De oplossing voor dit probleem was het verwijderen van de MSLicensing key. Dit doe je via Regedit op de client en blader dan naar de key: HKLM\SOFTWARE\Microsoft en verwijder de key MSLicensing.

 License_Error_regedit

De oplossing kwam van Super Pippo op het Citrix forum: http://support.citrix.com/forums

Meer informatie over TSServer Licensing vind je in het volgende KB document: KB823313

Ubuntu: RDP Client Settings


Sinds kort werk ik met Ubuntu als primaire OS. Dit gaat tot nu toe vrij aardig.  Binnen Ubuntu kun je op de twee manieren via het RDP verbinding maken. Deze twee leg ik hier even kort uit.

Via de Gui

Via Applications – Internet – Terminal Server Client.

Hier wil ik nog even twee opties uitlichten. De Display tab. Hier kun je Operate in full screen mode goed gebruiken.

Screenshot-Terminal Server Client-2

En bij Performance kun je Attach to console goed gebruiken.

Screenshot-Terminal Server Client-1

Via de Terminal

Dit alles kan natuurlijk ook via de Terminal.

Open de Terminal en voer het volgende commando uit:

rdesktop -u:Administrator -f -0 -5 servername

rdesktop is de client

-u de username, in dit geval de Administrator (je zou met -p ook een password kunnen meegeven).

-f staat voor fullscreen

-0 (0 <=> null )  staat voor attach console

-5 staat voor RDP v5

servername is de server waarnaar je connect

Meer commandline parameters kun je vinden door in de terminal alleen rdesktop uit te voeren,

Ubuntu: Speed up boot time in Ubuntu 7.10


De volgende stappen heb ik gedaan op Ubuntu 7.10 desktop.


Open een terminal.

Maak  een backup van het menu.lst bestand:

sudo cp /boot/grub/menu.lst /boot/grub/menu.lst_backup

Vervolgens op je het bestand menu.lst

gksudo gedit /boot/grub/menu.lst

zoek nu naar het woord splash en verwijder deze. Sla het bestand op.

de volgende keer dat je boot zul je merken dat het een stuk sneller gaat en als bonus krijg je ook nog te zien wat er op de achtergrond gebeurd.

Citrix: EventID 110


De volgende melding kun je terug vinden op je Citrix server. Deze melding treed op zodra je hotfix rollup pack 1 hebt geïnstalleerd.

image

Oplossing / Workarround

Open het bestand C:\Program Files\Citrix\XTE\conf\httpd.conf in Wordpad.

Voeg daarna de volgende text toe:

#Log Level

loglevel emerg

image 

Als laatste herstart je de XTE service. Dit kun je via Start – Run – Services.msc doen of via het commandprompt:

net stop “Citrix XTE Server” en net start “Citrix XTE Server”

Meer informatie over deze issue vind je hier: CTX114680

VMware: What’s new in VMware Workstation 6.5 beta 1


Het nieuwe virtualmachine scherm. Let op de gepimpte icoontjes.

image

De nieuwe optie voor 3D graphics.

image

Meer informatie over de 3D graphics:

Support for Direct3D Graphics

To take advantage of the 3-D capabilities of Workstation, the virtual machine must be running the version of VMware Tools included with Workstation 6.5 or higher. For example, you do not need to upgrade a Workstation 6.0 virtual machine to Workstation 6.5, but you do need to upgrade the VMware Tools running inside it. If you move the virtual machine and want to use the 3-D capabilities, be sure you have the correct version of VMware Tools installed.

Support for applications that use DirectX 9 accelerated graphics applies only to Windows XP guests, on hosts running Windows 2000, Windows XP, Windows Vista, or Linux.


De snapshot en replay opties.

image

The replay control dialog box contains the following buttons:

  • Play/Pause – The button is labeled Play if you want to play the last recording you made for the selected virtual machine. If the virtual machine is powered off, it is resumed, as if it had been suspended. It is labeled Pause if you want to suspend the replay and click the button again to resume replay.
  • Go Live – Stops the replay that is in progress and reverts to the current state of the virtual machine.
  • Add Marker – Takes a replay-specific snapshot at the current location within the recording. You can use this marker during replay to skip ahead in a recording.
  • Go to Previous Marker – Plays the previous marker.
  • Go to Next Marker – Plays the next marker.
  • Current Replay Position Slider – Allows to preview a replay. You can drag and drop the Current Replay Position Slider to the nearest previous snapshot and start replaying. On Linux, the auto-scroll function of the zoomed in portion is enabled. The Current Replay Position Slider is a red arrow located in the progress timeline.
  • Zoom Control – Controls the zoom in and out function during replay.
  • Minimize – On Windows, the (-) button minimizes the dialog box to the bottom left hand side of the status bar. The minimized control allows you to view your recording in the virtual machine and use the controls in the status bar. The progress indicator in the status bar shows the timeline of the recording.
  • Note Keep in mind that you cannot close the replay control dialog box.

Replay Speed Control – Controls the replay speed of a recording. Click the right button to increase the replay speed to the maximum. Click the left button to decrease the replay speed to normal.

Note The speed of a playback depends on the host activity and workload of the guest.


Voor de replay functie dien je wel de Hardware compatibility te verhogen naar Workstation 6.5.

image

  Het upgraden van de VMware Tools heeft ook weer wat meer opties gekregen.

image

Bij het starten van de VM kwam de onderstaande melding.

image

Nadat je op Update Tools hebt gedruk krijg je netjes een uitleg over hoe je de upgrade uit kunt voeren.

image

Wat verder opvalt bij de Advanced settings zijn de volgende opties:

  1. Disable Acceleration
  2. Disable memory page trimming
  3. Log virtual machine progress periodically
  4. Enable Template mode (to be used for cloning)
  5. Enable VMware parvirtual kernel support

image


Later meer……