VMware: Installing Updates with VUM


In deze post zie je hoe ik mijn ESX 3.5 test server update via de VMware Update Manager. Ik ga er vanuit dat je de VUM al hebt geïnstalleerd en dat je de updates al gedownload hebt. Zo niet dan lees je hier hoe je dat kunt doen.

Selecteer de host die je wilt gaan updaten. In dit voorbeeld gaat het om esx3srv1.ictfreak.local. Daarna klik je op Attach Baseline….

VUM_1

Nu selecteer je de baseline die je wilt gaan gebruiken of je maakt er zelf een aan via Create New Baseline…

VUM_2

Klik nu nogmaals op de host en op het tabblad Update Manager. Klik daarna op het Scan icoon (tweede vanaf rechts).

VUM_3

Klik Yes om de host te gaan scannen

VUM_5

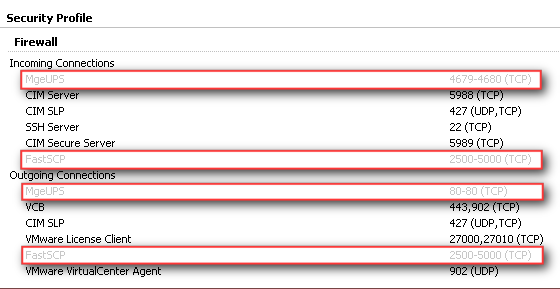
Nu worden de firewall porten open gezet en de host word gescanned.

VUM_6

Nadat de scan klaar is krijg je het onderstaande scherm te zien.

VUM_7

Klik nu nogmaals op de host en dan op Remediate (eerste icoontje vanaf rechts).

VUM_3

Selecteer vervolgens de baselines.

VUM_8

Bij het tabblad Updates kun je zien welke updates er geïnstalleerd worden. Hier kun je eventueel ook Updates uitschakelen.

VUM_9

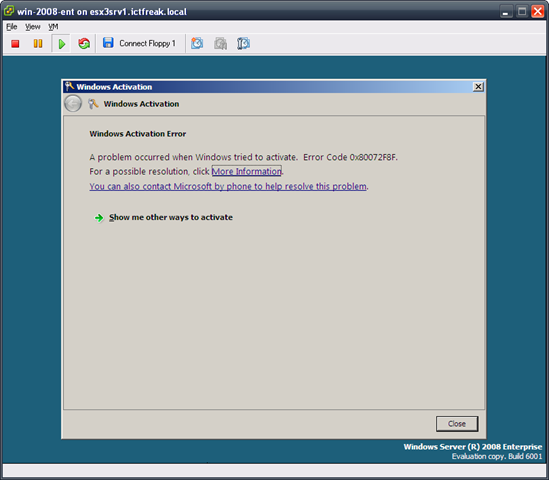
Opmerking: in eerste instantie kreeg ik hier een error en kon ik niet verdergaan. Na een herstart van de VirtualCenter service en de Update Manager service, kon ik wel gebruik maken van de Remediate optie.

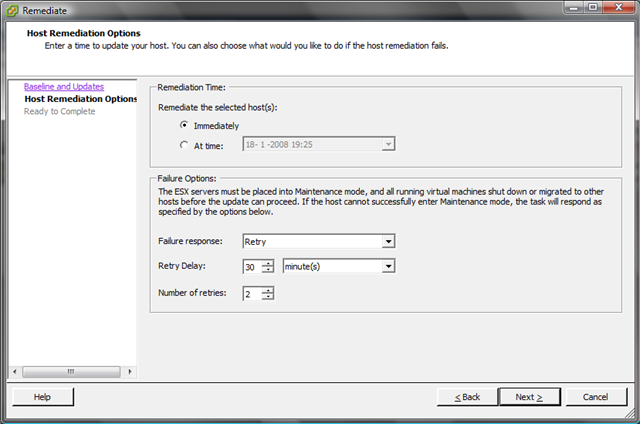
Ik wil de updates gelijk installeren dus kies ik voor de optie Immediately. Het is ook mogelijk om er een job voor te schedulen. Verder kun je hier instellen wat er moet worden gedaan, mocht er een update mis gaan. Ik heb dit op Default laten staan.

VUM_10

Nog even een overzicht van wat er gepatched gaat worden.

VUM_11

De ESX Server word in Maintenance mode geplaatst

VUM_12

En de updates worden stuk voor stuk geïnstalleerd.

VUM_13

Nadat de updates klaar zijn, word de ESX Server opnieuw opgestart en hoeft deze alleen nog maar uit de maintenance mode gehaald te worden.

VUM_14

Zoals je ziet is het build nummer bijgewerkt naar 70356. De updates zijn geïnstalleerd. Nu kijken of al mijn VM’s nog willen starten 😉

VMware: VMotion Corruption after applying the new ESX 3.5 patches [Update]


De Lone Sysadmin heeft een update geplaatst op zijn weblog over dit hele verhaal: http://lonesysadmin.net/2008/01/18/update-manager-vmotion-and-me/


De Lone Sysadmin maakte er al melding van op zijn blog http://lonesysadmin.net/ maar er schijnt dus een groot probleem te zijn met de nieuwe patches van VMWare ESX 3.5.

Nadat je de patches hebt geïnstalleerd raakt je VMotion switch corrupt. Door de VMotion Switch te verwijderen en weer opnieuw aan te maken, wordt het probleem opgelost. Meer informatie vind je in document: SR#1101801771


Bron: http://lonesysadmin.net/2008/01/18/update-manager-loss-of-vmotion-capabilities/

Microsoft: Windows Server 2008 RCx Activation Error


Nadat ik mijn lab omgeving thuis weer eens opnieuw gebouwd had. Wilde ik weer even Windows 2008 installeren. Dit alles ging goed totdat Windows zichzelf wilde activeren. Ik kreeg de onderstaande error:

w2008rc_activation_error

De oplossing bleek simpel; datum en tijd instellingen in de bios even goed zetten op mijn test ESX server.


Bron: http://www.code-complete.com/code/index.php?/archives/17-Windows-Server-2008-Error-Code-0x80072F8F.html

VMware: Resize a VMDK through the VI Client


Mocht je inmiddels over gegaan zijn naar VMware ESX 3.5 en VirtualCenter 2.5, dan kun je vanaf nu een VMDK resizen vanuit de VI client.

Sluit de desbetreffende VM af en op de properties van de VM. Klik op hardisk en zoals je ziet kun je nu de Capacity aanpassen.

resizevmdkvi35

Selecteer de gewensde grootte en druk op ok.

resizevmdkvi35_1

Daarna moet je nog wel binnen het OS van de VM de partitie(s) aanpassen.

VMware: Custom firewall rules via XML files


Na mijn vorige post over Veeam FastSCP en de firewall van ESX. Besloot ik zelf een xml bestand te maken voor de MGE shutdown module.

Dit heb ik als volgt gedaan:

Download de XMLNotepad vanaf hier: http://www.microsoft.com/

Kopieer de FastSCP.xml en noem deze MgeUPS.xml

Open de MgeUPS.xml in XMLNotepad
ESXFirewallxml

Voeg de volgende code in:

<!– Firewall configuration information for MGE UPS Network Shutdown Module–>
<ConfigRoot>
<service>
<id>MgeUPS</id>
<rule id=”0000″>
<direction>outbound</direction>
<protocol>tcp</protocol>
<port type=”dst”>
<begin>80</begin>
<end>80</end>
</port>
<flags>-m state –state NEW</flags>
</rule>
<rule id=”0001″>
<direction>inbound</direction>
<protocol>tcp</protocol>
<port type=”dst”>
<begin>4679</begin>
<end>4680</end>
</port>
<flags>-m state –state NEW</flags>
</rule>
</service>
</ConfigRoot>

Daarna sla je het bestand op en kopieer je deze naar de /etc/vmware/firewall directory op je ESX server.

Als laatste voer je het commando: esxcfg-firewall -e MgeUPS uit. Let op dit is cAsEsEnEtIve. Deze naam is hetzelfde als het <id> in het bovenstaande xml bestand.

Daarna nog even het volgende commando uitvoeren: service mgmt-vmware restart.

Nu kun je in de VI client de nieuwe rule activeren.

ESXFirewallxml3

De nieuwe rules zijn geconfigureerd.

ESXFirewallxml2

Op deze manier kun je dus zelf kant en klare XML bestandjes klaarzetten en uitvoeren.

    VMWare: Veeam FastSCP and VMware ESX 3.5


    Dit werkt niet meer out of the box. Gelukkig poste wingman7512 de oplossing op vmug.nl.

    De volgende stappen zijn nodig om FastSCP weer soepel te laten werken:

    1. Download het xml bestand: http://www.veeam.com/download/fastscp/FastSCP.xml
    2. Kopieer deze naar /etc/vmware/firewall
    3. voer het commando esxcfg-firewall -e FastSCP uit.
    4. Zoals Gabrie in de comments al zei: nog even service mgmt-vmware restart uitvoeren.
    5. Nu kun je via de VI client de nieuwe rule beheren.

    Daarna werkt FastSCP weer als een zonnetje. Wingman7512 bedank voor de oplossing.

    How to: Upload files to ESX 3.5


    In VMware ESX 3.5 is nu het mogelijk om direct via de Datastore bestanden over te zetten naar je ESX server. Voorheen moest je hier software zoals Veeam FastSCP of WinSCP voor gebruiken. Ik heb getest met Veeam FastSCP en deze werkt niet meer met ESX 3.5. Gelukkig kunnen we het nu als volgt doen:

    Open de nieuwe VI client. Login op je ESX server of VirtualCenter server. Klik op de host waar je het bestand naar toe wilt sturen, daarna klik je op het tabblad Configuration. De volgende stap is het dubbel klikken op de datastore of rechts klikken en Browse datastore…

     esx35upload_1

    Zoals je ziet zijn er nu een aantal knoppen bij gekomen. Klik op het datastore icoon met het groene pijltje.

    esx35upload_2

    Ik ga één enkele file uploaden, dus ik kies voor de eerste optie.

    Zodra je een bestand hebt geslecteerd wat naar de ESX server gestuurd moet worden, krijg je de onderstaande waarschuwing.  Dit spreekt voor zich denk ik.

    esx35upload_3

    Zodra je op Yes geklikt hebt word het bestand naar de esx server gestuurd.

    esx35upload_4


    Error: Failed to log into NFC server

    Als ik deze stappen doe via de VI client remote ingelogt op mijn VirtualCenter server. krijg ik onderstaande error. Log ik op de VirtualCenter server fysiek in. Dan gaat het wel goed.

    Voor deze error moet ik nog een oplossing zoeken. Zodra ik deze heb post ik die hier.

    esx35upload_error

    VMware: New Whitepapers


    VMware heeft wat leesvoer uitgegeven voor het weekend.

    Virtual Machine Failure Monitoring

    VMware® High Availability (VMware HA) monitors your virtual infrastructure for ESX Server host failures and restarts virtual machines that are interrupted by those failures on alternate hosts. Starting with ESX Server 3.5, VMware HA can also detect and handle the failures of individual virtual machines and respond appropriately based on your specifications.
    With this additional functionality, called Virtual Machine Failure Monitoring, VMware HA deals with both host operating system and guest operating system failures.

    Download de whitepaper hier: vi3_35_25_vmha.pdf


    Firewall Configurations for Backup Clients on ESX Server 3

    This document provides information about how to configure connections between different backup software products and VMware® ESX Server 3 hosts. The document explains how to open predefined firewall ports for supported backup products and how to open specific ports from a command line. If the backup product you use requires additional configuration changes to work with ESX Server 3, the document describes any specific steps you need to perform.

    Download de whitepaper hier: vi3_35_25_vcb_firewalls.pdf


    Round-Robin Load Balancing

    VMware® ESX Server 3.5 and ESX Server 3i version 3.5 enhance ESX Server native multipathing by providing experimental support for round‐robin load balancing. This technical note explains how round‐robin load balancing works and how to set it.

    Download de whitepaper hier: vi3_35_25_roundrobin.pdf


    Configuring and Troubleshooting N-Port ID Virtualization

    N‐Port ID Virtualization (NPIV) is an ANSI T11 standard that describes how a single Fibre Channel HBA port can register with the fabric using several worldwide port names (WWPNs). This allows a fabric‐attached N‐port to claim multiple fabric addresses. Each address appears as a unique entity on the Fibre Channel fabric.
    The primary source of information on configuring NPIV in a VMware Infrastructure 3 environment is the Fibre Channel SAN Configuration Guide, available on the VMware Web site.
    This technical note provides additional details about certain specific NPIV configurations and information on diagnostic techniques that may be helpful as you configure NPIV. It also includes information to help you understand error messages that may appear as you are working with NPIV in a VMware Infrastructure environment.

    Download de whitepaper hier: vi3_35_25_npiv_config.pdf


    Enabling NetFlow on Virtual Switches

    NetFlow is a general networking tool with multiple uses, including network monitoring and profiling, billing, intrusion detection and prevention, networking forensics, and SOX compliance. NetFlow sends aggregated networking flow data to a third‐party collector (an appliance or server). The collector and analyzer report on various information such as the current top flows consuming the most bandwidth in a particular virtual switch, which IP addresses are behaving irregularly, and the number of bytes a particular virtual machine has sent and received in the past 24 hours.

    Download de whitepaper hier: vi3_35_25_netflow.pdf


    VMware OVF Tool

    The Open Virtual Machine Format (OVF) is a virtual machine distribution format that supports sharing virtual machines between products and organizations. The format facilitates the use of virtual appliances, which are preconfigured virtual machines that package applications with the operating system they require. Because OVF runs on multiple platforms, a virtual appliance is ready to run without significant additional configuration.

    Download de whitepaper hier: ovf_tool.pdf