Windows: Terminal Server and connected Terminal Services clients pause when a Terminal Services client logs on or logs off


De laatste weken ben ik samen met Aleks Nikolić van Virtualistic.nl bezig met het troubleshooten van verschilende TS problemen. Tijdens de zoektocht naar mogelijke oplossingen kwamen uit op KB324446.

In KB324446 wordt het volgende geschreven:

When a Terminal Services client logs on or logs off (either in a session or on the console of the Terminal server), the Microsoft Windows Server 2003-based or the Microsoft Windows 2000-based Terminal server together with the connected Terminal Services client computers may stop responding or may pause for several seconds. Users may also experience one or more of the follow symptoms:

  • When a user types in a document, characters do not appear on the screen until this pause has ended.
  • Keyboard input and mouse input are queued, but they are not processed until this pause has ended.
  • Live performance monitoring (Perfmon) graphs have missing data points during this pause.
  • All running programs appear to stop responding, or “hang,” during this pause.
  • When Spooler is under a load from a large number of users, a high CPU usage is displayed for it.

Als je een Terminal server hebt met twee voedingen (wat wel gebruikelijk is volgens mij) dan moet je zeker de volgende change doorvoeren: Deze optie moet je alleen instellen als je raidcontroller een battery-backup cache module heeft (thanks Sven).

Zet het vinkje aan bij “Enable advanced performance”

image

Nadat de bovenstaande settings zijn doorgevoerd, moeten er ook nog een aantal registry keys aangepast worden. Namelijk de volgende:

Note This section applies to both Windows Server 2003 and to Windows 2000.

  • In the HKLM\SYSTEM\CurrentControlSet\Services\Lanmanserver\Parameters subkey,
  • configure the following entries:
    • Name: MaxWorkItems
      Data Type: REG_DWORD
      Value data: 8192 (decimal)
    • Name: MaxMpxCt
      Data Type: REG_DWORD
      Value data: 2048 (decimal)
    • Name: MaxRawWorkItems
      Data Type: REG_DWORD
      Value data: 512 (decimal)
    • Name: MaxFreeConnections
      Data Type: REG_DWORD
      Value data: 100 (decimal)
    • Name: MinFreeConnections
      Data Type: REG_DWORD
      Value data: 32 (decimal)
  • In the HKLM\SYSTEM\CurrentControlSet\Services\Lanmanworkstation\Parameters subkey, configure the following entry:
    • Name: MaxCmds
      Data Type: REG_DWORD
      Value data: 2048 (decimal)
  • By default, your registry does not have a Configuration Manager subkey. To create the key, locate and then right-click the following subkey:HKEY_LOCAL_MACHINE\System\CurrentControlSet\Control\Session ManagerPoint to New, and then click Key. Type Configuration Manager, and then press ENTER.
    In the new HKEY_LOCAL_MACHINE\System\CurrentControlSet\Control\Session Manager\Configuration Manager subkey, configure the following entry:
  • Name: RegistryLazyFlushInterval
    Data Type: REG_DWORD
    Value data: 60 (decimal)

Ik heb deze registry keys even uitgewerkt in de volgende twee files:

LanManServerTuning_KB32446.reg

Windows Registry Editor Version 5.00[HKEY_LOCAL_MACHINE\SYSTEM\CurrentControlSet\Services\lanmanserver\parameters]
“MaxWorkitems”=dword:00002000
“MaxMpxCt”=dword:00000800
“MaxRawWorkItems”=dword:00000200
“MaxFreeConnections”=dword:00000064
“MinFreeConnections”=dword:00000020

KB32446_Extra.reg

Windows Registry Editor Version 5.00[HKEY_LOCAL_MACHINE\SYSTEM\CurrentControlSet\Control\Session Manager\Configuration Manager]
“RegistryLazyFlushInterval “=dword:0000003c

Nadat je alle changes hebt doorgevoerd, moet je de server opnieuw op starten.

Event ID 1003: Error Code 00000019, parameter1 00000020


Vandaag klapte er een Citrix Terminal server uit ons farm met een BSOD als gevolg. Na een herstart van de server vond ik de onderstaande eventlog entry:

image

Nadat de server opnieuw was opgestart kwam er ook een melding, dat er een mini-dump was aangemaakt. Deze wilde ik gaan debuggen en kwam toen uit op de volgende site: http://www.microsoft.com/whdc/devtools/debugging/debugstart.mspx

Op de pagina staan ook de download links voor de debug tools. Je kunt ze ook hier vinden:

Nadat je de software hebt geïnstalleerd, open  een commandprompt en blader naar de onderstaande directory:

C:\Program Files\Debugging Tools for Windows (x86)>

Voer daarna het volgende commando uit:

windbg -y srv*c:\symbols*http://msdl.microsoft.com/download/symbols -i c:\windows\i386
-z C:\dump11112008_1150\Mini111108-01.dmp achter de –z optie zet je het pad naar je dmp file.

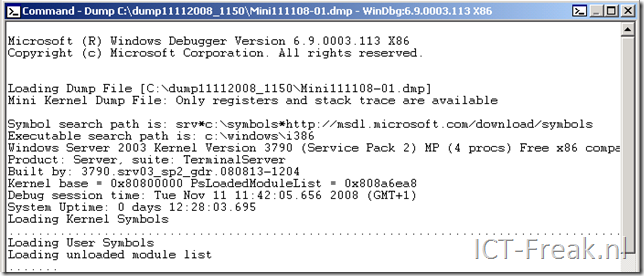
Het volgende scherm word gestart:

image

Even later zie je de Bugcheck Analysis:

image

Uit CTX115626 haal ik de volgende quote:

This hotfix rollup pack also contains all fixes included in Hotfix Rollup Pack 1, Hotfix Rollup Pack 2 , plus the following fixes that shipped since the release of Hotfix Rollup Pack 2:

  1. Servers might experience a fatal exception on vdtw30.dll.

    [From PSE450R02W2K3001][#170153]

Dat word dus Hotfix Rollup pack 3 installeren. Nu hopen dat dit zonder al te grote gevolgen blijft.

Event ID: 1505


Gisteren kreeg ik de melding binnen dat het inloggen op de Citrix XenApp / Terminal Server niet meer lukte. Tijdens het inloggen verscheen de volgende error:

Windows cannot load the user’s profile but has logged you on with the default profile for the system. Detail: Insufficient system resources exist to complete the requested service.

In de Applicationlog van de server stond de onderstaande Event gelogt:

image

Nadat ik deze in google had geschoten kwam KB935649 naar voren en daar stond de volgende oplossing:

To resolve this problem, modify the registry to increase the PoolUsageMaximum value and the PagedPoolSize value. To do this, follow these steps:

1. Click Start, click Run, type regedit, and then click OK.

2. Locate and then click the following registry subkey:

HKEY_LOCAL_MACHINE\SYSTEM\CurrentControlSet\Control\Session Manager\Memory Management

3. On the Edit menu, point to New, and then click DWORD Value.

4. In the New Value #1 box, type PoolUsageMaximum, and then press ENTER.

5. Right-click PoolUsageMaximum, and then click Modify.

6. In the Value data box, type 60, and then click OK.

7. If the PagedPoolSize registry entry exists, go to step 8. If the PagedPoolSize registry entry does not exist, create it. To do this, follow these steps:

a.  On the Edit menu, point to New, and then click DWORD Value.

b. In the New Value #1 box, type PagedPoolSize, and then press ENTER.

8. Right-click PagedPoolSize, and then click Modify.

9. In the Value data box, type ffffffff, and then click OK.

10. Exit Registry Editor, and then restart the computer.

Je kunt ook de volgende regkey importeren op de terminal server KB935649.reg:

Windows Registry Editor Version 5.00

[HKEY_LOCAL_MACHINE\SYSTEM\CurrentControlSet\Control\Session Manager\Memory Management]
“PagedPoolSize”=dword:ffffffff
“PoolUsageMaximum”=dword:00000060

Helaas zijn de nieuwe settings pas van kracht nadat de server opnieuw is opgestart. De error heeft geen invloed op de bestaande sessies. Ik heb daarom op de Server de logins tijdelijk uitgeschakeld en deze na het herstarten van de server weer ingeschakeld. Daarna was het probleem ook verholpen.

How To: Ubuntu in a Windows Domain


In deze “How To” lees je hoe eenvoudig het is geworden om een Ubuntu 8.04 machine in een Windows domain toe te voegen.

Als eerste dien je likewise-open te installeren en te configureren. Dit gaat als volgt:

  • sudo apt-get update
  • sudo apt-get install likewise-open
  • sudo domainjoin-cli join ubuntu.lnx.lab Administrator
    fqdn                             Administrator account binnen AD.image
  • sudo update-rc.d likewise-open defaults
    image
  • sudo /etc/init.d/likewise-open start
  • sudo reboot -n

Nadat de linux machine opnieuw is opgestart kun je inloggen met Domain\Userid

image

Je kunt in de Terminal nog even via het commando whoami nakijken of alles klopt:

image

Als je nu op de Domain Controller in de Active Directory kijkt, zie je de linux doos in de Computers container staan:

image

Bron: http://bobbyallen.wordpress.com/2008/05/23/how-to-join-ubuntu-804-to-windows-active-directory-domain/

Script: Set-VMVideoAccLevel


Hugo Peeters van www.peetersonline.nl heeft een powershell script gemaakt voor het instellen van de video hardware acceleration level. Zoals je weet staat dit bij een standaard installatie van Windows Server 2003 (en ook andere versies) standaard op none.

image

Via het script van Hugo kun je in een keer deze setting aanpassen op alle VM’s (Windows 2003 servers en deze moeten wel aan staan). Zie de onderstaande quote van Hugo:

I have created a simple, fire-and-forget script that sets the Hardware Video Acceleration Level for all your (Windows Server 2003 and Powered On) VM’s to Full. This way you can always enjoy smooth mouse movements when working in the console!

Het script kun je hier downloaden: http://www.peetersonline.nl/index.php/vmware/setting-video-hardware-acceleration-level/

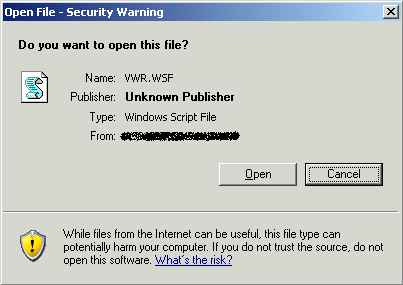
Update: Open File Security Warning


Ik had over deze melding al een post gemaakt. Maar op de een of andere manier werkte dit niet meer.

Na wat zoeken op google vond ik op de website van Aaron Parker de oplossing.

Vink de optie ‘Automatically detect intranet networks’ uit.

image

Daarna voeg je het Windows domain toe aan de zone.

image

Je wilt deze oplossing niet met hand uitvoeren dus heb ik even de registry keys erbij gezocht. Kopieer de volgende twee blokken in notepad en sla deze dan op als *.reg file.

Domains.reg
Windows Registry Editor Version 5.00

[HKEY_CURRENT_USER\Software\Microsoft\Windows\CurrentVersion\Internet Settings\ZoneMap\Domains\kvk.nl] [HKEY_CURRENT_USER\Software\Microsoft\Windows\CurrentVersion\Internet Settings\ZoneMap\Domains\kvk.nl\*.k37] "*"=dword:00000001 [HKEY_CURRENT_USER\Software\Microsoft\Windows\CurrentVersion\Internet Settings\ZoneMap\Domains\kvk.nl\*.k94] "*"=dword:00000001

Zones.reg
Windows Registry Editor Version 5.00

[HKEY_CURRENT_USER\Software\Microsoft\Windows\CurrentVersion\Internet Settings\Zones\1]
"Flags"=dword:000000db
"2007"=dword:00010000

Daarna kun de files via een script laten importeren.

How To: Disable Automatic Drive Letter Assignment


Voordat je de VCB proxy aan het SAN gaat koppelen moet je eerst de volgende stappen uitvoeren om de automatic drive letter assignment uit te zetten. Doe je dit niet dan kun je hier tegen aanlopen:

vcb-proxy-forgot-to-disable-automount

Open een commandprompt:

Start nu DISKPART.exe en voer de volgende twee commando’s uit:

automount disbable

automount scrub

image

Daarna doe je nog twee keer EXIT om Diskpart en het command prompt af te sluiten.

Na deze actie kun je met een gerust hart je HBA configureren.

Microsoft: Set Google as default search provider in Internet Explorer 7


Dit kun je doen door het onderstaande registry bestand te importeren.

Windows Registry Editor Version 5.00

[HKEY_CURRENT_USER\Software\Microsoft\Internet Explorer\SearchScopes]
“DefaultScope”=”{06652DC2-D1BD-4BD1-BACA-EC681D3E6E33}”
“Version”=dword:00000001

[HKEY_CURRENT_USER\Software\Microsoft\Internet Explorer\SearchScopes\{06652DC2-D1BD-4BD1-BACA-EC681D3E6E33}]
“DisplayName”=”Google”
“URL”=”
http://www.google.com/search?hl=en&q={searchTerms}&meta=”

[HKEY_CURRENT_USER\Software\Microsoft\Internet Explorer\SearchURL]
@=
http://www.google.com/keyword/%s

Je kunt een ook een custom ADM maken om dit via een GPO door te voeren. Hoe dit werkt lees je in KB918238